


9
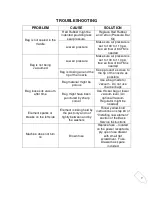
TROUBLESHOOTING
PROBLEM
CAUSE
SOLUTION
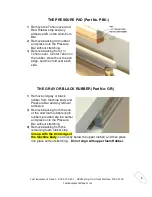
Bag is not sealed in the
middle
Red Rubber might be
indented providing less
seal pressure.
Replace Red Rubber
and Teflon (Pressure Bar
Kit)
Low air pressure
Make sure air pressure is
set to 100 to 110 psi,
free air flow of 6CFM is
needed
Bag is not being
vacuumed
Low air pressure
Make sure air pressure is
set to 100 to 110 psi,
free air flow of 6CFM is
needed
Bag is closing around the
tip of the nozzle
Keep product as close to
the tip of the nozzle as
possible
Bag looses its vacuum
after time
Bag material might be
porous
Use a bag made for
vacuum. Do not use
channel bags
Bag might have been
punctured by sharp
corner
Use thicker bag or lower
vacuum level (An
optional Vacuum
Regulator might be
needed)
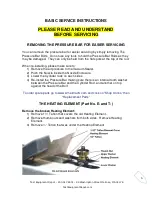
Element sparks or
breaks on the left side
Element is being held by
the post only and not
tightly between and by
the washers
Follow yellow-bold
instructions on step #4 of
“Installing new element”
section of the Basic
Service Instructions
Machine does not turn
on
Blown fuse
Replace fuse – located
on the power receptacle,
pry open fuse drawer
with small flat
screwdriver. Fuse
Drawer has spare
included


