background image

20

Warranty

2889 TTY for the authorized 
service center nearest you. You
must prepay all shipping costs. 

We suggest you save the original
package materials in the event
you need to ship the XL-30. When
shipping for warranty repair,
include your name, address,
phone number, proof of date of
purchase, and a description of the
problem. After repairing the 
product, we, (or the service 
center) will ship it back to you at
no cost within the United States
and Canada. CANADIAN
RESIDENTS: call ameriphone at
800-874-3005, 800-772-2889
TTY for instructions.

This warranty does not cover
defects resulting from accidents,
damage while in transit to our
service location, alterations, 
unauthorized repair, failure to 
follow instructions, misuse, use 
outside the United States or
Canada, fire, flood, and acts of
God. Nor do we warrant the
product to be compatible with any

particular telephone equipment,
party line, key telephone systems
or more sophisticated switching
systems. 

If your XL-30 is not covered by this
warranty, call us at  (800) 874-
3005 voice or (800) 772-2889
TTY for advice as to whether we
will repair your XL-30 and other
repair information. The repair
shall be warranted for 90 days.

E

N
G

L

I

S

H

Summary of Contents for DIALOGUE XL 30

Page 1: ... Garden Grove CA 92841 VOICE 800 874 3005 TTY TDD 800 772 2889 FAX 714 897 4703 email ameriphonecs plantronics com website www ameriphone com 2003 Plantronics Inc All rights reserved Ameriphone Amplifying Your Life Plantronics and Walker are all trademarks or registered trademarks of Plantronics Inc ...

Page 2: ...E N G L I S H F R A N Ç A I S Users Guide XL 30 5270 3321 B 10 03 M03699 XL 30 XL XL 30 AMPLIFIED TELEPHONE The Extra Loud Clear Line Powered ...

Page 3: ...Place this telephone on a stable surface Serious damage and or injury may result if the telephone falls 8 Do not cover the slots and openings on this telephone This telephone should never be placed near or over a radiator or heat register This telephone should not be placed in a built in installation unless proper ventilation is provided 9 Operate this telephone using the electrical voltage as sta...

Page 4: ...E If the telephone has been dropped or the case has been damaged F If the telephone exhibits a distinct change in performance 15 Never install telephone wiring during a lightning storm 16 Never install telephone jacks in wet locations unless the jack is specifically designed for wet locations 17 Never touch uninsulated telephone wires or terminals unless the telephone line has been disconnected at...

Page 5: ...fied equipment should be made by an authorized Canadian maintenance facility designated by the supplier Any repairs or alterations made by the user to this equipment or equipment malfunctions may give the telecommunications company cause to request the user disconnect the equipment Users should ensure for their own protection that the electrical ground connections of the power utility telephone li...

Page 6: ...k or Wall Mount 4 Desktop Use 4 For Wall Mounting 5 Using Your XL 30 Incoming Voice Volume 6 Incoming Voice Tone 7 Ringer Volume and Pitch 7 Hold 8 Last Number Redial 8 Flash 8 Special Features Programming the Memory Buttons 9 Direct Audio Output 10 Outgoing Voice Amplification 10 Cochlear Implant Adapter Cord 10 Connecting to Speech Processor 11 Troubleshooting Chart 12 Regulatory Compliance 13 W...

Page 7: ...rating Guide provide you with the information you need to use your XL 30 effectively and safely Read this manual thoroughly before using your telephone Keep the manual near the telephone for easy reference Warranty Service Your telephone is designed to provide years of quality service But should the phone malfunction and the Trouble shooting Chart on page 12 not resolve the problem follow the Warr...

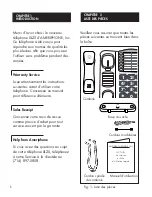
Page 8: ...N O D E F 2 3 4 5 6 7 8 9 0 HOLD PROG TONE LO HI FLASH REDIAL VOL AMPLIFY M1 M2 M5 M6 M7 M8 M9 M10 M11 M3 M4 P W OPERATING INSTRUCTIONS AND QUICK GUIDE XL 30 Handset Base Unit Telephone Line Cords Handset Coil Cord Operating Guides Figure 1 Package Components Mounting Bracket ...

Page 9: ...on VOL volume slider LOW BATTERY indicator RING flasher AMPLIFY button AMPLIFY indicator PROG program button DIAL AUDIO OUTPUT P T RINGER RING TONE Lo Hi Off Lo Hi 1 A B C G H I Q R S T U V X Y Z J K L M N O D E F 2 3 4 5 6 7 8 9 0 HOLD PROG TONE LO HI FLASH REDIAL VOL AMPLIFY M1 M2 M5 M6 M7 M8 M9 M10 M11 M3 M4 P W Figure 2 Base Unit Controls TONE slider HOLD button HOLD indicator ...

Page 10: ...stall one 9 Volt alkaline battery not included To install new battery 1 Slide open the battery compartment cover on the bottom of the telephone Figure 3 2 Install one fresh battery and reinstall the cover Setting the Dialing Mode Set the dial mode switch to T tone if you have touch tone service Set the switch to P pulse if you have rotary dialing Connecting for Desk or Wall Mount Desktop Use 1 Con...

Page 11: ...sition of the base as shown in Figure 6 Push the mounting bracket in and down firmly until it snaps into place 3 Locate a desired wall phone jack and hold phone upright 4 Plug in the short phone line cord and mount the phone as shown in Figure 7 Figure 4 Connecting the Components Figure 5 Reversing the Hook MANUAL AUTO Figure 6 Mounting Bracket for Wall Mounting MANUAL AUTO Figure 7 Wall mounting ...

Page 12: ...ing volume will be up to 30dB louder HOLD PROG TONE LO HI FLASH REDIAL VOL AMPLIFY HOLD PROG TONE LO HI FLASH REDIAL VOL AMPLIFY Figure 9 Volume Slide Control Figure 8 AMPLIFY Button and Indicator 5 Angle the phone downward to feel for the LOWER protruding nail head Insert the WALL JACK S nail head into the LOWER part of the phone s mounting bracket 6 Once the lower nail head has been inserted ins...

Page 13: ...tal exposure to amplification levels greater than18 dB may be harmful to individuals without hearing disabilities Therefore do not remove the warning label attached to the back of the handset If it is likely that a visually impaired person will use the telephone securely attach the provided warning printed in Braille to the back of the handset See Diagram A NOTE In standard use the amplifier turns...

Page 14: ...The RING TONE has two pitch settings LO and HI Hold To put the line on hold press the HOLD button and return the handset to its cradle You will notice the HOLD indicator light comes on NOTE If you pick up an extension phone on the same line when the XL 30 is on HOLD the XL 30 will release the HOLD and you can continue your conversation on the extension phone DIAL AUDIO OUTPUT P T RINGER RING TONE ...

Page 15: ...rmally Note Press REDIAL if you want to insert a brief pause between two numbers 3 Press a memory button Figure 16 to store this number on that button 4 Immediately hang up the handset Note Any number previously stored at that button number will be overwritten 5 To change a stored number repeat the programming process starting with step 1 Note Do not program 911 in any memory button 1 A B C D E F ...

Page 16: ...fication The XL 30 can amplify your outgoing voice by up to 15 dB To use this feature set the outgoing voice amplifier switch to AMPLIFY underneath the unit Note Even with the AMPLIFY switch ON the voice of your callers can still be amplified by up to 15dB Note The factory pre setting is NORMAL Cochlear Implant Adapter Cord A cochlear adapter cord is available from Ameriphone that can be used to d...

Page 17: ... speech processor Plug the stereo end of the plug into the Audio Output socket on the phone Speak into the handset when using the Cochlear Implant Adapter Cord WARNING During thunderstorms avoid using telephones Electric shock from lightning can occur 1 A B C G H I Q R S T U V X Y Z J K L M N O D E F 2 3 4 5 6 7 8 9 0 HOLD PROG TONE LO HI FLASH REDIAL VOL AMPLIFY M1 M2 M5 M6 M7 M8 M9 M10 M11 M3 M4...

Page 18: ...TIVE ACTION Check all phone cord connections No number stored in that memory button See Programming the Memory buttons P 9 See Setting Up Your Phone to reset the dial mode switch P 4 5 1 Check that line cord is not loose 2 Check battery Check and replace the 9 Volt battery SYMPTOM No dial tone No number dialed when memory button pressed Call cannot be dialed or dials very slowly Call comes in but ...

Page 19: ...e connected to a telephone line Excessive RENs on a telephone line may result in the devices not ringing in response to an incoming call In most but not all areas the sum of RENs should not exceed five 5 0 To be certain of the number of devices that may be connected to a line as determined by the total RENs contact the local telephone company For products approved after July 23 2001 the REN for th...

Page 20: ... parts Opening the equipment or any attempt to perform repairs will void the warranty For service or repairs call 1 800 874 3005 Connection to party line service is subject to state tariffs Contact the state public utility commission public service commission or corporation commission for information If your home has specially wired alarm equipment connected to the telephone line ensure the instal...

Page 21: ...ursuant to Part 15 of FCC rules These limits are designed to provide reasonable protection against harmful interference in residential installation This equipment generates uses and can radiate radio frequency energy and if not installed and used in accordance with the instructions may cause harmful interference to radio communications However there is no guarantee that interference will not occur...

Page 22: ... CA 92841 Telephone 800 874 3005 Industry Canada Technical Specifications This product meets the applicable Industry Canada technical specifications Before installing this equipment users should ensure that it is permissible to be connected to the facilities of the local telecommunications company The equipment must also be installed using an acceptable method of connection In some cases the compa...

Page 23: ...al areas Caution Users should not attempt to make such connections themselves but should contact the appropriate electric inspection authority or electrician as appropriate The Ringer Equivalence Number is an indication of the maximum number of terminals allowed to be connected to a telephone interface The termination on an interface may consist of any combination of devices subject only to the re...

Page 24: ...E S P A Ñ O L F R A N Ç A I S E N G L I S H 18 ...

Page 25: ...ed for either 90 days or the remaining time on the original warranty period whichever is longer Implied warranties including those of fitness for a particular purpose and merchantability an unwritten warranty that the product is fit for ordinary use are limited to one year from date of purchase We will not pay for loss of time inconvenience loss of use of your XL 30 phone or property damage caused...

Page 26: ...t 800 874 3005 800 772 2889 TTY for instructions This warranty does not cover defects resulting from accidents damage while in transit to our service location alterations unauthorized repair failure to follow instructions misuse use outside the United States or Canada fire flood and acts of God Nor do we warrant the product to be compatible with any particular telephone equipment party line key te...

Page 27: ... 3kHz 30dB Wide band 300 to 3000Hz 20dB Tone control range Full range 300 to 3000Hz using one slide control Dimensions Size 91 2 x 7 x 31 4 Weight 2 52 lbs Power Requirements One 9 Volt alkaline battery for ring flasher operation only not included ...

Page 28: ...sor 11 Direct Audio Output 10 Features 3 Flash 8 Help from Ameriphone 1 Hold 8 Incoming Voice Tone 7 Incoming Voice Volume 6 Installing the Backup Batteries 4 Last Number Redial 8 Package Checklist 2 Programming the Memory Buttons 9 Ringer Volume and Pitch 8 Sales Receipt 1 Troubleshooting 12 Warranty Service 1 ...

Page 29: ...F R A N Ç A I S M47402 XL30FRE B 10 03 Manuel d utilisation XL XL 30 AMPLIFIED TELEPHONE Très Forte et très Claire Activé Par Ligne Téléphonique ...

Page 30: ...le utilisé CONSERVEZ CES INSTRUCTIONS Lorsque vous utiliserez votre téléphone suivez toujours les mesures de sécurité de base suivantes afin de réduire les risques d incendie de choc électrique et de blessures 1 Lire et bien comprendre toutes les instructions Se conformer à tous les avertissements et à toutes les instructions marqués sur l appareil 2 Pendant un orage électrique ne pas utiliser de ...

Page 31: ...Amplificateur 6 B Bouton d amplification 6 C Sélecteur de tonalité 8 D Volume de la voix de l utilisateur 8 E Volume et tonalité de la sonnerie 8 F Indicateur visuel de la sonnerie 9 G Appel en garde 9 H Recomposition du dernier numéro 9 I Programmation des numéros fréquemment composés 9 J Composition des numéros mémorisés 10 K Prise audio directe 10 L Commutateur 11 M Cordon pour implant cochléai...

Page 32: ...u téléphone XL 30 d AMERIPHONE Inc Ce téléphone a été conçu pour répondre aux normes de qualité les plus élevées afin que vous puissiez l utiliser sans problème pendant des années Warranty Service Lisez attentivement les instructions sui vantes avant d utiliser votre téléphone Conservez ce manuel pour référence ultérieure Sales Receipt Conservez votre reçu de caisse comme preuve d achat pour tout ...

Page 33: ...H Contrôle du Volume Indicateur de pile usée Voyant de la sonnerie Touche d Amplification Voyant d Amplification Touche de Programmation DIAL AUDIO OUTPUT P T RINGER RING TONE Lo Hi Off Lo Hi 1 A B C G H I P R S T U V W X Y J K L M N O D E F 2 3 4 5 6 7 8 9 0 HOLD PROG TONE LO HI FLASH REDIAL VOL AMPLIFY M1 M2 M5 M6 M7 M8 M9 M10 M11 M3 M4 Réglage de la Tonalité Boutton de mise en attente Indicateu...

Page 34: ...commutateur à P impulsion si vous avez composer rotatoire L installation du XL 30 comprend cinq étapes 1 Placez quatre piles alcalines AA de secours en cas de panne de courant 2 Choisissez l installation murale ou sur bureau 3 Raccordez toutes les pièces du téléphone 4 Programmez jusqu à 12 numéros de téléphone à rappeler en appuyant sur une touche de mémoire 5 Réglez les fonctions spéciales A Ins...

Page 35: ...de la tonalité Le téléphone est prêt à l emploi Installation murale 1 Retirez le crochet du socle fig 6 et retournez_le pour le pointer vers le haut et pour qu il soutienne le combiné dans la position verticale 2 Placez les pattes du socle de montage en position basse fig 7 et enfoncez jusqu à enclenchement 3 Choisissez une prise murale de téléphone à proximité d une prise CA et tenez le téléphone...

Page 36: ... désactiver l amplificateur Lorsque la touche AMPLIFY est activée cela vous ramène au réglage précédent de Fig 9 0 HOLD PROG TONE LO HI FLASH REDIAL VOL AMPLIFY 5 Dirigez le téléphone vers le bas pour sentir la tête de clou saillante DU BAS Insérez la tête de clou de la PRISE MURALE dans la partie INFÉRIEURE du support de fixation du téléphone 6 Une fois la tête de clou du bas insérée insérez la t...

Page 37: ...tible d utiliser le téléphone fixez de manière sûre l avertissement imprimé en Braille à l arrière du combiné schéma A F R A N Ç A I S Remarque En mode d utilisation normale l amplificateur s éteint dès que vous raccrochez Ceci est très pratique lorsque plusieurs personnes utilisent le même combiné Si vous désirez que l amplificateur reste toujours allumé placez sur ON le bouton de neutralisation ...

Page 38: ... vous entendez des sons forts clairs et faciles à comprendre Cela vous permet d accentuer les fréquences des sons que vous entendez le mieux 1 Lorsque vous avez une personne en ligne appuyez sur AMPLIFY 2 Ajustez le sélecteur de tonalité TONE jusqu à ce que vous entendiez bien D Volume de la voix de l utilisateur Vous pouvez utiliser l amplificateur pour augmenter le volume de la voix de l utilisa...

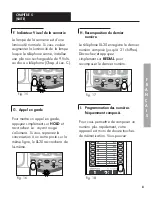
Page 39: ...XL 30 raccrochera de lui même H Recomposition du dernier numéro Le téléphone XL 30 enregistre le dernier numéro composé jusqu à 31 chiffres Décrochez et appuyez simplement sur REDIAL pour recomposer le dernier numéro I Programmation des numéros fréquemment composés Pour vous permettre de composer un numéro plus rapidement votre appareil est muni de douze touches de mémorisation Vous pouvez P E 0 H...

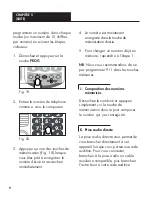
Page 40: ...pareil lorsque vous portez une aide auditive Pour vous connecter branchez à la prise audio un cable auxiliaire compatible puis branchez l autre bout à votre aide auditive programmer un numéro dans chaque touche un maximum de 15 chiffres par numéro en suivant les étapes cidessous 1 Décrochez et appuyez sur la touche PROG 2 Entrez le numéro de téléphone comme si vous le composiez 3 Appuyez sur une d...

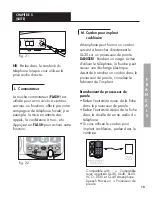
Page 41: ...e parlez dans le combiné NB Parlez dans le combiné du téléphone lorsque vous utilisez la prise audio directe L Commutateur La touche commutateur FLASH est utilisée pour avoir accès à certains services ou fonctions offerts par votre compagnie de téléphone locale par exemple la mise en attente des appels la conférence à trois etc Appuyez sur FLASH pour activer cette fonction AUDIO OUTPUT ER RING TON...

Page 42: ...é à le composer Pas de sonnerie Le téléphone se bloque aucune fonction ne fonc tionne CAUSES ET SOLUTIONS Vérifiez tous les cordons de raccordement Aucun numéro n a été programmé dans cette touche de mémorisation Voir la section Enregistrement des numéros composés fréquemment Voir la section Installation pour régler le mode de composition 1 Vérifiez que la corde de ligne n est pas lâche 2 Vérifiez...

Page 43: ...800 772 2889 TTY TDD pour obtenir des conseils concernant la réparation de votre appareil Toute réparation sera couverte par une garantie de 90 jours Cette garantie s applique seulement aux appareils Ameriphone achetés et utilisés aux États Unis et au Canada Ameriphone garantit ce téléphone XL 30 contre tous défauts dans les matières premières et la fabrication pendant l année suivant la date d ac...

Page 44: ...antie 13 Installation au mur 5 Installation 5 Installation sur bureau 5 Lampe de la sonnerie 9 Liste des pièces 2 Mémorisation 9 Modes de composition Impulsions 4 Tonalité 4 Pile 4 Prise audio directe 10 Recomposition 9 Tonalité de la sonnerie 3 8 Volume de la sonnerie 3 8 Voyant lumineux 3 Fabriqué aux É U DIMENSIONS Taille 9 1 2 x 7 x 3 1 4 24 1 x 17 7 x 8 2 cm Poids 2 52 lb 1 Kg PILE Pile non r...

Reviews: