background image

7301967-100 Rev. C

- 3 -

3

5

7

6

4

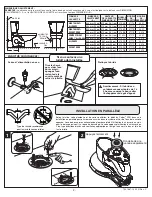
Apply weight evenly. 
Do not move after 
placement. Water 
tight seal may break.

!

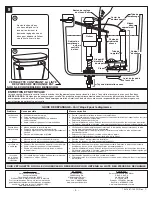
WARNING: Overtightening of 
water supply line nuts could 
result in breakage and potential 
flooding. If the connection leaks 
after hand tightening, replace 
the supply line. Do not use any 
type of sealant on the water 
supply connection. Use of 
plumber’s putty, pipe dope, or 
any other type of sealant will 
void the warranty.

Hand tighten
only. Do not
overtighten.

!

Connect water
supply line.
(Sold separately)
Hand tighten nut.

A

NOTE:  To ease 
installation, push 
down on the top of 
the tank while 
tightening handles.

Tighten handles 
alternately until the 
tank contacts the 
front and back of the 
bowl achieving 
china-to-china 
contact.

B

Turn on water supply.

Summary of Contents for Cadet 270AA Series

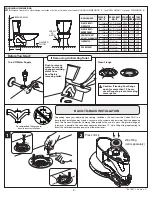
Page 1: ...ontour of china and components Thank you for selecting American Standard the benchmark of fine quality for over 100 years To ensure this product is installed properly please read these instructions carefully before you begin Certain installations may require professional help Also be sure your installation conforms to local codes Wax Ring TankTo Bowl Gasket Slow CloseToilet Seat Water Supply Line ...

Page 2: ...art If Removing An ExistingToilet Caution If leaving floor flange open for more than 1 2 hours cover flange to prevent escaping sewer gases ROUGHING IN DIMENSIONS NOTE Distance from wall to closet flange centerline must be as listed on chart under ROUGH IN DIMENSION A the BOWL HEIGHT is listed as DIMENSION B BOWL SHAPE RIGHT HEIGHT 12 305mm 16 1 2 419mm 270AA 3717A 4021 ELONGATED 10 254mm 16 1 2 4...

Page 3: ...ne Do not use any type of sealant on the water supply connection Use of plumber s putty pipe dope or any other type of sealant will void the warranty Hand tighten only Do not overtighten Connect water supply line Sold separately Hand tighten nut A NOTE To ease installation push down on the top of the tank while tightening handles Tighten handles alternately until the tank contacts the front and ba...

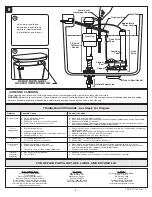
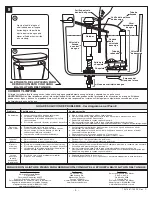
Page 4: ...g or deformed b Sand or debris lodged in water control c Flush valve chain too tight holding flapper open a Wax ring not fully compressed b Floor not level a Open valve and allow water to fill tank b Shut off water supply disconnect supply line and inspect all gaskets and washers Reassemble c Readjust chain length as required d Shut off water supply Remove cap and clean as per Fluidmaster maintena...

Page 5: ...nar American Standard el punto de referencia de la calidad por más de 100 años Para asegurar que no haya problemas durante la instalación lea atentamente estas instrucciones antes de comenzar algunas instalaciones pueden requerir ayuda profesional Asegúrese también de que su instalación cumple con los códigos locales Empaque del tanque a la taza Manijas de fijación con tuercas 2 Arandelas de plást...

Page 6: ... DE COMBINACIÓN MODELO DE TAZA MODELO DE TANQUE ALTURA DE LA TAZA DIM B Cierre el suministro de agua Descargue el inodoro para quitar el agua del tanque saque con una esponja el agua restante de la taza antes de quitar el inodoro Limpie la brida Si está quitando un inodoro existente Precaución Si deja la brida del piso abierta por más de 1 2 horas cubra la brida para prevenir el escape de gases de...

Page 7: ...spués de la colocación ya que el sello impermeable podría romperse ADVERTENCIA Apretar demasiado las tuercas de la línea de suministro de agua podría ocasionar una rotura y un escape potencial de agua Si la conexión presenta fugas después de apretarla reemplace la línea de suministro No utilice ningún tipo de sellador en la conexión de suministro de agua El uso de masilla para plomeros grasa para ...

Page 8: ... está muy floja o desconectada d El control de agua está obstruido por arena o desechos a El nivel del agua en la taza es muy bajo b La válvula de suministro está parcialmente cerrada c Hay una trampa y o tubo de drenaje y o tubo de ventilación parcialmente obstruidos d La presión de suministro es demasiado baja a Mala conexión de la línea de suministro b Mala conexión de la taza al tanque o al pi...

Page 9: ... plus de 100 ans Afin de vous assurer que le produit est installé correctement veuillez lire attentivement les instructions avant de commencer Certaines installations peuvent nécessiter une aide professionnelle Assurez vous également que votre installation est conforme aux codes locaux RÉSERVOIR 4019 et 4021 CUVETTE 3717A 3717C 3717F ALLONGÉE CUVETTE 3717B 3717D DEVANT ROND Joint du réservoir à la...

Page 10: ...DÈLE DE RÉSERVOIR HAUTEUR DE LA CUVETTE DIMENSION B Appuyez fermement Fermez l alimentation en eau Tirez la chasse pour vider l eau du réservoir épongez l eau restante de la cuvette avant de retirer la toilette Nettoyez la bride Avant de commencer Si vous enlevez une toilette déjà installée Avertissement Si la bride au sol demeure ouverte plus de 1 à 2 heures couvrez la pour éviter l échappement d...

Page 11: ...un scellant sur le raccord de l alimentation en eau L utilisation de mastic de plomberie de pâte lubrifiante ou de tout autre type de scellant annulera la garantie Serrez à la main seulement Ne serrez pas excessivement Raccordez le tuyau d alimentation en eau Vendu séparément Serrez l écrou à la main Serrez les poignées une à la fois jusqu à ce que le réservoir touche l avant et l arrière de la cu...

Page 12: ... robinet de chasse trop détendue ou déconnectée d Sable ou débris logés dans la commande d eau a Niveau d eau de la cuvette trop bas b Robinet d alimentation partiellement fermé c Jambe de siphon et ou drain et ou évent partiellement obstrué d Pression de l alimentation trop faible a Mauvais raccord de la conduite d alimentation b Mauvais raccord de la cuvette au réservoir plancher a Le dispositif...

Reviews: