American Standard ACONT302 Installation And User Manual Download Page 18

Installation and User Guide

18 

Part No. 37-7775005

   09/2020   11-HD17D1-1C-EN

but can be set in the range of -5 ° to 79°. Thermostat will 
not allow a setting at or below the (dF) dual fuel setting. 
If indoor temperature drops below 45° because of 
a possible heat pump malfunction, the thermostat 
will turn off the pump and switch to Auxiliary 
heat. “Call for Service” will display on screen. 
There are two ways the thermostat will return to normal 
heat pump operation:


• 

Press any key to retry the pump and erase the   “call 
for service icon.


• 

When setpoint is achieved on Auxiliary, system will 
return to heat pump operation on next call for heat.

From this point on screen reference numbers are specific to 

either the 302 or the 303 model

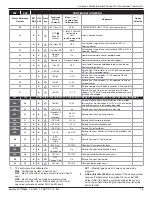
38. (303 ONLY)  Select Programmable Blower Balance Point 

(bP) – Applicable with HP1 or HP2 selected, dF On with 
outdoor sensor. Requires DHM connection from thermostat 
to heat pump system. This feature de-energizes the DHM 
terminal to operate the blower at a slower speed for first 
stage heat when the outdoor temperature is below the 
temperature selected. This circulates warmer air than the 
higher fan speed. The default is 80° (disabled), but can be 
set from 20° to 79°. Select an outdoor temperature where 
the air coming out of the ducts begins to feel cool and the 
thermostat will lower the fan speed to circulate warmer air.  

39.  (303 ONLY) Humidity Display (Hd) 

– Selecting HD On 

enables the display to alternately show the current time and 
the humidity. If HD is selected OFF, the display will not show 
the humidity. (See page 10 for Humidity setpoint range) 

40.  (303 ONLY) Adjustable Humidity Display

 – The display 

will show the ambient humidity and 00 (default). The 
setting can be changed from -20 and LO to 20 and HI. The 
displayed humidity will change as the offset is changed. 
In Run mode, the displayed humidity will be the ambient 
humidity adjusted by the setting selected. 

41.  (303 ONLY) Auto Humidity Reduction (HR)

 – This feature 

automatically lowers humidity setting when the outside 
temperature drops to prevent the interior windows/walls 
from reaching the dew point where water condenses on 
surfaces. This feature default is 

OFF

. It can be changed  

to select 

LO 

(low humidity reduction) or 

HI. 

To achieve 

automatic humidity reduction, the thermostat lowers the 
humidity when furnace cycles are long. When the outside 
temperature rises, it increases humidity. “

LO” 

indicates a 

low amount of humidity reduction. 

42. (303 ONLY) Automatic Humidification (AH)

 – This 

feature if enabled allows for humidification independent of 
a call for heating – useful in arid climates where addition 
humidification in heating and/or cooling is desired. If 
enabled, will energize the humidifier and circulator blower 
(

“G” 

terminal and the 

“HM”

 terminal) if the actual humidity 

is below the humidity set point. The display indicates 

AH

Pressing the   key will cycle the display from 

OFF

 to 

(feature enabled in Heat mode) to 

C

 (feature enabled in 

Cool mode) to 

A

 (feature enabled to Auto mode) and back 

to 

OFF

43.  (303 ONLY) Cycle Humidifier (CH)

 – This feature provides 

an option that reduces the water usage by up to 50% when 
a flow-through humidifier is controlled by the thermostat. It 
is recommended for use on flow-through humidifiers only. 
The display indicates 

CH

 (

C

ycle 

H

umidifier) with the default 

indicating OFF. Pressing the   or   keys will toggle the 
display from 

OFF

 to 

On

 and back to 

OFF

. When CH is 

enabled, the humidifier will cycle to turn off for 10 minutes 
after it has run for 10 minutes. The blower and/or furnace 
will continue to run during the humidifier off period. 

44. (303 ONLY) Programmable Dehumidification Optimal 

Comfort Mode (OC) or Optimal Dehumidification (Od)

 – 

This item can be selected to OC (Optimal Comfort mode), 

Od 

(Optimal Dehumidification), or 

OFF. 

When Optimal 

Comfort (OC) is enabled, this feature automatically reduces 
indoor humidity with a call for Cooling if humidity is 2% above 
humidity setpoint. Humidity is set by pressing the Humidity 
key when in the appropriate mode, in this case Cooling, 
and pressing the 

 or 

 keys to set desired humidity 

(range 40% to 95%) level followed by pressing Humidity 
key again. This dehumidification feature uses less energy 
by maintaining temperature and dehumidifying only when a 
call for Cooling is required. Optimal Dehumidification (Od) 
when enabled, this feature automatically reduces indoor 
humidity with a call for Cooling if humidity is 2% above 
setting. Humidity is set by pressing the 

HUMIDITY

 key when 

in the appropriate mode, in this case Cooling, and pressing 
the 

 or 

keys to set desired humidity level followed by 

pressing Humidity key again. This dehumidification feature 
may use more energy by making dehumidification a priority 
initiating a call for cooling if humidity is 2% above desired 
setting. This feature may also over-cool the condition space 
by up to 3 degrees to achieve the desired humidity level. 
(Note: Both dehumidification modes operate in Cooling 
mode only with a call for cooling) 

45, 46  on 303  (38/39 on 302) 

Change UV Lamp

 –  This feature allows the thermostat 

to display the words “Change UV Lamp” (Call for Service 
of UV bulb) after a set time of UV bulb operation. This is 
a reminder to maintain your UV system at optimum level 
of operation. When enabled, the factory set interval for 

Change UV Lamp

” to be displayed is 350 days of UV 

bulb operation and can be adjusted in 25 day increments. 
This should be adjusted with respect to the bulb’s 
recommended maintenance schedule. When “

Change 

UV Lamp

” is displayed, you can clear it by pressing Clean 

Display.

47, 48  (303 ONLY) Change Humidifier Pad –

 This feature 

allows the thermostat to display the words “

Change Pad

” 

after a set time of humidifier operation. This is a reminder 
to maintain or clean your humidifier. The factory set interval 
for “

Change Pad

” to be displayed is 100 hours of humidifier 

operation. This should be adjusted with respect to the 
humidifier’s recommended maintenance schedule. When 

Change Pad” 

is displayed, you can clear it by pressing 

Clean Display. 

49, 50  on 303 (40/41 on 302) 

Select Change Filter Run Time

 – This feature allows 

thermostat to display “

Change Filter

” after a set time of 

blower operation. This is a reminder to change or clean 
your air filter. This time can be set from 25 to 1975 hours 
in 25 hour increments. A selection of OFF will cancel this 
feature. When “

Change Filter”

 is displayed, you can clear 

it by pressing Clean Display. In a typical application, 200 
hours of run time is approximately 30 days. 

Summary of Contents for ACONT302

Page 1: ...ANT This Document is customer property and is to remain with this unit These instructions do not cover all variations in systems or provide for every possible contingency to be met in connection with the installation Should further information be desired or should particular problems arise which are not covered sufficiently for the purchaser s purposes the matter should be referred to your install...

Page 2: ...s lighting ballasts and large distribution panels Failure to follow these wiring practices may introduce electrical interference noise which can cause erratic system operation All unused thermostat wire to be grounded at indoor unit chassis ground only Shielded cable may be required if the above wiring guidelines cannot be met Ground only one end of the shield to the system chassis 1 Safety 2 2 Pr...

Page 3: ... Heat Pump 1 2 F 1 7 F Emer Heat 0 6 F 1 7 F THERMOSTAT APPLICATION GUIDE Thermostat Configuration Options Thermostat Applications Maximum Stages Heat Cool Single Stage 1 No Heat Pump SS1 Gas Oil Electric Heat Only Cool Only or Heat Cool Systems 2 or 3 wire Hydronic Zone Hot Water or Steam Systems 24 Volt or Millivolt 1 1 Multi Stage 2 No Heat Pump MS2 2 2 Heat Pump 1 Single Stage Compressor Heat ...

Page 4: ...the thermostat will cause damage to the unit 4 Place base over hole in wall and mark mounting hole locations on wall using base as template See Fig 1 5 Move base out of the way Drill mounting holes If you are using existing mounting holes and the holes drilled are too large and do not allow you to tighten base snugly use plastic screw anchors to secure the base 6 Fasten base snugly to wall using m...

Page 5: ...ration required for remote sensor Call for cool No Output Cool mode 1st stage Blower Circulator fan energized on a call for cool or Fan On also energized in heating if configured for Electric Heat Installer Configuration Menu selects O or B for changeover function Set to O terminal energized in Cool Off mode Set to B terminal energized in Heat mergency mode Power closed connection for SPDT 3 wire ...

Page 6: ...Installation and User Guide 6 Part No 37 7775005 09 2020 11 HD17D1 1C EN 5 Wiring Diagrams ...

Page 7: ...American Standard Silver 302 and 303 Touchscreen Thermostat Part No 37 7775005 09 2020 11 HD17D1 1C EN 7 ...

Page 8: ... remote indoor or outdoor wired sensor FOOTNOTES 1 A TCONT302 does not include humidifier HM and dehumidifier DHM terminals AC Cooling with GAF2 S Thermostat Thermostat Indoor Caution Do not run Outdoor Remote sensor wires in the same bundle with HVAC wires Also keep away from high voltage wiring to avoid interference Y B Outdoor ...

Page 9: ...r HM and dehumidifier DHM terminals 2 Wire third party condensate overflow switches between Y of the thermostat and Y1 of the airflow control board 3 X2 is required for aux heat signal during defrost 4 Factory installed jumper 1 or 2 Stage Heat Pump with Variable Speed Furnace Caution Do not run Outdoor Remote sensor wires in the same bundle with HVAC wires Also keep away from high voltage wiring ...

Page 10: ...Installation and User Guide 10 Part No 37 7775005 09 2020 11 HD17D1 1C EN ...

Page 11: ...ze aux heat during defrost 4 Factory installed jumper Heat Pump with GAF2 S Thermostat Indoor Unit Outdoor Unit Caution Do not run Outdoor Remote sensor wires in the same bundle with HVAC wires Also keep away from high voltage wiring to avoid interference 1 1 2 4 3 G R B W1 O B L Y2 Y G Rc Rh C S HM W2 W E 6 DHM Optional remote indoor or outdoor wired sensor FOOTNOTES 1 A TCONT302 does not include...

Page 12: ...age Unit with Variable Speed Blower Thermostat Thermostat Package Unit BK X2 Y1 G R B W1 O B L Y2 Y G Rc Rh C S HM W2 W E 6 DHM Optional remote indoor or outdoor wired sensor FOOTNOTES 1 A TCONT302 does not include humidifier HM and dehumidifier DHM terminals HP Package Unit with Non Variable Speed Blower Thermostat Thermostat Package Unit Caution Do not run Outdoor Remote sensor wires in the same...

Page 13: ...y pad or to replace UV lamp 6 COPY key or INSTALLER CONFIG key 7 CLEAN DISPLAY key allows 30 seconds to wipe off the display or ADVANCE DAY key for programming 8 Used in programming to set time and in configuration menu to change selections 9 Hold Until indicates the time when a temporary hold period will end 10 Hours and Days displays during steps in installer configuration 11 The words Hold At a...

Page 14: ...or HP2 is selected above 4 Days 7 P 5 or 0 Programs per week 7 days 5 1 1 days or non programmable 5 4 PS 2 Programs per day 4 Morning Day Evening Night 2 Day Night Not available if 4 is 0 6 Cool Off Heat Auto Cool Off Heat Heat Off Heat Cool Off Auto Off System switch configuration in non heat pump mode Cool Off Heat Em Auto Cool Off Heat Em Off Em Auto System switch configuration heat pump mode ...

Page 15: ...POINT ON REFER TO THE SPECIFIC MODEL FOR THE CORRECT SCREEN REFERNCE NUMBER N A 38 80 bP 79 20 Selects Blower balance point Selection of 80 disables this feature This item appears if HP1 or HP2 is selected and outdoor sensor is installed and enabled N A 39 OFF Hd on Selects Humidity Display alternate with time N A 40 Humidity 00 Room Humidity 20 LO 20 HI Selects Humidity Display adjustment N A 41 ...

Page 16: ...r up to five minutes 13 Select Continuous Display Lighting dL In low lighting conditions display backlight improves the display contrast 14 Select Temperature Display Adjustment 5 LO to 5 HI This allows you to adjust the room temperature display by 5 F to 5 F in 1 steps Your thermostat was accurately calibrated at the factory however you have the option to change the display temperature value to m...

Page 17: ...orces additional heat stages to come on quickly when is used to raise the temperature a few degrees above the room Select this setting if you want the heat to increase quickly when you manually raise the temperature Selecting FA OFF allows the thermostat to calculate an optimal time to bring on additional stages of heat When the is used to raise the setting above the room temperature additional he...

Page 18: ...ier is controlled by the thermostat It is recommended for use on flow through humidifiers only The display indicates CH Cycle Humidifier with the default indicating OFF Pressing the or keys will toggle the display from OFF to On and back to OFF When CH is enabled the humidifier will cycle to turn off for 10 minutes after it has run for 10 minutes The blower and or furnace will continue to run duri...

Page 19: ...ey to select EM EM Heat Mode will flash on the display 8 Press to adjust thermostat setting above room temperature The Emergency heating system will begin to operate The display will show System On flashing EM Heat Mode and Heat to indicate that the Emergency system is operating 9 Adjust temperature setting to 3 above room temperature Any additional stages of auxiliary heat should begin to operate...

Page 20: ...installer menu Then press Set Time once to indicate hour AM or PM designation in clock display 2 Press and hold either the or touch key until you reach the correct hour and AM or PM designation 3 Press Set Time again to display minutes only in clock display 4 Press and hold either the or touch keys until you reach the correct minutes 5 Press Set Time once again to display year 6 Press either the o...

Page 21: ...system switch area indicating the active mode being programmed You can switch to the other mode by pressing the system switch at any time 3 The top of the display will show the day s being programmed The time and set at temperature are also displayed Morning will also be displayed to indicate the period 4 Press or key to change the temperature to your selected temperature for the 1st heating perio...

Page 22: ...meters 300 feet Terminals S and on the terminal block allow connection of the remote sensor The thermostat must have 24 VAC Common connection to terminal C for the remote sensor to operate The remote sensor can be enabled or disabled in the Installer Configuration menu item 29 When remote sensor Remote is selected Off factory default no remote sensor is enabled When remote sensor is selected On th...

Page 23: ...lected on the thermostat can monitor the outside temperature using remote sensor F145 1378 or use software logic to determine when to switch to gas heat and shut down the compressor This eliminates the need for a fossil fuel kit The user selectable temperature is called the dual fuel temperature setpoint dF and is set in the Installer Configuration menu items 33 or 34 With outdoor remote sensor in...

Page 24: ...tantly 1 Possible short in wiring 2 Possible short in thermostat 3 Possible short in heat cool fan system 4 FAN Switch set to Fan ON Check each wire connection to verify they are not shorted or touching together No bare wire should stick out from under terminal block Try resetting the thermostat as described above If the condition persists the manufacturer of your system or service person can inst...

Reviews: