background image

22

Step 2 : Bidet

Paso 1 
del funcionamiento: Enjuague

Flujo 

Flujo alto

Gire la manilla hacia la derecha desde la posición vertical.
La boquilla de ENJUAGUE se moverá hacia delante y comenzará a funcionar.
El flujo de agua cambia al girar la manilla.


Flujo 

Flujo alto

Gire la manilla hacia la izquierda desde la posición vertical.

La boquilla de BIDÉ se moverá hacia delante y comenzará a funcionar.
El flujo de agua cambia al girar la manilla.


Summary of Contents for B07VM9T6Q1

Page 1: ...on Electric Bidet Toilet Seat Elongated B07VM9T6Q1 Si ge De Toilette Bidet Non lectrique Allong B07VPDFX1Y Si ge De Toilette Bidet Non lectrique Ronde B07VM9T6Q1 Asiento No El ctrico para Bid y WC Ala...

Page 2: ...English 3 Espa ol 14 Fran ais 25...

Page 3: ...lation Template x1 Sliding Plates x2 Expansive Nuts x2 T shaped Connector x1 x2 Connecting Bolts Part List Parts Description Qty A A Bolt x 2 B Sliding Plates x 2 C Adaptable Panel x 1 D Expansive Nut...

Page 4: ...third party then these instructions must be included Before First Use Check for transport damage Risk of suffocation Keep any packaging materials away from children these materials are a potential sou...

Page 5: ...5 Step 3 Insert the connecting bolts in the holes of the adapter panel Insert the connecting bolts through the slot of adjusting pieces Assembly Step 2...

Page 6: ...p 5 Install the installation template on the on top of toilet bowl Insert the expansion nuts into the holes on toilet bowl Assembly Step 4 Option 1 Option 2 Installation template In sta lla tion te m...

Page 7: ...Installation template Installation template Option 1 Using the adapting panel with the bolts screw the bolts into the expansion nuts Option 2 Using the adapting panel with the bolts screw the nuts ont...

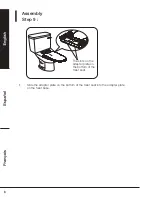
Page 8: ...8 Slide the adapter plate on the bottom of the toilet seat into the adapter plate on the toilet base Assembly Step 9 The slots on the adapter plate on the bottom of the toilet seat...

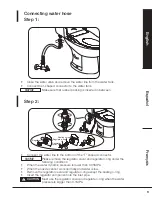
Page 9: ...Please remove the regulator cover and regulate o ring under the following conditions Connect the water line to the bottom of the T shaped connector When the water dynamic pressure is lower than 0 05M...

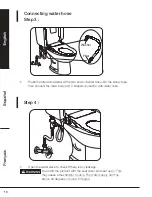
Page 10: ...of water hose into the screw tube then connect the main body and T shaped connector with water hose Connecting water hose Step 3 Washer Filter Do not lift the product with the seat cover and seat ope...

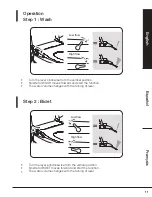
Page 11: ...cal position Nozzle for WASH moves forward and start the function The water volume changes with the turning of lever Low flow High flow Turn the lever anticlockwise from the vertical position Nozzle f...

Page 12: ...ater could empty the cold water The wand cleans itself after each use For additional flush clean of the wand position the lever at 25 for a few seconds and then reposition back to 90 Cleaning and Main...

Page 13: ...Feedback and Help Love it Hate it Let us know with a customer review AmazonBasics is committed to delivering customer driven products that live up to your high standards We encourage you to write a r...

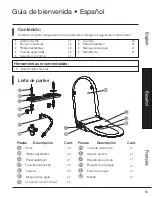
Page 14: ...deslizantes x2 Tuercas expansivas x2 Conector con forma x1 x2 Pernos conectores Lista de partes Piezas Descripci n Cant A A Perno x 2 B Placas deslizantes x 2 C Panel adaptador x 1 D Tuercas expansiv...

Page 15: ...n incluir estas instrucciones Antes de usar por primera vez Revise por si hay da os ocurridos en el transporte Riesgo de asfixia Mantenga los materiales de empaque lejos de los ni os ya que estos mate...

Page 16: ...16 Paso 3 Introduzca los pernos conectores en los agujeros del panel adaptador Introduzca los pernos conectores en la ranura de las piezas de ajuste Paso 2 del ensamblaje...

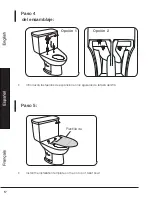
Page 17: ...nstall the installation template on the on top of toilet bowl Introduzca las tuercas de expansi n en los agujeros de la taza del WC Paso 4 del ensamblaje Opci n 1 Opci n 2 Plantilla de Plantilla de in...

Page 18: ...ice Plantilla de instalaci n Plantilla de instalaci n Opci n 1 Use el panel adaptador con los pernos y apri telos en las tuercas expansivas Opci n 2 Use el panel adaptador con los pernos y rosque las...

Page 19: ...lice la placa adaptadora de la parte inferior del asiento del WC en la placa adaptadora de la base del WC Paso 9 del ensamblaje Las ranuras en la placa adaptadora van en la parte inferior del asiento...

Page 20: ...lador y la junta t rica reguladora en las siguientes condiciones Conecte la l nea de agua a la parte inferior del conector con forma de T Si la presi n din mica del agua es inferior a 0 05 MPa Si la b...

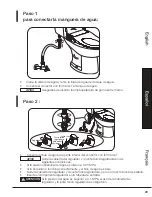
Page 21: ...roscado luego conecte el cuerpo principal y el conector con forma de T a la manguera de agua Paso 3 para conectar la manguera de agua Arandel Filtro No levante el producto con la cubierta del asiento...

Page 22: ...i n vertical La boquilla de ENJUAGUE se mover hacia delante y comenzar a funcionar El flujo de agua cambia al girar la manilla Flujo Flujo alto Gire la manilla hacia la izquierda desde la posici n ver...

Page 23: ...fr a La boquilla se limpia autom ticamente luego de cada uso Para una limpieza adicional de la boquilla coloque la manilla en la posici n de 25 durante algunos segundos y luego vuelva a colocarla en l...

Page 24: ...y ayuda Le gust No le gust H ganoslo saber con un comentario del cliente En AmazonBasics estamos comprometidos con entregar a nuestros clientes productos que cumplan con sus altos est ndares Lo animam...

Page 25: ...t D Installation x1 Plaques x2 Coulissantes x2 crous Bride x1 x2 Boulons De Liaison Liste Des Pi ces Parts Description Qty A A Boulon x 2 B Plaques Coulissantes x 2 C Panneau Adaptable x 1 D crous bri...

Page 26: ...uctions doivent galement lui tre remises Avant la premi re utilisation Assurez vous que le produit n a pas t endommag au cours du transport Risque d touffement Conservez tous les mat riaux d emballage...

Page 27: ...27 tape 3 Ins rez les boulons de liaison dans les trous du panneau d adaptateur Ins rez les boulons de liaison travers la fente des pi ces de r glage Montage tape 2...

Page 28: ...e 5 Installez le gabarit d installation sur la cuvette de toilette Ins rez les crous bride dans les trous situ s sur la cuvette de toilette Montage tape 4 Option 1 Option 2 Gabarit G abatit d insta ll...

Page 29: ...nstallati Gabatit d installation Option 1 l aide du panneau de r glage portant les boulons vissez les boulons dans les crous bride Option 2 l aide du panneau de r glage portant les boulons vissez les...

Page 30: ...aptation situ e dans la partie inf rieure du si ge de toilette dans la plaque d adaptation situ e sur la base de la latrine Montage tape 9 Les fentes de la plaque d adaptation situ es dans la partie i...

Page 31: ...int torique de r gulation dans les conditions suivantes Raccordez la conduite d eau la partie inf rieure du connecteur en forme de T Lorsque la pression dynamique de l eau est inf rieure 0 05 MPa Lors...

Page 32: ...tube vis puis raccordez le corps principal et le connecteur en forme de T au tuyau d eau Raccordement du tuyau d eau tape 3 Ne pas soulever le produit lorsque le rev tement de si ge et le si ge sont o...

Page 33: ...icale La buse correspondant WASH Lavage avance et d marre la fonction Le volume d eau change avec la rotation du levier Faible D bit Tournez le levier dans le sens inverse des aiguilles d une montre p...

Page 34: ...froide Le tube rallonge se nettoie apr s chaque utilisation Pour un nettoyage suppl mentaire du tube rallonge positionnez le levier sur 25 pendant quelques secondes puis repositionnez le sur 90 Nettoy...

Page 35: ...ion et Aide L appr ciez vous Le ou la d testez vous Faites le nous savoir gr ce votre t moignage AmazonBasics est d termin proposer des produits r pondant aux attentes des clients et vos normes les pl...

Page 36: ...HECHO EN CHINA FABRIQU EN CHINE MADE IN CHINA amazon com AmazonBasics...

Reviews: