background image

12

Ductwork

Duct systems and register sizes must be properly designed 

for the C.F.M. and external static pressure rating of 

the unit. Ductwork should be designed in accordance 

with the recommended methods of Air Conditioning 

Contractors of America Manual D (Residential) or Manual Q 

(Commercial). All ductwork exposed to the outdoors must 

include a weatherproof barrier and adequate insulation.

A duct system should be installed in accordance with 

Standards of the National Board of Fire Underwriters for 

the Installation of Air Conditioning, Warm Air Heating and 

Ventilating Systems. Pamphlets No. 90A and 90B.

The supply duct from the unit through a wall may be 

installed without clearance. However, minimum unit 

clearances as shown in the appendix must be maintained.  

The supply duct should be provided with an access panel 

large enough to inspect the air chamber downstream of 

the heat exchanger. A cover should be tightly attached to 

prevent air leaks.

For duct flange dimensions on the unit refer to the Unit 

Dimension illustration in the appendix.

For down-discharge applications, the ductwork should 

be attached to the roof curb prior to installing the unit. 

Ductwork dimensions are shown in the roof curb installation 

manual.

If desired, supply and return duct connections to the unit 

may be made with flexible connections to reduce possible 

unit operating sound transmission.

Filters

CAUTION

To prevent property damage due to fire and loss of 

equipment efficiency or equipment damage due to dust and 

lint build-up on internal parts, never operate the unit 

without an air filter installed in the return air system.

Even though a return air filter is not supplied with this unit, 

there must be a means of filtering all return air. All units 

may be externally filtered.

Refer to the unit filter size chart in the appendix for filter 

size information.

Filters installed external to the unit should be sized in 

accordance with their manufacturer recommendations. A 

throwaway filter must be sized for a maximum face velocity 

of 300 feet per minute. 

Filter Installation

IMPORTANT NOTE: When installing a filter, the air 

flow arrows on the filter must point toward the 

circulator blower.

UNIT

2 Ton

2 1/2 Ton

3 Ton

3 1/2 & 4 Ton

5 Ton

Min. Filter Size (1)20 x 20 x 1 (1)20 x 25 x1 (1)25 x 25 x1 (2)20 x 20 x 1 2(20) x 25 x1

Filter Size Recommendations

VENTING

NOTE: Venting is self-contained. Do not modify or 

block.

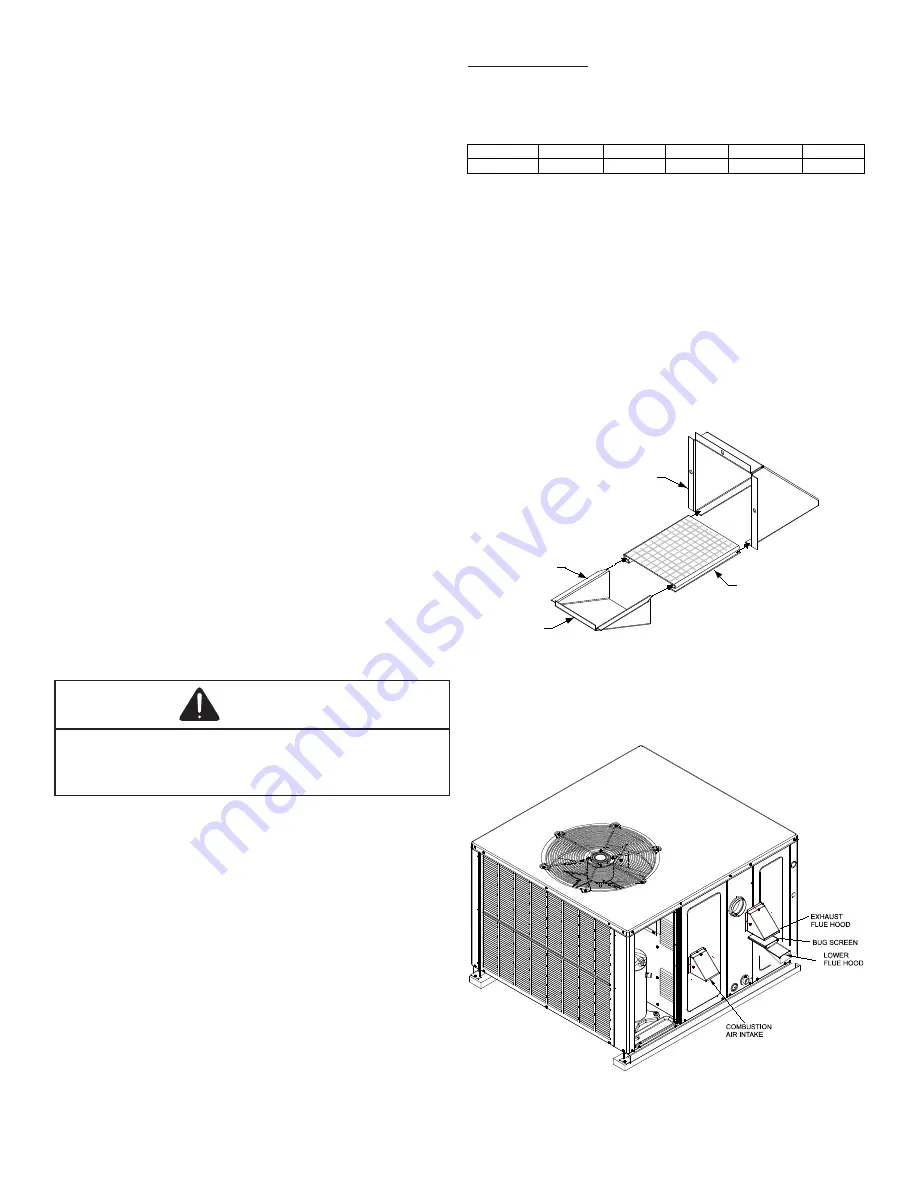
Installation - Flue Hood Exhaust

1. 

Locate the flue hood assembly box in the unit.

2. 

Slide screen over flanges on the lower flue hood.

3. 

Slide screen and lower flue hood into hood.

4.  Using the three screws provided, attach the hood 

(with the opening facing down) over the flue exhaust 

opening in the utility panel.

SCREEN

HOOD

LOWER

FLUE

HOOD

LIP

Installation - Combustion Air Intake Hood

1.  Locate the second hood.

2.  Using the three screws provided, attach the hood 

(with the opening facing down) to the heat exchanger 

access door.

Summary of Contents for A/GPUM3

Page 1: ...ease contact your distributor or our website for the applicable Specification Sheets referred to in this manual This Forced Air Central Unit Design Complies With Requirements Embodied In The American National Standard National Standard of Canada Shown Below ANSI Z21 47 CSA 2 3 Central Furnaces WARNING Do not bypass safety devices Only personnel that have been trained to install adjust service main...

Page 2: ...c Pressure Check 17 Blower Speed Adjustments 17 EEM Motors 17 Limit Check 18 Unit Shut Down 17 Compression Protection Devices 17 Refrigerant Charge Check 17 Checking Subcooling 18 Checking superheat 18 Superheat Adjustment 18 Cooling Startup 18 TROUBLESHOOTING 19 Ignition Control Error Codes 19 Fault Recall 19 Resetting from Lockout 20 Pressure Sensor 20 Primary Limit 20 Flame Detected with Gas Va...

Page 3: ...d and attached with the PCB or else the unit might not function as intended ID Plug PCB Terminal J9 Adjusting Gas Manifold Pressure Use the below manifold pressure settings Gas Input BTU HR Manifold Pressure up till 4 500 Ft Manifold Pressure at 5 000 Ft Manifold Pressure at 7 500 Ft 40 000 3 0 w c 2 7 w c 2 2 w c 60 000 3 0 w c 2 7 w c 2 2 w c 80 000 3 0 w c 2 7 w c 2 2 w c REPLACEMENT PARTS Orde...

Page 4: ...uilding Immediately call your gas supplier from a neighbor s phone Follow the gas supplier s instructions If you cannot reach your gas supplier call the fire department Installation and service must be performed by a qualified installer service agency or the gas supplier WARNING Should overheating occur or the gas supply fail to shut off turn off the manual gas shutoff valve external to the furnac...

Page 5: ...ven la on est nécessaire pour éviter le danger d intoxica on au CO pouvant survenir si un appareil produisant du monoxyde de carbone con nue de fonc onner au sein de la zone confinée Esta ven lación es necesaria para evitar el peligro de envenenamiento por CO que puede ocurrir si un monóxido de carbono sigue operando en el lugar cerrado disposi vo que produce WARNING To avoid property damage perso...

Page 6: ...on monoxide poisoning or death The following steps shall be followed with each appliance connected to the venting system placed in operation while any other appliances connected to the venting system are not in operation 1 Seal any unused openings in the venting system 2 Inspect the venting system for proper size and horizontal pitch as required by the National Fuel Gas Code ANSI Z223 1 or the Nat...

Page 7: ...nts must be observed when installing the unit IMPORTANT NOTE Remove wood shipping rails prior to installation of the unit All Installations For proper flame pattern within the heat exchanger and proper condensate drainage the unit must be mounted level The flue outlet hood must be at least 12 inches from any opening through which flue gases could enter a building and at least three feet above any ...

Page 8: ... wood floors or on Class A Class B or Class C roof covering material To avoid possible personal injury a safe flat surface for service personnel should be provided Roof Curb Installations Only Sufficient structural support must be determined prior to locating and mounting the curb and package unit Ductwork must be constructed using industry guidelines The duct work must be placed into the roof cur...

Page 9: ...id possible unsatisfactory operation or equipment damage due to underfiring of equipment use the proper size of natural gas piping needed when running pipe from the meter to the furnace The rating plate is stamped with the model number type of gas and gas input rating Make sure the unit is equipped to operate on the type of gas available The gas line installation must comply with local codes or in...

Page 10: ...esting for leaks on a new installation Therefore the air must be bled from the line by loosening the ground joint union until pure gas is expelled Tighten union and wait for five minutes until all gas has been dissipated in the air Be certain there is no open flame in the vicinity during air bleeding procedure The unit is placed in operation by closing the main electrical disconnect switch for the...

Page 11: ... on 208V reconnect the transformer primary lead as shown on the unit wiring diagram The induced draft blower on some models is equipped with a low speed 240V lead blue and a low speed 208V lead black If equipped connect the induced draft blower low speed 208V lead black in place of the low speed 240V lead blue Place the unused 240V lead on the PARK terminal located on ignition control NOTE Connect...

Page 12: ... sound transmission Filters CAUTION To prevent property damage due to fire and loss of equipment efficiency or equipment damage due to dust and lint build up on internal parts never operate the unit without an air filter installed in the return air system Even though a return air filter is not supplied with this unit there must be a means of filtering all return air All units may be externally fil...

Page 13: ...inuously 9 R and W thermostat contacts open completing the call for heat gas valve de energizes 10 Induced draft blower keeps operating for 30 second post purge 11 Ignition control begins timing the HEAT FAN OFF delay There is an adjustable HEAT FAN OFF delay of approximately 90 120 150 180 seconds factory set at 150 PCBBL216 Heat Cool Delay NOTE This delay allows any additional heat in the heat e...

Page 14: ...ration Checks 1 Close the manual gas valve external to the unit 2 Turn off the electrical power supply to the unit 3 Set the room thermostat to its lowest possible setting 4 Remove the heat exchanger door on the side of the unit by removing screws 5 This unit is equipped with an ignition device which automatically lights the main burner DO NOT try to light burner by any other method 6 Move the gas...

Page 15: ... Manometer Natural Gas Min 5 0 W C Max 10 0 W C INLET GAS SUPPLY PRESSURE 7 Turn OFF all electrical power and gas supply to the system 8 Remove the manometer hose from the hose barb fitting or inlet pressure Tap 9 Replace inlet pressure tap a White Rodgers Valve Turn inlet pressure test screw in to seal pressure port clockwise 7 in lb minimum 10 Retest for leaks If bubbles form shut down gas and r...

Page 16: ...to seal pressure port clockwise 7 in lb minimum 14 Turn ON electrical power and gas supply to the system 15 Close thermostat contacts to provide a call for heat 16 Retest for leaks If bubbles form SHUT OFF GAS AND REPAIR ALL LEAKS IMMEDIATELY Gas BTU Input Natural Gas Only Check To measure the gas input use a gas meter and proceed as follows 1 Turn off gas supply to all other appliances except the...

Page 17: ...c pressure of the supply duct Positive Pressure 3 Add the two readings together NOTE Both readings may be taken simultaneously and read directly on the manometer is so desired 4 Consult proper table for quantity of air If the external static pressure exceeds the minimum or maximum allowable statics check for closed dampers dirty filters undersized or poorly laid out ductwork Blower Speed Adjustmen...

Page 18: ...re making adjustments to charge NOTE Check all manual reset limit controls in heating circuit if cooling mode does not operate Compressor Protection Devices The compressor includes components which are designed to protect the compressor against abnormal operating conditions WARNING To prevent personal injury or death always disconnect electrical power before inspecting or servicing the unit NOTE A...

Page 19: ...n check subcooling NOTE To adjust superheat turn the valve stem clockwise to increase and counterclockwise to decrease b If subcooling is low and superheat is high add charge to raise subcooling then check superheat c If subcooling and superheat are high adjust TXV valve superheat then check subcooling d If subcooling is high and superheat is low adjust TXV valve superheat and remove charge to low...

Page 20: ...e heat exchanger At the beginning of a call for heat the control ensures the inducer is in an off state then checks the pressure sensor output for the proper null offset value If the pressure sensor output is outside the acceptable range for the null value the control enters a five minute lockout After the lockout timer has expired the control resumes normal operation During inducer operation incl...

Page 21: ... Some electronic thermostats also have a built in compressor short cycle timer that may be longer than the three minute delay given above If you are using an electronic thermostat and the compressor has not started after three minutes wait an additional five minutes to allow the thermostat to complete its short cycle delay time High Pressure Switch Low Pressure Switch Some models include a high pr...

Page 22: ...wly rotate the cable with the drill and insert it into one of the primary heat exchanger tubes While reversing the drill work the cable in and out several times to obtain sufficient cleaning Use a large cable for the large tube and then repeat the operation with a small cable for the smaller tube Repeat for each tube 5 When all heat exchanger tubes have been cleaned replace the parts in the revers...

Page 23: ...Circulator Blower Motor Ignition Control Compressor Induced Draft Blower Condenser Coil Pressure Sensor Condenser Fan Blade Pressure Sensor Hose Condenser Fan Motor Spark Igniter Module Contactor Thermostatic Expansion Valve ECM Interface Module Transformer Evaporator Coil Time Delay Relay Flame Sensor Low Pressure Switch General Information 1 Refer to the description in Functional Parts List when...

Page 24: ...FLASH RETRIES EXCEEDED RED 1 HOUR FIXED 10 FLASHES HIGH LIMIT SWITCH RECOVERY TIMER EXPIRED RED 1 HOUR OR HARD LOCKOUT RAPID FLASH CLEAR ERROR HISTORY GREEN N A 2 FLASHES PRESSURE SENSOR NULL ERROR RED 5 MINUTES STEADY ON OEMFACTORY TEST MODE AMBER N A 1 FLASH CALL FOR HEATING GREEN N A 3 FLASHES PRESSURE SENSOR SPAN ERROR RED 5 MINUTES RAPID FLASH FIELD TEST MODE AMBER N A 2 FLASHES CALL FOR COOL...

Page 25: ...A GPUM342 41 47 51 40 42 1 2 Large A GPUM348 41 47 51 40 42 1 2 Large A GPUM361 41 47 51 40 42 1 2 Large Model Unit Dimensions Inches Height Chassis Size W H W H A GPUM324 41 16 16 16 16 A GPUM330 41 16 16 16 16 A GPUM336 41 16 16 16 16 A GPUM342 41 16 18 16 18 A GPUM348 41 16 18 16 18 A GPUM361 41 16 18 16 18 Duct Openings Supply Return Model ...

Page 26: ...CONDENSER MOTOR COMP COMPRESSOR EM EVAPORATOR MOTOR FPS FREEZE PROTECTION SWITCH FS FLAME SENSOR GND EQUIPMENT GROUND GPT GAS PRESSURE TRANSDUCER GV GAS VALVE COMPONENT LEGEND HPS HIGH PRESSURE SWITCH IGN IGNITOR PLF FEMALE PLUG CONNECTOR PLM MALE PLUG CONNECTOR PLS PRIMARY LIMIT SWITCH RC RUN CAPACITOR TON ON DELAY TIMER RELAY TR TRANSFORMER VM VENT MOTOR WIRE CODE BLACK BLUE BROWN GREEN GRAY ORA...

Page 27: ... L2 L2 L1 GND J3 5 4 3 2 1 PLM 3A BK RD GR RDWH PLM PLF GPT 3 2 1 2 1 BK GR RD RD BR GV BR CC T1 T2 BK CM BR RC GR YL BR BK PU COM H F PU BK COMP M 1 M 1 M 1 PLF PLM 5 4 3 2 1 VM YL OR C L G N BK PU BL GR PU BK T1 T2 T3 T4 T5 M 1 EM FS YL RD GND TON t 180s R1 Y1 BL Y2 R2 PU 3 5 4 3 2 1 YL GR LINE VOLTAGE 208 230V 1PH 60Hz R C RD L1 L2 G R W Y C 5 4 3 2 1 GR COM TR BR RD BK RD YL OR BR WH BK OR YL ...

Page 28: ...948 329 A GPUM33006041 Rise Range 30 60 E S P T1 FAN ONLY SPEED T2 HEATING SPEED T3 HEATING SPEED T5 COOLING SPEED T4 COOLING SPEED CFM WATTS CFM WATTS RISE CFM WATTS RISE CFM WATTS CFM WATTS 0 1 870 107 1216 228 31 870 107 42 1448 342 1533 408 0 2 792 118 1149 234 32 792 118 44 1403 343 1470 419 0 3 685 130 1083 246 33 685 130 48 1358 354 1416 428 0 4 623 138 1014 252 34 623 138 51 1319 361 1360 ...

Page 29: ...2 285 59 1528 739 1578 693 A GPUM34808041 Rise Range 30 60 E S P T1 FAN ONLY SPEED T2 HEATING SPEED T3 HEATING SPEED T4 COOLING SPEED T5 COOLING SPEED CFM WATTS CFM WATTS RISE CFM WATTS CFM WATTS CFM WATTS 0 1 1156 158 1283 200 42 1420 284 2044 757 2107 602 0 2 1077 163 1224 210 44 1371 294 1996 770 2060 616 0 3 1015 172 1152 216 46 1318 302 1955 779 2015 622 0 4 930 179 1098 228 49 1268 313 1913 ...

Page 30: ...essor motor is hermetically sealed and does not require additional oiling Annual Inspection Qualified Servicer Only Your package unit should be inspected by a qualified installer or service agency at least twice every year This check should be performed before the heating and cooling seasons begin This will ensure that adequate combustion air is being drawn and the vent system is working properly ...

Page 31: ...Liquid Propane Residential Package Outdoor Section ELECTRICAL Supply Voltage Measure L1 and L2 Voltage L1 L2 Compressor Amps Condenser Fan Amps PRESSURES TEMPERATURES Suction Circuit Pressure Suction Line Temperature PSIG TEMP F Liquid Circuit Pressure Liquid Temperature PSIG TEMP F Outdoor Air Temperature Dry bulb Wet bulb DB F WB F SUPERHEAT SUBCOOLING SH SC Additional Checks Check wire routings...

Page 32: ...t us contact us You can also scan the QR code on the right for the product brand you purchased to be directed to the feedback page Our continuing commitment to quality products may mean a change in specifications without notice 19001 Kermier Rd Waller TX 77484 www goodmanmfg com www amana hac com 2022 Daikin Comfort Technologies Manufacturing L P is a registered trademark of Maytag Corporation or ...

Reviews: