background image


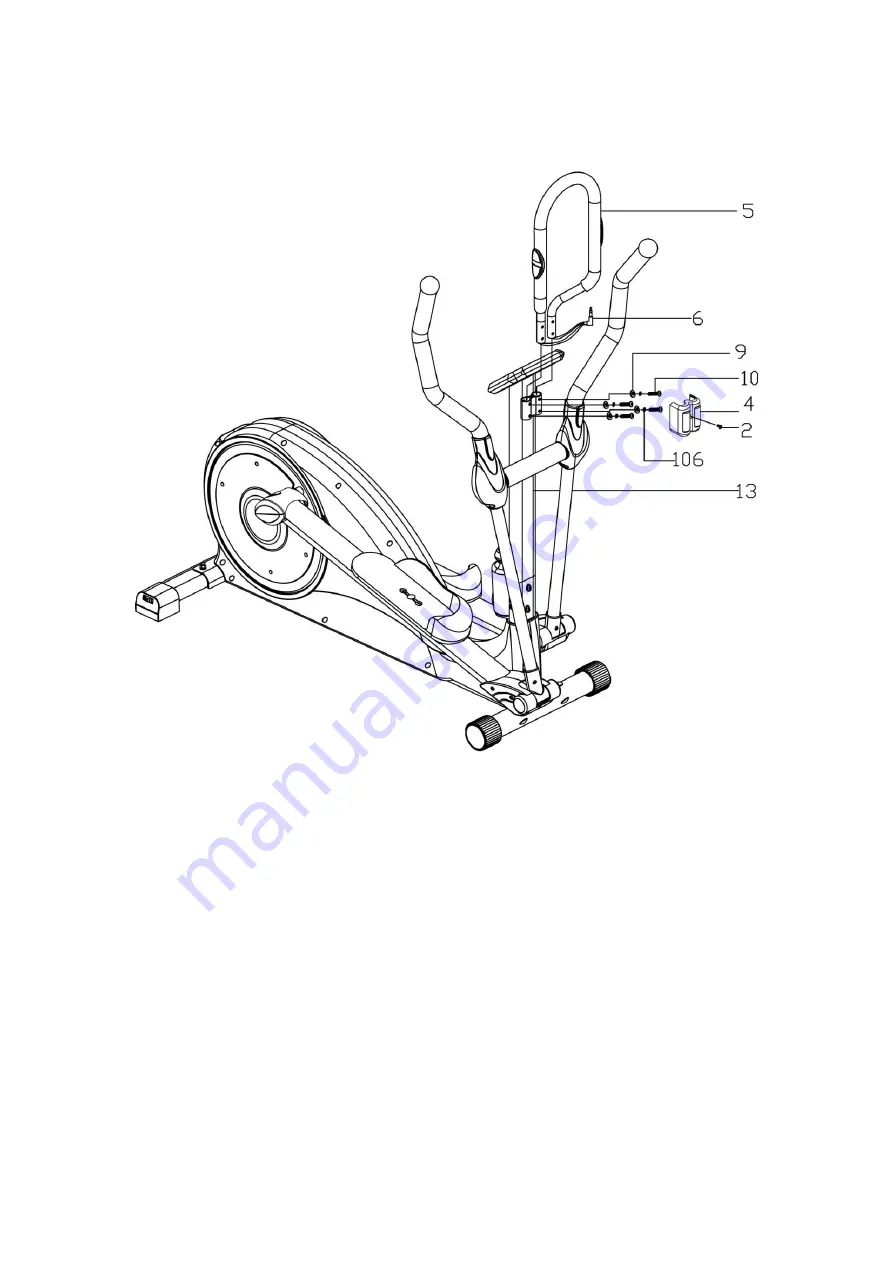
Step9 


Fasten the 

handlebar with pulse sensor

 (5) to the rear end of the handlebar 

post(13) in the plate already pre-mounted with both 

Allen key bolt M6

 (10) the 

curved washer (9) and the lock washer (106).   
 
Then you set the plastic 

Cover for handlebar with pulse sensor

 (4) on the plate of 

handlebar post and fasten these with the cross-notched screw (2). Put the 
hand pulse cable (6) into the associated socket on the computer back. 


Summary of Contents for C9.1-E

Page 1: ...0 C9 1 E Elliptical Trainer ...

Page 2: ...nt The equipment is designed for adult use only 5 Use the equipment on a solid flat level surface with a protective cover for your floor or carpet For safety the equipment should have at least 0 5 metre of free space all around it 6 Before using the equipment check the nuts and bolts are securely tightened Some parts like pedals etc It s easy to be wared away 7 The safety level of the equipment ca...

Page 3: ...u could be damaged or scratched Make sure that you have sufficient movement free space at least 1 5 m during the assembly in each direction Step 1 Fasten the rear stabilizer 24 with the carriage bolt M8 55L 89 flat washer 18 lock washer 71 and the Domed nuts M8 25 at the main frame 16 Fasten the front stabilizer 21 with the carriage bolt M8 70L 20 the curved washer 19 lock washer 71 and the Domed ...

Page 4: ...handlebar post 13 into the hole of the main frame 16 Fix the handlebar post 13 with four allen key bolts M8 17 four flat washer 18 and four curved washer 19 Tighten these connections firmly Use by the hexagon key Fasten now the drinking bottle owner 98 with the help of the two cross notched screws 99 to the handlebar post 13 Insert the drinking bottle 100 into the bottle rack 98 ...

Page 5: ...ith Lock nut M10 49 Flat washer 82 and Socket head screw M10 86 Step 4 Install the pedal 88L R on the pedal arms 48L R with Lock screw for pedal M6 87 Flat washer 39 and Grasp nut 51 You have the possibility of installing the pedal in three different positions ...

Page 6: ...ush the upper ends of the connecting arm onto the axle 12 which you push before into the handlebar post 13 The connecting arm 85R need be fasten with the help of wave washer 69 a D washer 101 a flat washer 102 a lock washer 103 and a socket head screw 104 Proceed in the same way with the left pedal arm 85L You may use 2 wave washers 69 into the handlebar axle 12 if the space between connecting arm...

Page 7: ...d screws 94 95 at the rear end of the pedal arms 48R 48L Fasten the front and back of the front pedal arm cover 91R 91L at the lower surface of the connecting arms 85R 85L with a cross notched screw 8 Afterwards fasten the respective two side parts of the front pedal arm cover 97R 97L with in each case two cross notched screws 96 ...

Page 8: ...R to the openings of the two connecting arms 85L 85R Fasten these with help of two socket head screws 84 and two curved lock washer 71 Fasten the two covers 81L 81R 83L 83R by previous plugging together with the help of the four cross notched screws 90 ...

Page 9: ...er back 1 Put the upper sensor cable 7 into the associated socket cables on the computer back and you push now the computer 1 onto the mounting plate at the handlebar post 13 Then you fasten the computer 1 to the mounting plate with the two cross notched screws 2 ...

Page 10: ...ady pre mounted with both Allen key bolt M6 10 the curved washer 9 and the lock washer 106 Then you set the plastic Cover for handlebar with pulse sensor 4 on the plate of handlebar post and fasten these with the cross notched screw 2 Put the hand pulse cable 6 into the associated socket on the computer back ...

Page 11: ...10 ...

Page 12: ... Front small plastic chain cover 1PC 15 Lower plug 1PC 16 Main frame 1SRT 17 Allen key bolt M8 M8 16L 6PCS 18 Flat washer φ20 φ8 1 2T 10PCS 19 Curved washer φ20 φ8 1 2T 6PCS 20 Carriage bolt M8 M8 70L 2PCS 21 Front stabilizer 1PCS 22 Front stabilizer cap 2PCS 23 Adaptor 1PC 24 Rear stabilizer 1PCS 25 Domed nut M8 M8 4PCS 26 Rear stabilizer cap 2PCS 27 Wire of motor 1PC 28 Sensor fixer 1PC 29 Senso...

Page 13: ...ushing or Powder metallurgy 4PCS 60 Spring washer φ6 0 4PCS 61 Drive pulley φ320 1PC 62 Hexagon screw M6 M6 15L 4PCS 63 Axle for drive pulley 1SET 64 Belt 590J 4F 1PC 65 Chain cover L R 1SET 66 Cross notched screw M5 M5 25L 7PCS 67 Cross notched screw M5 M5 20L 6PCS 68 Support frame for pedal 2SET 69 Wave washer φ16 6PCS 70 Flat washer φ28 φ8 2 0T 2PCS 71 Lock washer φ8 16PCS 72 Socket head screw ...

Page 14: ... in the back top side right L R 1SET 93 Cover for pedal arm in the back lower surface right L R 1SET 94 Cross notched screw M5 M5 10L 4PCS 95 Cross notched screw M4 M4 16L 4PCS 96 Cross notched screw M5 M5 10L 8PCS 97 Cover for connecting arm laterally L R 2SET 98 Drinking bottle rack 1SET 99 Cross notched screw M5 M5 14L 2PCS 100 Drinking bottle 1PC 101 D washer φ28 φ16 4 5T 2PCS 102 Flat washer ...

Page 15: ...ew stretching exercises as shown below Each stretch should be held for approximately 30 seconds do not force or jerk your muscles into a stretch if it hurts STOP 2 The Exercise Phase This is the stage where you put the effort in After regular use the muscles in your legs will become more flexible Work to your own pace but it is very important to maintain a steady tempo throughout The rate of work ...

Page 16: ...please ensure all connections are correct MUSCLE TONING To tone muscle while on your EXERCISE CYCLE you will need to have the resistance set quite high This will put more strain on your leg muscles and may mean you cannot train for as long as you would like If you are also trying to improve your fitness you need to alter your training program You should train as normal during the warm up and cool ...

Page 17: ...l 1 6 after 1 minute F1 is the best and F6 is the worst MODE Press to switch display form RPM to SPEED ODO to DIST WATT to CALORIES during workout Workout Selection After power up using UP or DOWN keys to select then pressing ENTER to enter the desired mode There are 7 basic workout modes Manual Pre programs Watt Program Body Fat Program Target Heart Rate program Heart Rate Control program and Use...

Page 18: ...rograms Time and Distance can not be set up at the same time Once a program has been selected pressing ENTER will make Time parameter flash Using UP OR DOWN KEY you may select desired time value Press ENTER KEY to input value Flashing prompt will move to the next parameter Continue use of UP OR DOWN KEY Press START STOP to start workout More About Workout Parameters Field Setting Range Default Val...

Page 19: ...s flash Users may exercise in any desirous of resistance level adjusting by UP DOWN keys during the workout Note If user sets up the target time to workout then the next parameter of Distance can not be adjusted One of workout parameters counts down to be zero it will have bi sounds and stop the workout automatically Press START KEY to continue the other unfinished parameter will continue counting...

Page 20: ...H R Selecting TARGET H R using UP OR DOWN KEY then pressing ENTER KEY 1St parameter Time will flash so value can be adjusted using UP OR DOWN KEY Press ENTER KEY to save value move to next parameter to be adjusted If user sets up the target time to workout then the next parameter of Distance can not be adjusted Continue through all desired parameters pressing START STOP to start workout Note If Pu...

Page 21: ... parameter User Program 4 User program allow user to set their own program that can be used immediately Setting Parameters for User Program Selecting user using UP OR DOWN KEY then pressing ENTER KEY 1St parameter Time will flash so value can be adjusted using UP OR DOWN KEY Press ENTER KEY to save value move to next parameter to be adjusted If user sets up the target time to workout then the next...

Page 22: ...21 ...

Reviews: