background image

Always “On” UPS Systems Inc. 

19 

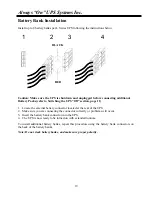
Battery Bank Installation 

 
Install up to 8 battery banks per L Series UPS following the instructions below. 


Caution: Make sure the UPS is shutdown and unplugged before connecting additional 
Battery Packs (refer to Switching the UPS “Off” section, page 11) 

 
1.  Locate the external battery connector located at the rear of the UPS. 
2.  Make sure you are connecting the connector correctly or problems will occur. 
3.  Insert the battery bank connector into the UPS. 
4.  The UPS is now ready to be turned on with extended runtime. 
 

To install additional battery banks, repeat this procedure using the battery bank connectors on 

the back of the battery banks. 


Note: Do not stack battery banks, and make sure proper polarity. 


 1               2         3                  4

BLACK 

RED 

Summary of Contents for GES-102L

Page 1: ...se Input Single Phase Output Uninterruptible Power Supply USER MANUAL Version 1 4 GES 801L GES 102L GES 152L GES 202L GES 302L Line Interactive True Sine Wave 800VA 1000VA 1500VA 2000VA 3000VA Extende...

Page 2: ...Always On UPS Systems Inc...

Page 3: ...skin and eyes It may be toxic CAUTION A battery can present a risk of electrical shock and high short circuit current The following precautions should be observed when working on or with the batterie...

Page 4: ...ING OFF THE UPS 12 SELF TEST 12 SILENCE THE ALARM 12 LOAD BAR GRAPH 12 BATTERY CHARGE BAR GRAPH 13 COLD START 13 SHUTDOWN MODE 13 AUDIBLE ALARM 13 BACK UP SLOW ALARM 13 LOW BATTERY RAPID ALARM 13 OVER...

Page 5: ...eplacement Also included with our UPS systems is a cyclic self testing function to verify both the operation of the UPS and the condition of the battery In addition the L Series UPS provides advanced...

Page 6: ...e user must exercise basic and regular maintenance Please follow the precautions below 1 Do not remove the UPS cover unless authorized by factory Removing the cover will void the warranty 2 The UPS ca...

Page 7: ...PS plugged in press the ON TEST button to turn on the UPS and power the loads ON TEST also activates the UPS s self test and utility line voltage displays 6 LINE NORMAL indicator GREEN LED This LED il...

Page 8: ...for external battery pack 13 SNMP INTERFACE PORT optional This option will allow the UPS to be connected directly to a network and also allow for remote monitoring Through the RS 232 communication por...

Page 9: ...ngers of the circuit breakers extend when tripped 17 SITE WIRING FAULT INDICATORS RED LED It illuminates when the UPS is connected to an improperly wired AC power outlet Note This device is available...

Page 10: ...e compatible with this UPS Note External battery connection is not necessary The UPS will work properly without an external battery bank connection Caution Use only factory supplied external battery c...

Page 11: ...rrent limiting feature could be rendered inoperable if improperly installed Make sure that the line from the wall is plugged into the connector marked IN and the device to be protected telephone modem...

Page 12: ...PS briefly operates the load s on battery power the Back Up LED turns on If the UPS passes the self test it returns to on line operation the Back Up LED turns off and the Line Normal LED turns on stea...

Page 13: ...apacity The UPS will scroll the front panel indicators sequentially in shutdown mode Audible Alarm Back Up Slow Alarm When in back up mode the Yellow LED illuminates and the UPS sounds an audible alar...

Page 14: ...T V3 5 or later FreeBSD Linex Novell and more Interface Kits A series of interface kits are available for various operating systems that provide UPS monitoring Each interface kit includes the special...

Page 15: ...communication port in some cases a special plug in card may be needed Open Collector Dry Contact Communication 1 Pin 5 and 2 are open collector outputs that must be pulled up to a common referenced su...

Page 16: ...cting wires and electronics will be exposed Be careful not to touch any inner components when changing the battery 6 Remove the two 2 main connecting wires the Red and Black ones from the batteries 7...

Page 17: ...power is connected yet starts after pushing power on off switch Breaker at back panel blown No AC input UPS AC detecting circuit fail Switch breaker Check AC power Call for service UPS goes into back...

Page 18: ...om the accessory slot and disconnect any cables connected to the computer interface port to avoid unnecessary drain on the battery Extended Storage During extended storage periods in environments wher...

Page 19: ...age 11 1 Locate the external battery connector located at the rear of the UPS 2 Make sure you are connecting the connector correctly or problems will occur 3 Insert the battery bank connector into the...

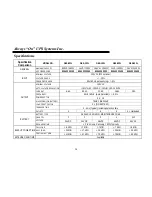
Page 20: ...N 15 for 90 109VAC 15 for 130 150VAC CURRENT 6 6A 8 33A 12 5A 16 6A 25A FREQUENCY 50Hz 60Hz Auto Detected 0 5 POWER FACTOR 0 5 1 0 WAVE FORM ON BATTERY TRUE SINE WAVE LOAD CREST FACTOR 3 1 ON BATTERY...

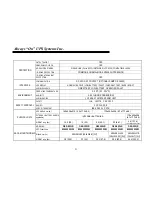
Page 21: ...NG ENVIRONMENT AUDIBLE NOISE 40 dBA AT 1 METER FROM UNIT SAFETY cUL UL1778 CSA C22 2 EMI RFI FCC CLASS B SAFETY APPROVAL SURGE TRANSIENT IEEE C62 41 CAT A UPS WxDxH mm in 140x436x210 5 5x17 2x8 3 170x...

Page 22: ...com Website www alwaysonups com QA Warranty Questions Always On UPS Systems Inc Bldg 1 150 Campion Road Kelowna BC Canada V1X 7S8 Phone 250 491 9777 Ext 209 Fax 250 491 9775 Email qa alwaysonups com W...

Reviews: