background image

  [email protected]

Model: 

NettI S

Language: 

English

 Version: 

2020-08


My-Netti.com

 25

If the head support stand does not fit 

       the bracket perfectly the bracket 

       is probably fixed too tight or unevenly.

After fitting the head support fix it   

       properly by tightening the little set  

       screw in the centre on top of the head

       support bracket using an Allen key.


If the head support seems to short in    

       height, it can be turned 180° by  

       releasing the adjustment wheel at  

       the rear of the horizontal bar (B) .

6.20 PUSH BOW

Adjustment of push bow:

• Release the red handle on the right side of 

   the push bow.

• Swing the push bow into required      

   position.

• Lock the bow in required position by    

   tightening the red handle.  

Be sure to lock the push bow properly.

Make sure the wires for brakes and  

        tilt/ recline functions never are    

        sharply bent.

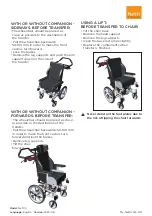
To get the push bow out of the way it  

        can be turned all the way down till 

        it touches the chair back.

• The head support bracket is fixed by   

   tightening the four screws two by two 

   diagonally so the bracket is fixed with 

   the same strength divided on the four   

   screws. 

Adjusting the head support in depth:

• Release the locking lever on top of the 

   vertical bar (A).

• Adjust the head support and fix it in 

   required position.

Adjusting the head support in height:

• Release the locking lever on the head 

   support adapter (C).

• Adjust the head support and fix it in   

   required position.

Adjusting the head support in angle:

• Release the adjustment wheel at the rear  

   of the horizontal bar (B). 

• Adjust the head support and fix it in 

   required position.

Adjusting the head support sideways:

• The head support adapter can be moved   

   both to the right and left, giving the  

   possibility to accommodate special needs  

   for head support.

• Loosen the four screws holding the

   adapter together.

• Move the adapter to the required        

   position and fix the adapter by    

   tightening the screws  diagonally.

Remember to release the levers 

       when adjusting the head support.

Summary of Contents for NETTI S

Page 1: ...S FAMILY C O M F O R T USER MANUAL NETTI S My Netti com This product conforms to 93 42 EEC for medical products UM0130UK 2020 08...

Page 2: ...SEMBLING AND ADJUSTING 15 6 1 Unpacking 15 6 2 Main wheels 15 6 3 Front fork 15 6 4 Front castors 15 6 5 Seat height at the front 16 6 6 Seat height at the rear 16 6 7 Backrest 17 6 8 Seat depth balan...

Page 3: ...9 Lifting the chair 34 8 10 Camber angle 34 9 TRANSPORT 35 9 1 Folding for transport 35 9 2 Transport in car 35 9 3 Transporting in air plane 36 9 4 Travelling on public transport 36 10 MAINTENANCE 3...

Page 4: ...justment and adaptation It is a wheelchair that is easy to adjust over time as the child grows providing an ergonomically sitting environment for the child Netti S has an adjustable seat and back angl...

Page 5: ...of metal parts and cause agony for the user 1 2 QUALITY AND DURABILITY The Netti S wheelchair is tested at T V S D Product Service GmbH in Germany following the European Standard DIN EN 12183 2014 As...

Page 6: ...s etc for a new user ANTI TIP Correctly fitted the anti tip will secure the chair from tipping backwards We strongly recommend use of the anti tips 1 5 ABOUT THIS MANUAL In order to avoid damages whil...

Page 7: ...ti tippers The test was stopped by 15 Specification min max Overall length with leg support and push bow 905 mm 905 mm Overall length without leg support pushbow folded 740 mm 740 mm Overall width 405...

Page 8: ...nt countries Illustrations may differ from the delivered product For visually impaired people manuals and catalogues can be downloaded at www My Netti com If in doubt contact your dealer 2 0 QUICK REF...

Page 9: ...9 Front fork 10 Front castor 11 Foot board lock 12 Foot board 13 Calf support 14 Height adjustment screw 15 Angle adjustment knob 16 Name plate Wheelchair on lower back cross bar 17 Arm support height...

Page 10: ...Height adjustable whole foot plate ARM SUPPORT Height adjustable and push down arm support Removable Depth adjustable arm pads HEAD SUPPORT Netti Mini height and depth adjustable with side support Re...

Page 11: ...models hip belts with or without upholstery and with plastic lock or car lock vests and harnesses See chapt 5 1 and 5 2 for mounting Abduction block Netti Mini Mounting rail for harness Height and wid...

Page 12: ...e for the arm resting on the tray Netti Nature Kit with 12 front wheel and frame to fix to Netti S allows for driving outdoors and off road WHEELS Main wheels 16 and 22 with drum brake 22 wheel kit wi...

Page 13: ...the hip belt The hip belt bracket is mounted to the seat plate by pushing the screw following the Evoflex kit through the belt bracket on the seat plate Push the hat nut through the belt in the hole g...

Page 14: ...xlocks on the bar and lock Adjust to the requested belt length The Fixlock allows for easy adjustment at any time The lower ends of the belts can be fixed like shown in chapter 5 1 4 mm Allen key for...

Page 15: ...wheels can be ordered They will be installed from factory or authorized personnel The 22 wheels have 4 degree camber angle and drum brakes The brakes are operated independent on each side 22 main whee...

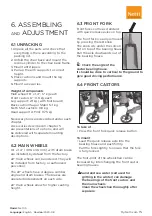
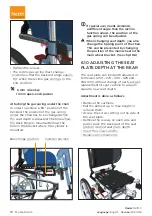
Page 16: ...rk Check the angle of the castor bearing house 6 6 SEAT HEIGHT AT THE REAR The seat height at the rear depends on Size of main wheel Position of main wheel Main wheel Unfix the screws holding the whee...

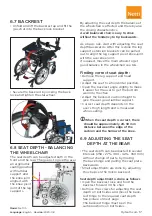
Page 17: ...d balance in the wheelchair see 6 6 Finding correct seat depth Remove the leg support and head support Adjust the seat to a horizontal position Open the backrest angle slightly to make it easier for t...

Page 18: ...eds demands a different angle than the recline function allows the position of the gas spring can be adjusted When changing seat depth you also change the tipping point of the chair This can be preven...

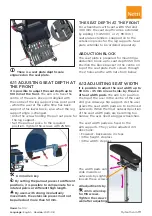
Page 19: ...the seat depth can be extended by adding 1 45 mm or 2 90 mm seat plate extenders snapped on to the extension pieces for the leg supports Seat plate extender to be ordered separately ABDUCTION BLOCK Th...

Page 20: ...ashable and thereby reusable Follow the instruction on the back of the cushion for correct maintenance and washing of the cushion 6 13 ANTI TIP Netti S is always delivered with anti tips The anti tips...

Page 21: ...est cushion so that user gets room for the bottom and the integrated lumbar support in correct position Tighten the straps so that they follow the curvature of the spine and gives a little extra suppo...

Page 22: ...ve Please note that the Dynamic System footboard is still allowing for some rota tion forward to flex when the user extends his her feet Universal leg support 6 18 LEG SUPPORTS Netti S is as a basis d...

Page 23: ...on the footboard with the feet on the middle of it ANKLE HUGGERS The footboard has holes prepared for ankle huggers or shoe shells to be mounted as accessories if required Ankle huggers are useful wh...

Page 24: ...ee Functional overview The Netti Dynamic leg supports allow con trolled Open Kinetic Chain OKC movements of the lower extremities of the user Unlike static wheelchairs the user s distal segments are s...

Page 25: ...ned all the way down till it touches the chair back The head support bracket is fixed by tightening the four screws two by two diagonally so the bracket is fixed with the same strength divided on the...

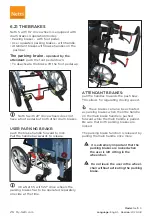
Page 26: ...he brake handle forward to lock Pull the handle backwards to release On a Netti S with 22 drive wheels the parking brakes has to be operated separately one side at the time ATTENDANT BRAKES pull the h...

Page 27: ...CYLINDER It may be required to change the cylinder for adjustments to the user weight and power Fold the chair back forward by disconnecting the chair back from the cylinder Open the nut A with a 17 m...

Page 28: ...m a recline and tilted position 7 1 TILTING THE SEATING UNIT OPERATING TILT HANDLE Press the left handle on the push bar and put pressure to the push bar to tilt the seating unit with one of your hand...

Page 29: ...muscle tone in the neck when sitting upright If the recline function is used during a transfer situation or other situations it is very important that the recline angle is adjusted back to the correct...

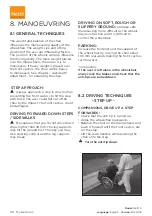
Page 30: ...G FORWARD DOWN STEPS SIDEWALKS Be cautious that you do not drive down steps higher than 30 mm The leg supports may hit the ground first Thereby you may lose steering control and the leg supports may b...

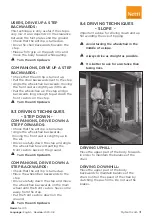
Page 31: ...heelchair backwards moving the front castors slightly up in the air Drive carefully down the step and angle the wheelchair forward putting the front castors back on the ground Turn the anti tip down C...

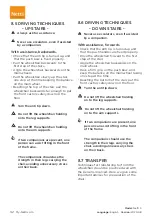
Page 32: ...their legs carrying the chair avoiding unnecessary stress on their back 8 6 DRIVING TECHNIQUES DOWN STAIRS Never use escalators even if assisted by a companion With assistance forwards Check that the...

Page 33: ...rt down on the side of the transfer WITH OR WITHOUT COMPANION FORWARDS BEFORE TRANSFER The wheelchair should be placed as close as possible to the destination of the transfer Pull the wheelchair backw...

Page 34: ...krest Always use the anti tip 8 9 LIFTING THE WHEELCHAIR The wheelchair should be lifted in the frame push bar push handles only It is marked with the above symbol where it should be lifted Never lift...

Page 35: ...20 DISR developed by Unwin Safety Systems For further information www unwin safety com FIXING THE WHEELCHAIR The angle of the belts should be ca 45 to the floor Tighten well Lock the brakes Always use...

Page 36: ...uction UN3164 the IATA DGR special regulation A114 rules that the goods that contain gas and are determined to function as shock absorbers including energy absorbing devices or pneumatic springs are N...

Page 37: ...ings Alu Rehab recommends use of ordinary bicycle oil You can order original paint from Alu Rehab to repair scratches and minor damages to the paint Please contact your dealer to order 10 3 LONG TIME...

Page 38: ...djust the angle of the bearing house Heavy weight over the front castors Adjust the point of balance 6 4 6 4 8 8 The front castors are wobbling Too much weight over the front castors Adjust the point...

Page 39: ...l be considered null and void This warranty is only valid when the user use maintain and handle the wheelchair as described in the user manual 12 3 CLAIM If a product has developed a fault during the...

Page 40: ...s By these combinations the CE mark and warrantees are valid For further information please contact your dealer or Alu Rehab A S Norway directly PRODUCT RESPONSIBILITY Netti S with different configura...

Page 41: ...red from front of seat plate to backrest hinge without cushion When mounting seat depth extenders to Netti S with seat width 350 mm the seat depth can be extended to 395 and 440 mm When using Netti Sm...

Page 42: ...ly check Leg support position the height of the foot plate shall allow the thigh to stay on the seat cushion Calf supports may need height adjustment Adjustments are described in chapter 6 18 Seat dep...

Page 43: ...hair shall fit the user at the time of receiving the wheelchair This gives the user the best support and safety from day 1 However since children are quickly developing and growing we have prepared fo...

Page 44: ...tti no Alu Rehab ApS Kl fteh j 8 DK 8680 Ry Tel 45 87 88 73 00 Fax 45 87 88 73 19 info My Netti com This product conforms to 93 42 EEC for medical products UM0130 UK 2020 08 IN DIALOGUE WE CREATE SIMP...

Reviews: