2
Powering the Headphones
The AHP612 headphones can be powered by three rechargeable
AAA Nickel Metal Hydride (Ni-MH) batteries (supplied, (R)) or any
other NiCd or alkaline batteries.
Inserting the Batteries
1. Remove the left ear-cushion.
2. Insert batteries following polarity (“+” and “–”) as diagrammed
inside the battery compartment.
Charging batteries
• Make sure that the headphones’ “ON/OFF/SCAN” button (C) is
turned off and the LINK indicator light is unlit.
• Place the headphones on the transmitter, ensuring that the charging
contacts (E) on the left ear cup sit securely on the charging contacts
on the transmitter base. The CHARGE indicator light (I) on the
transmitter will turn on when the headphones are seated properly.
Charging Schedule:
Use: Charge Time: Average 10–12 hours
Play Time: 6–8 hours*
*Play time as shown above reflects use of batteries in good condition.
Warnings:
• The AHP612 headphones can also be powered by three AAA alkaline
batteries (not included). You may experience slightly longer play
time with alkaline batteries, but you will not be able to recharge
them, as you can with the supplied NiMH or NiCd rechargeable
batteries.
• The AHP612 built-in charger will charge rechargeable NiMH
(supplied, (R)) or NiCd batteries only. DO NOT attempt to charge
any other batteries except those specified above.
• The included NiMH batteries can be charged at any time, without
any adverse memory effect, whereas NiCd batteries must be fully
discharged before they can be recharged in order to avoid a
reduction in performance. For this reason we recommend continued
use of the supplied NiMH.
• Over time, with repeated use, even Ni-MH batteries will eventually
wear out. If, after a full charge, you notice a) dramatically decreased
playing time, b) the power indicator light begins to dim quickly
and/or c) static interference occurs within a short time of turning
the headphones on, it may be time to replace the batteries.
Notes:
• The charger will not overcharge the batteries if left to charge longer
than shown above. However, if you do not intend to use the
headphones for an extended period of time, it is recommended that
you unplug the transmitter from the AC power outlet.
• Battery life depends on frequency of use, time, and care.
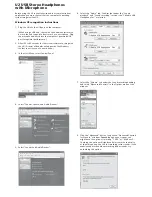
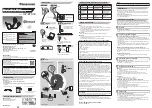
Adjusting the Transmitter
Transmitter Front View:
Transmitter Back View:
• Turn ON your audio source (i.e., A/V receiver, TV, portable CD player,
etc.) and play music at a normal listening volume.
• Set the channel select switch (K) on the back of the transmitter to
1, 2 or 3. The transmitter provides three different broadcasting
frequencies. In the event that you experience poor reception or
interference, try choosing a different frequency by moving the
channel select switch to another position.
• Turn the input level control (L) down (all the way to the left —
your left when looking at the front of the transmitter).
• Check the audio level indicator light (J) on the front of the
transmitter. If the light flickers intermittently (about half the time),
proceed to the next section. If the light does not blink or is flickering
very rapidly, turn the input level control (L) slowly up (to the right —
your right when looking at the front of the transmitter) until the
light flickers intermittently.
Note: if the light does not flicker, please check the following:
• Confirm that the transmitter AC power adapter (O) is securely
connected.
• Confirm that the audio input cable coming out of the transmitter
is securely connected to the audio source output (TV, A/V receiver,
etc.).
• Turn the input level control (L) slowly up (to the right — your right
when looking at the front of the transmitter) and check if the
transmitter is connected to a variable audio output, such as a
headphone jack or TV audio output. Adjust the volume on the audio
source up or down as necessary to make the audio level indicator
light (J) flickers intermittently. If you are unclear as to the kind of
output (variable or fixed) you are using, please see the section
entitled MORE HELPFUL INFORMATION.
(I) Charge indicator light
(J) Audio level indicator light
CHANNEL
1 2 3
LEVEL
L INPUT R
DC 12V
CHANNEL
1 2 3
LEVEL
L INPUT R
DC 12V
CHANNEL
1 2 3
LEVEL
L INPUT R
DC 12V
(K) Channel select switch
(L) Input level control
(M) RCA audio input jacks
(N) Transmitter power input jack
Summary of Contents for AHP 612
Page 1: ...User s guide Guía del usuario Mode d emploi AHP612 ...
Page 2: ...2 ...