background image

78

-EN

Setup Before Using

Bluetooth is a wireless technology allowing communication between a 
mobile device or personal computer over short distances. This enables a 
hands-free call or data transmission between Bluetooth compatible 
devices. Bluetooth transmission is available in the unlicensed 2.4 GHz 
spectrum if the distance between devices is within 10 meters. For details, 
refer to the Bluetooth website (http://www.bluetooth.com/).

• Depending on the Bluetooth version, a Bluetooth compatible device 

may not be able to communicate with this unit.

• Proper function of this unit with all Bluetooth compatible devices is not 

guaranteed. For handling of the Bluetooth compatible device, consult 
your Alpine dealer or Alpine website.

• Depending on the surroundings, Bluetooth wireless connection may be 

unstable.

• When you place a call, or perform setup operations, be sure to stop your 

car in a safe place.

• Depending on the connected Bluetooth compatible device(s), the 

function may differ. Also refer to the Owner’s Manual of the connected 
device(s).

Hands-free calls are possible when using a HFP (Hands-Free Profile) 
compatible mobile phone with this unit.

• Avoid performing a hands-free call in heavy traffic or on narrow or 

winding streets.

• Close the windows while calling to reduce background noise.
• If both calling parties are using hands-free devices, or the call is made in 

a noisy location, difficulty hearing the other person’s voice is normal. 

• Depending on telephone line conditions or certain mobile devices used, 

voices may sound unnatural.

• When using a microphone, speak as directly as you can into the 

microphone to obtain the best sound quality.

• Certain mobile phone features are dependent on the capabilities and 

settings of your service provider’s network. Additionally, certain features 
may not be activated by your service provider, and/or the provider’s 
network settings may limit the feature’s functionality.
Always contact your service provider about feature availability and 
functionality.
All features, functionality, and other product specifications, as well as 
the information contained in the Owner’s Manual are based upon the 
latest available information and are believed to be accurate at the time 
of printing.
Alpine reserves the right to change or modify any information or 
specifications without notice or obligation.

Before using the hands-free phone/audio function, the following 
settings need to be made.

1

Set “Bluetooth” to “On” (

).

2

Register a Bluetooth device in this unit (page 29).

• See “Bluetooth Setup” (page 29).
• You can search for this unit using a Bluetooth compatible device, and 

then connect that Bluetooth compatible device to this unit. The device 
name of this unit is “ALPINE NAVI” and the initial number of the 
passcode is “0000.” Also refer to the Owner’s Manual of the connected 
device(s).

• Before using the hands-free function, make sure “Setting the Hands-free 

Connection” (page 47) is set to “Aftermarket” or “Factory.”

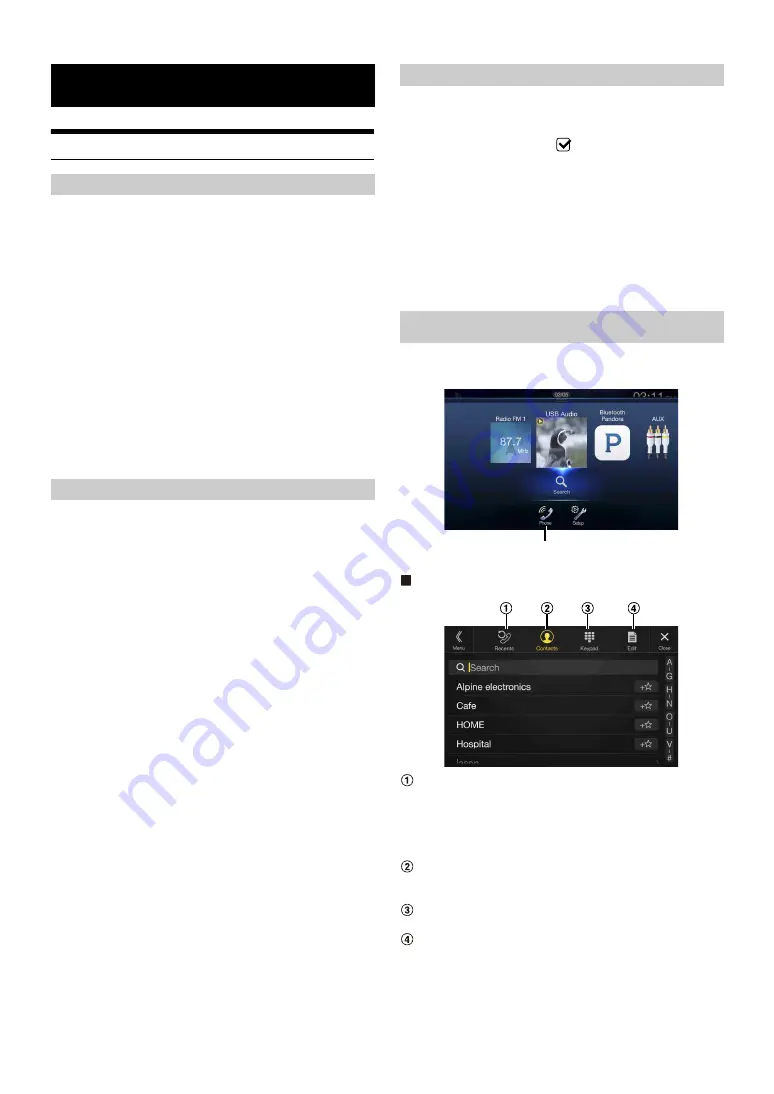
Touch 

[Phone]

 in the Menu screen to display the Phone menu screen 

(page 78).

Phone menu screen example

Recent Events list*
You can display up to 60 items, such as phone numbers of the 
most recent incoming calls, missed calls and outgoing calls, and 
contact names that are registered in the Phone Book. When 60 
items exist in the list, the oldest item is deleted when a newer 
item is to be added.
Contacts list*
You can make a phone call from the Phone Book, or edit the 
Phone book.
Keypad screen
Use to type a phone number.
Edit*
Use to edit the Contacts list.

*

When you connect two Hands-Free Phones, the information of the 
Bluetooth device set to Primary is displayed.

Bluetooth Operation

About Bluetooth

About the Hands-free Phone

Before Using Bluetooth

Hands-free Phone Control

[Phone] button

Summary of Contents for X109D

Page 1: ...pdates if applicable special promotions news about Alpine and entered for a chance to win prizes Merci d avoir acheté ce produit Alpine Nous vous invitons à consacrer un moment à la protection de votre achat en enregistrant votre produit dès maintenant à l adresse suivante www alpine usa com registration Vous serez tenu informé des mises à jour des produits et des logiciels le cas échéant des prom...

Page 2: ......

Page 3: ...ers and Numbers Keypad 22 Favorite Function Using the Favorite Function 23 Editing the Favorite Screen 23 Registering Items 23 Changing Item Names 24 Changing Icons only the Shortcut Dialing and Navigation icons 24 Changing the Layout 25 Deleting Items 25 Applying Alpine TuneIt App Adjusting the sound via the Smartphone 26 Facebook Notification Function 26 Setup Setup Operation 28 Wireless Bluetoo...

Page 4: ...em 44 HDMI Setup 44 Setting the Bluetooth Pandora 44 System Setup Camera Setup 45 Setting the Camera Input 45 Setting the Camera Signal Input 45 Switching Video Patterns for Multi View Camera 45 Adjusting the Rear Front Side Camera Guide 45 Camera Interrupt Setting Power OFF Mode Rear Camera Only 46 Setting Multi Camera to On Off 47 Factory System Setup 47 Setting the Source Category 47 Setting th...

Page 5: ...ion 67 Using Jump Memory and Jump Recall function 67 HDMI Device About HDMI selector Optional 68 DVD Player Operation Inserting Ejecting a Disc 68 Inserting the Disc 68 Removing the Disc 68 DVD Player SETUP 68 System Setup 69 DVD Contents Setup 69 CD Contents Setup 70 Audio Setup 70 CD MP3 WMA AAC WAV Playback 71 Stopping Playback 71 Repeat Play 71 MIX Random Play 72 File Folder Name Search Concer...

Page 6: ...Rear Camera Image from the Menu screen 89 Displaying the rear view video while the car is in reverse 89 Switching the Image Pattern for the Rear Camera 89 Guide Display ON OFF Setting 89 Adjusting the Caution Display Location 90 About the Rear Camera Guide 90 Front Camera Operation 91 Displaying the Front Camera image from the Menu screen 91 Switching the Image Pattern for the Front Camera 91 Abou...

Page 7: ...anner and location before attempting operation Make certain that the volume level of the navigation system is set to a level which still allows you to hear outside traffic and emergency vehicles If there is anything in the manual about the operation of the navigation system which you are uncertain about please contact your local Alpine authorized navigation dealer or Alpine at 1 888 NAV HELP 1 888...

Page 8: ...REPLACING FUSES Failure to do so may result in fire or electric shock DO NOT BLOCK VENTS OR RADIATOR PANELS Doing so may cause heat to build up inside and may result in fire USE THIS PRODUCT FOR MOBILE 12V APPLICATIONS Use for other than its designed application may result in fire electric shock or other injury MAKE THE CORRECT CONNECTIONS Failure to make the proper connections may result in fire ...

Page 9: ...oid installing the unit in locations with high incidence of moisture or dust Moisture or dust that penetrates into this unit may result in product failure NOTICE Product Cleaning Use a soft dry cloth for periodic cleaning of the product For more severe stains please dampen the cloth with water only Anything else has the chance of dissolving the paint or damaging the plastic Temperature Be sure the...

Page 10: ...ndora is currently available in the U S Australia and New Zealand HD Radio Technology manufactured under license from iBiquity Digital Corporation U S and Foreign Patents HD Radio and the HD HD Radio and Arc logos are proprietary trademarks of iBiquity Digital Corp Sirius XM and all related marks and logos are trademarks of Sirius XM Radio Inc All rights reserved BlackBerry RIM Research In Motion ...

Page 11: ...ite Function page 23 Favorite screen example Frequently used functions and useful functions can be customized for your convenience You can register up to 54 functions You cannot register a function more than once About Swiping the Touch Screen You can change a screen or a page by swiping the touch screen vertically or horizontally with your finger For details see Touch Screen Operation page 16 Swi...

Page 12: ...age 16 1 The Search mode differs depending on the audio source For details see the operating instructions of the audio source 2 The screen also switches by pressing the Menu button Shortcut Setup Screen page 18 Preset button or Quick Search mode Screen 1 You can set the Sound Setup or Rear Seat Entertainment System Audio Sources Screen USB Audio Dual Screen page 13 You can switch between the displ...

Page 13: ...em OM in the website at http www alpine usa com You can switch the left right positions of the Audio Visual screen and Navigation screen Each time you touch the positions of Audio Visual screen and Navigation screen switch When is not displayed touch Dual Screen Display Position Audio full Screen Touch or swipe to the left Touch or swipe to the right Touch or swipe to the left Touch or swipe to th...

Page 14: ... your vehicle in a safe location and apply the parking brake before attempting these operations 1 Turn the ignition key to the ACC or ON position The system turns on When turned on the system displays the last screen that was displayed before the ignition key was turned off For example if the unit is in radio mode when ignition is turned off it will remain in radio mode when ignition is turned bac...

Page 15: ...udio back to its previous level Inserting Ejecting a Disc 1 Press c Eject The monitor is opened 2 Insert the disc with the label side facing up Insert the disc until it is automatically pulled into the unit 1 Press c Eject The monitor will open Then the disc is ejected When the disc has been ejected part way take it out 2 Press c Eject Do not apply shock to the monitor when it is open as it may re...

Page 16: ...D 1 3 Pandora 1 Bluetooth Pandora 1 4 SiriusXM 1 or Factory SiriusXM 2 AUX 3 5 Bluetooth Audio 1 or Factory Bluetooth Audio 2 Radio 1 When no USB flash drive iPod HDMI device Smartphone Bluetooth compatible device SiriusXM Tuner is connected this option is not available 2 Not displayed when your car does not support the source or Setting the Source Category page 47 is set to Aftermarket 3 The name...

Page 17: ...cted item Switches to the menu screen or the previous screen Item select button Closes the window Displays the next list page When the next selection item does not exist the list item is not displayed Lists items for selection When there are more than five list items the page can be changed by swiping vertically Returns to the list screen of the page that you touched The list screens that can be d...

Page 18: ...nnected phone the incoming call screen is displayed Tone Adjustment mode BASS ENGINE SQ mode Button for changing the BASS ENGINE SQ mode screen Balance Fader Image area 1 To reset to the initial settings touch Rear Seat Entertainment Function screen switch button When Setting the Rear Seat Entertainment is Off you cannot change the screen For details on Rear Seat Entertainment setting see Rear Sea...

Page 19: ...Rear monitor Front The image and sound of the same visual source as the unit are output Off Stops output to the Rear monitor Illumination Color button 3 The color coordination select button of the Rear monitor White Blue Green Amber Red Purple Skyblue Off This function is depended on Over Head Monitor Plasmacluster air volume adjustment button 4 Whenever you touch the button you can change the air...

Page 20: ... this unit page 27 When there is no Notification No Notifications will be displayed Camera button 2 Displays camera images page 89 Setup button Displays the Setup screen page 28 Vehicle Info button 3 Displays the iDataLink Info mode screen page 93 Phone button 4 Displays the Phone menu screen page 78 1 Displayed when Alpine TuneIt App is set to USB iPhone or Bluetooth Android and when a smartphone...

Page 21: ...e opening screen This setting requires the following image format folder name and file name Usable file format BMP image Image size 800 480 pixels number of color bit 24 8 4 1 bit Compression format non compressed Folder name 1 OPENINGFILE File name 2 openingfile bmp 1 Connect the USB flash drive to the USB extension cable A message confirming the opening screen change is displayed 2 Touch OK An u...

Page 22: ...een area Cursor position alteration switch Cancel Keypad mode finishes Delete Returns to the previous character and erases it Touching here for more than 2 seconds will erase all input characters Input number is confirmed Character keypad Space Special character selector switch The Alphanumeric Special characters Symbols selection popup is displayed Touch the desired character type ...

Page 23: ...s displayed touch Call For details see Calling by Favorite Function page 80 Editing the Favorite Screen 1 Touch Edit A checkbox is displayed on the upper left area of the registration icon and it changes to Edit mode Setting item Item registration Item name change Icon change Layout change Item deletion 2 After editing is complete touch Back 3 After the caption for the confirmation is displayed to...

Page 24: ...ries Displays the selected Place Categories list For details of navigation operations refer to Navigation System OM in the website at http www alpine usa com Phone Shortcut Dialing 5 You can register the user s shortcut dialing stored in the Phone Book If multiple phone numbers are stored select a number you want to register You can register directly by touching of the Contacts list page 78 You ca...

Page 25: ...d move to another drag to the end of the screen and lift your finger after the page changes When deleting a selected item 1 Touch the checkbox at the left of the item you want to delete and place a check in it 2 Touch Delete The selected item will be deleted When deleting all items Touch Delete All All items are deleted Changing the Layout Deleting Items ...

Page 26: ...This function may not be available depending on the paired Smartphone Please obey all local traffic laws while using this function When Setting the External Audio Processor page 48 is On this function is not available Facebook Notification Function Some functions may be available in a future version of Alpine TuneIt App Depending on the paired Smartphone the following functions may not be availabl...

Page 27: ... such as the unit is powered off or during a call etc Notification of the Smartphone will not be prompted by this unit Facebook screen is not displayed while driving Displaying Notification List You can view the received Notification from Facebook in the connected Smartphone via this unit Notification List screen example Poster s Name and Message Messages are not displayed while driving Touch Read...

Page 28: ...must be parked with the ignition key in the ACC or ON position To do this follow the procedures below 1 Bring your vehicle to a complete stop at a safe location Engage the parking brake 2 Release the parking brake For safety release the parking brake while depressing the foot brake pedal 3 Engage the parking brake again For automatic transmission vehicles place the transmission lever in the Park p...

Page 29: ...gistered Bluetooth device whenever this unit is turned ON See Registering the Bluetooth Device if no device is registered Make sure the Bluetooth setting is On See Bluetooth Setup page 29 You can display the Bluetooth device name and device address of this unit Setting item Bluetooth Information The Bluetooth device is used when a connectable Bluetooth compatible device is searched and connected f...

Page 30: ...OK Touching Cancel will cancel the setting Make sure the Bluetooth setting is On See Bluetooth Setup page 29 When you connect two Hands Free Phones set the priority of the operation and the setting of incoming outgoing calls Setting item Hands free Device Priority Setting contents Primary Secondary Touch the checkbox for Primary Secondary of the device names that are registered to the unit to set ...

Page 31: ...ound Setup Function page 18 2 You can also make the setting in the Bal Fad screen For details on how to adjust see Setting the Balance Fader Rear Speaker Subwoofer page 32 3 This setting is only available when Subwoofer is set to On Changing the Character Code of the Phone Book Latin 1 ISO 8859 1 Latin 9 ISO 8859 15 Russian ISO 8859 5 Chinese GB18030 Thai CP874 Arabic CP1256 UTF 8 UTF 16LE UTF 16B...

Page 32: ...al Fad screen is displayed 2 When the Sound Setup of the Shortcut Setup is selected to BASS ENGINE SQ you cannot perform the set up Fad Bal screen Enables you to change to each setting screen Balance Fader Image area Setting the Balance Fader Touch the desired point within the image area Or touch Balance L15 to R15 Fader F15 to R15 To reset to the initial setting touch Center Rear Speaker Setting ...

Page 33: ...espond to Compressed Media Factory Media USB iPod Factory SiriusXM Factory Bluetooth Audio correspond to Factory Audio 10 typical equalizer settings are preset at the factory for a variety of musical source material Setting item EQ Presets Setting contents FLAT POP ROCK NEWS JAZZ ELECTRONIC HIP HOP EASY LISTENING COUNTRY CLASSICAL Only one type can be set to ON When Equalizer Presets is set the li...

Page 34: ... 36 Setting item X Over When the Sound Setup of the Shortcut Setup is selected to BASS ENGINE SQ you cannot perform the set up 1 Touch Channel to select the channel Each time you touch the channel switches The channel being adjusted is displayed in red 2 Adjust the crossover to your preference Selecting the Cut Off Frequency Touch or of Frequency and then select the cut off frequency Setting conte...

Page 35: ...urned Off This disables any settings made for these functions Setting item Defeat Setting contents Off On Setting item Source Volume Setup Radio SiriusXM Compressed Media 1 iPod Music iPod Video or AUX 2 3 DVD 3 Bluetooth Audio Factory Audio 4 Setting contents 14 to 14 1 Compressed Media is the music data in a USB flash drive MP3 WMA AAC FLAC 2 The item selected in AUX Source Select iPod Video or ...

Page 36: ... filter Cuts the higher frequencies and allows the lower frequencies to pass Slope The level change in dB for a frequency change of one octave The higher the slope value the steeper the slope becomes Adjust the slope to FLAT to bypass the HP or LP filters Do not use a tweeter without the HPF on or set to a low frequency as it may cause damage to the speaker due to the low frequency content Adjustm...

Page 37: ...ver s seat etc and measure the distance in meters between your head and the various speakers 2 Calculate the difference between the distance correction value to the farthest speaker and the other speakers L distance to farthest speaker distance to other speakers These values are the time correction values for the different speakers Setting these values to make each sound reach the listening positi...

Page 38: ...he display shows MIN or MAX respectively Setting item Tint Setting content R15 to G15 Initial setting 0 Adjust the Color from R15 to G15 Setting item Contrast Setting content 15 to 15 Initial setting 0 You can adjust the contrast between MIN 15 and MAX 15 When it reaches the minimum or maximum point the display shows LOW or HIGH respectively Setting item Sharpness Setting content 5 to 5 Initial se...

Page 39: ...backlight This function could be used for instance to change the screen brightness while traveling at night Setting item Screen Dimmer Level Setting content 15 to 15 Initial setting 0 You can adjust the level between MIN 15 and MAX 15 When it reaches the minimum or maximum point the display shows MIN or MAX respectively This setting is only available when Dimmer is set to On or Auto You can choose...

Page 40: ...SB flash drive etc from the system before operation Setting item Clear All Settings 1 Touch Reset of Clear All Settings 2 After the confirmation message appears touch OK The confirmation screen appears again 3 Touch OK The system starts initialization Do not turn on off the power change the ignition key position or remove the screen panel until system restart is completed This unit has a Demonstra...

Page 41: ...tting Setting contents Normal Initial setting HiFi Stable Noise may be more noticeable when HiFi is set depending on the reception status In this case the Normal setting is recommended During manual tuning you can select the frequency step for FM analog radio station searching Setting item FM Frequency Step Setting contents 200kHz Initial setting 100kHz SiriusXM Setup SiriusXM is selected on the S...

Page 42: ...ext of the Team name Total registrations and Remaining number of registration slots is displayed for two seconds then the team is registered as a Favorite Team When you set a team that is registered as an Alert to released scrolling text for confirmation is displayed Touch OK to cancel the registration The maximum number of registered Teams Artists and Songs is 50 For details on how to register an...

Page 43: ...dicator This menu item displays the SiriusXM signal strength as Strong Good Weak or No Signal If the Signal Indicator reports Weak or No Signal and your vehicle is parked outside with no obstructions to the southern sky then your SiriusXM antenna may not be properly installed or may have become damaged AUX Setup AUX is selected on the Source Setup Menu screen in step 1 See Source Setup page 41 You...

Page 44: ...a Select the setting item is different For details see Setting Multi Camera to On Off page 47 2 When Camera Select is set to Off you cannot select this item 3 You can select this item only when Camera Select is Front or Rear 4 You can select this item only when Camera Select is Rear 5 Set this setting after closing the Alpine TuneIt App 1 Select the desired item 2 To switch the setting touch or ma...

Page 45: ... Rear Front Camera only the camera guide will not be displayed When you connect a Multi View compatible camera select a Video Pattern to make a guide adjustment To adjust the guide position of the Rear Camera touch Hitch Guide On or Hitch Guide Off to display hide the Hitch Guide You can adjust the Hitch Guide to mark the position of the junction between your vehicle and your trailer When you conn...

Page 46: ...ra 1 Touch Link The 2 vertical guides of the currently selected guide link together allowing them to be adjusted simultaneously Turning Guide Display On Off Rear Front Camera only Turning the selected guide off 1 Touch On Off The currently selected guide will turn off 2 To turn the guide on touch On Off again Guides that are turned off are still adjustable Returning Guides to Default 1 Touch Defau...

Page 47: ...u cannot set the source that is currently being played Select to pair the Bluetooth compatible phone with this unit or the connected iDataLink module Setting item Hands free Connection Setting contents Factory Aftermarket Initial setting When Factory is selected the screen changes to the Phone menu screen of the iDataLink module Press and hold the Favorite button for at least 2 seconds or touch th...

Page 48: ...the Rear monitor to Navi When set to Rear monitor you cannot operate them from this unit Make sure the Rear Seat Entertainment is set to On See Rear Seat Entertainment Setup page 48 For remote control operation the remote sensor of the external device Rear monitor etc can be switched as you prefer Setting item Remote Sensor Setting contents Front Initial setting Rear You can also control this sett...

Page 49: ...lected on the System Setup Menu screen in step 1 See System Setup page 44 Set Alpine TuneIt App to USB iPhone when an iPhone is connected or set to Bluetooth Android when an Android Smartphone is paired Setting item Alpine TuneIt App Setting contents Off USB iPhone Initial setting Bluetooth Android Set this setting after closing the Alpine TuneIt App For this function to work properly specific app...

Page 50: ... HD Radio broadcasting signal in the current area after 10 seconds this unit will switch to receive the RBDS Radio signal automatically However the display is still HD Radio Technology mode screen HD Radio main screen example Function mode HD Radio Indicator 1 Band display Displays the band of the signal currently being received Multicast Indicator 2 Lights during multicast reception Info area RBD...

Page 51: ... least 2 seconds The selected station is stored 3 Repeat the procedure to store up to 11 other stations onto the same band To use this procedure for other bands simply select the desired band and repeat the procedure A total of 36 stations can be stored in the preset memory 12 stations for each band FM1 FM2 or AM For details on switching to the Preset mode screen see in HD Radio main screen exampl...

Page 52: ... only You can select and receive the currently receivable stations in the Program Type list screen Program Type list screen example For details on switching to the Program Type list screen see in Preset mode screen example page 50 Select the desired program type in the Program Type list screen Program Type Seek starts and the receivable program type is received If no Program Type station is found ...

Page 53: ...ogy enables local radio stations to broadcast a clean digital signal AM sounds like today s FM and FM sounds like a CD Program Service Data Contributes to the superior user experience of HD Radio Technology Presents song name artist station IDs HD2 HD3 Channel Guide and other relevant data streams Adjacent to traditional main stations are extra local FM channels These HD2 HD3 Channels provide new ...

Page 54: ...urrent or previous track file Touch Fast reverse Touch and hold Advancing to the beginning of the next track file Touch Fast forward Touch and hold The buttons provide the same functions above 3 To pause playback touch Touching again will resume playback During playback the indicator is displayed in Audio main screen During a pause the indicator is displayed in the Audio main screen The playback t...

Page 55: ... played When you select a Folder name repeat the same procedure to select another Folder name or File name 2 When you touch the by a Folder name the unit plays from the first song in the Folder For details on switching to the Full Search mode see in Quick Search mode screen example page 54 To switch the displayed list or return to the previous page in the Full Search mode see About Basic Operation...

Page 56: ...ration Ver 5 1 1 iPod nano 5th generation Ver 1 0 2 iPod classic 160 GB Late 2009 Ver 2 0 4 iPod touch 2nd generation Ver 4 2 1 iPod nano 4th generation Ver 1 0 4 iPod classic 120 GB Ver 2 0 1 iPod touch 1st generation Ver 3 1 3 iPod nano 3rd generation Ver 1 1 3 iPod classic 80 GB 160 GB Ver 1 1 2 The following devices have been tested and shown to work with this unit Correct function of earlier ...

Page 57: ...use playback touch If a song is playing on the iPod iPhone before it is connected to the unit it will continue playing when it is connected An episode may have several chapters The chapter can be changed by touching or If the artist album or song name created in iTunes has too many characters songs may not be played back when connected to the unit Therefore a maximum of 64 characters is recommende...

Page 58: ...Searching for a Desired Video File You can select a movie music video etc from the list screen Video search mode depends on the iPod iPhone If the specification of the iPod iPhone is changed the search mode on this unit will also be changed Examples for the video search mode Video Playlists Movies Music Videos etc For example Searching by Movie The following example explains how a Movie search is ...

Page 59: ...a normal picture wider to fit in a wide screen monitor by evenly stretching out the picture horizontally Cinema mode In Cinema mode the monitor displays a normal picture by stretching out the picture horizontally and vertically This mode is good for displaying a cinema type picture at the 16 9 ratio Normal mode In Normal mode the monitor displays a normal picture at the center of the screen with a...

Page 60: ...nction mode Track Artist bookmark icon Shuffle indicator Station name Artist Name Song Name Album Name Playing time Artwork display Listening to Pandora 1 Launch Pandora on the smartphone 2 Press the AUDIO button to select Pandora or Bluetooth Pandora mode The display shows the Pandora mode screen You can select and change the source in the Menu screen page 20 or Favorites screen page 23 3 To paus...

Page 61: ...rtist a personalized Pandora station can be created The new station will play more music like it Free word 1 During playback touch New Station The Key Pad screen is displayed You can enter a keyword and search for Artist Song 2 Enter a keyword and touch OK 3 Touch the desired list The new station is automatically applied For details of how to input characters from the keypad refer to How to Input ...

Page 62: ...ct Bluetooth connection will start 1 Touch Settings The Device Setting select pop up screen is displayed 2 Touch Disconnect The Bluetooth connection is disconnected If multiple Bluetooth devices are registered in this device you can change the connection among the registered devices 1 Touch Settings 2 Touch Change 3 Touch Audio or Hands free of the selected device The connection will transfer to t...

Page 63: ...ng Channel Name Category Name Song Info Mode Artist Name Song Name Album Name Album Art The image that corresponds with the channel currently being received is displayed You can change the artwork position For details see Switching the Artwork Position page 39 Preset mode button Touch or swipe to the right when you use the Preset mode screen In Station Info Mode the Channel logo currently being re...

Page 64: ...y 3 Select the desired channel If no operation is performed for 10 seconds the category browsing mode is canceled Changing the Display Text information such as the channel name artist name feature and song program title is available with SiriusXM or channel The unit can display this text information as explained below Touch Info Each time you touch this button the Station Info mode and the Song In...

Page 65: ...n SiriusXM Tuner SXV200 is connected or later is connected When Tuner SXV200 is connected this function is available only for Preset channels 1 6 When Tuner SXV300 is connected this function is available for all Preset channels If no operation is performed during the scanning process when scanning finishes the next mode depends on the SiriusXM Tuner During Tune Scan mode the artist and song name w...

Page 66: ...rtist song is not available to be stored Artist Song Saved is displayed if this Artist Song was previously stored If there is no memory space Alert Memory Full is displayed and then you are asked whether you want to replace a stored item If you select OK then the list of stored alert items is displayed Touch the item that you want to replace Receiving and Tuning to an Alert Whenever a stored sport...

Page 67: ...42 The initial number is 0000 If you input a wrong passcode Incorrect Pass Code entered is displayed After entering the correct passcode you can access all locked channels without entering the passcode again until the unit is powered off and then back on Using Jump Memory and Jump Recall function The Jump Channel is a special channel that you can jump to with the press of a dedicated button and th...

Page 68: ...il it is automatically pulled into the unit Do not touch the surface of the disc directly with your fingers Before inserting or removing the disc always turn the ignition key to ACC or ON You cannot remove or insert the disc with the ignition key turned to OFF 1 Press Eject button When the disc has been ejected part way take it out If the disc cannot be ejected by pressing Eject press and hold Eje...

Page 69: ...mage and audio may be distorted Returning to the Initial Setting You can return the contents you previously set to the initial factory settings Setting item Setup Initialize Setting contents Yes No Initial setting Setting the language The audio language subtitle language and menu language can be set according to your preferences Once set this becomes the default language This function is convenien...

Page 70: ...k Audio Setup Bitstream Select Bitstream when you want to connect a digital audio processor to play Dolby Digital or DTS audio When Bitstream is selected the HDMI audio will be muted The X109D optical output must be used for the external processor LPCM The audio signal recorded on the disc is converted to 48 kHz 16 bit for DVDs or 44 1 kHz for video CDs and CDs linear PCM audio signals for output ...

Page 71: ... be played back on this unit If a disc contains both audio data and MP3 WMA AAC WAV data this unit plays back only the audio data The track display for CD audio data playback shows the track numbers recorded on the disc If an MP3 WMA AAC WAV disc with many files and folders is played it may take longer than normal to start playback The playback time may not be correctly displayed when a VBR Variab...

Page 72: ...ter When selecting Folder select File following same procedure then touch Enter When there are 9 or more names on the list a page number is displayed Touch or to change the page Touch or to change the list select panel location from right to left or vice versa To return to the previous hierarchy touch Selecting Folders Concerning MP3 WMA AAC WAV Touch Folder Down or Folder Up to select the folder ...

Page 73: ...dio can be heard while driving DVD Commercial Video discs used for the distribution of movies etc or a DVD R DVD RW DVD R DVD RW recorded in a video mode can be used Video CD discs can be used WARNING It is dangerous for the driver to watch the DVD while driving the vehicle The driver may be distracted from looking ahead and an accident could occur Install the unit correctly so that the driver can...

Page 74: ... numeric keypad input mode screen appears 2 Touch a desired number Touch to delete an entered number To delete all the numbers you have entered touch for at least 2 seconds 3 Touch Enter on the numeric keypad input mode screen to confirm your selection Touch to hide the keypad display You cannot operate them while driving When a DVD contains two or more titles the top menu screen appears Touch Top...

Page 75: ...re advances by one frame each time the button is touched 2 Touch to return to normal mode No sound is output during forward frame by frame playback You can only execute reverse frame by frame playback when playing DVD V Repeat Playback Use this function to play the disc s titles chapters or tracks etc repeatedly Touch to repeatedly play back The repeat mode switches every time the button is touche...

Page 76: ...n the disc every time the button is touched The alternate track selected becomes the default setting every time the power is turned on or the disc is replaced If the disc does not include that track the disc s default language is selected instead Not all discs will allow changing the alternate audio tracks during playback In these cases select audio tracks from the DVDs menu There may be a delay b...

Page 77: ...age 59 You cannot operate them while driving Switching the source when two HDMI devices are connected You can switch the source only when you have connected the HDMI selector and Setting the HDMI Selector On Off page 49 is set to On Screen example when the HDMI Setup is HDMI 1 Touch HDMI 2 The HDMI source changes to HDMI 2 and the Function button changes to HDMI 1 Each time you touch HDMI 1 or HDM...

Page 78: ...rk Additionally certain features may not be activated by your service provider and or the provider s network settings may limit the feature s functionality Always contact your service provider about feature availability and functionality All features functionality and other product specifications as well as the information contained in the Owner s Manual are based upon the latest available informa...

Page 79: ...splay it again Touch or swipe downward on on the upper part of the screen During an incoming call or a conversation on the Primary Secondary Hands Free Phone if there is an incoming call on the Secondary Primary Hands Free Phone you cannot answer the call on the Secondary Primary Hands Free Phone without first ending the call on the Primary Secondary Hands Free Phone Hanging up the Telephone 1 Tou...

Page 80: ...n page 23 1 Press the Favorite button The Favorite screen is displayed Favorite screen 2 Touch the Short Cut icon A contact s name phone number and a confirmation message of the phone number are displayed 3 Touch Call The phone call is started Making a phone call from the Recent Events list 1 Touch Recents to change to the Recent Events list screen Dialed history Names or Numbers Date Received his...

Page 81: ...ase touch the microphone icon in the center of the Voice Control mode screen You can continue to use the Voice Control mode 3 To finish the Voice Control mode touch or press and hold the AUDIO button for at least 2 seconds Depending on the iPhone the Siri function may finish automatically Adjusting the volume Adjust the speaker microphone volumes in Voice Control mode Perform the same procedure to...

Page 82: ...mber You can transmit a Touch Tone signal during a call Phone Book Function Phone Book screen example Use to search by directly inputting a name or phone number with the Keypad For details see How to Input Characters and Numbers Keypad page 22 Displayed when multiple phone numbers are registered Touch to display the registered phone number list Use to narrow down your search for names etc For deta...

Page 83: ... how to input characters using the keypad see How to Input Characters and Numbers Keypad page 22 If there are fewer than five registered items in the phone book you cannot use the phone book search function If a Bluetooth compatible mobile phone portable player etc is connected by wireless you can play back a song operation is controllable from the unit Operation may vary depending on the Bluetoot...

Page 84: ...ected Random Play mode changes the button Operations may differ depending on the connected Bluetooth compatible device Search Function Available for AVRCP Ver 1 4 and 1 5 only The displayed list differs with the connected Bluetooth device You can search for your desired song by using one of two modes the Quick Search mode and the Full Search mode Quick Search mode Touch your desired Group name or ...

Page 85: ... connection will start 1 Touch Settings The Device Setting select pop up screen is displayed 2 Touch Disconnect The Bluetooth connection is disconnected If multiple Bluetooth devices are registered in this device you can change the connection among the registered devices 1 Touch Settings 2 Touch Change 3 Touch Audio or Hands free of the selected device The connection will transfer to the selected ...

Page 86: ...ch the video display area Example for AUX AUX DVD GAME USB Player mode display Display Mode For details see Switching Display Modes During Video File Play Back page 59 You cannot operate them while driving External DVD player display example Touch the switch to go back to the beginning of the current chapter track file Touch the switch once more to find the beginning of the previous chapter track ...

Page 87: ...creen are the same as the external DVD player operation screen See Operating an External DVD Player External DVD changer screen example Disc1 Disc6 Selects a Disc Touch the left side of the operation screen or swipe the operation screen to the right to display the Disc selection screen Menu operation mode screen example Switches the Channel number Favorite channel number down Switches the Channel ...

Page 88: ...Switches the band Tune Channel or Preset or Manual Switches amongst Channel mode Preset mode and Manual mode Auto Preset The tuner automatically seeks and stores stations Display Mode You can set the Display Mode For details see Switching Display Modes During Video File Play Back page 59 You cannot operate them while driving Operating a TV ...

Page 89: ...t Setting a Default Camera page 47 to Rear If you connect a Front Camera and Side Camera at the same time touch Front or Side in the Rear Camera image to switch the Camera image You can also switch the Camera view by Pressing CAMERA button 1 Shift the gear lever to the reverse R position The rear view image is displayed while the car remains in reverse 2 If you shift the gear lever to a position o...

Page 90: ...you measure the actual distance to the marks when parked on a level surface Depending on the condition of the car or road surface the range of vision may vary The camera has a limited range of vision Objects at extreme angles to the camera e g under the bumper or at opposite ends of the bumper may not be in the its field of vision The rear camera image may have a tint which is different from the a...

Page 91: ...ra image is being displayed and touch or to return to the main source screen or previous screen You can perform a Guide Adjustment For details see Adjusting the Rear Front Side Camera Guide page 45 If you connect a Front Camera using the optional Multi Camera Interface module you can display the Front camera image using the Camera button only when you set Setting a Default Camera page 47 to Front ...

Page 92: ...era button only when you set Setting a Default Camera page 47 to Side If you connect a Rear Camera and Front Camera at the same time touch Rear or Front in the Rear Camera image to switch the Camera image You can also switch the Camera view by Pressing CAMERA button If the camera has a view switch function the Direct Change switch is displayed 1 Touch the screen when the image from the side camera...

Page 93: ... displayed You can use the MUTE button or the DOWN UP button to control the volume of Voice Information Operation of the Remote Control unit is also restricted Access to iDataLink Mode You can check the car s status set the air conditioning etc 1 Press and hold the Favorite button for at least 2 seconds or touch Vehicle Info in the Menu screen to activate iDataLink mode The iDataLink mode screen s...

Page 94: ...tion is displayed only when the Front camera or Rear camera is interlocked Parking Sensor Camera interlock screen example Rear camera You can check for obstacles through an interlocked camera image by connecting a Front or Rear Camera Touch the Camera image area to switch to the Camera full screen While displaying the Camera full screen touch the Camera screen then touch Sensor to return to the Pa...

Page 95: ...ry screen When changing the name Touch the icon name then input characters into Edit Name Keypad You can also select a basic name from the Template of the Keypad For details on how to input characters using the keypad see How to Input Characters and Numbers Keypad page 22 When a basic name is selected from the Template the icon will be changed according to the basic name When changing the layout o...

Page 96: ...lace in direct sunshine Battery Replacement Battery type CR2025 battery or equivalent 1 Opening the battery case Slide out the battery cover while firmly pressing in the direction of the arrow 2 Replacing the battery Put the battery in the case with the indication upward as shown in the illustration Placing a battery in backwards way may cause a malfunction 3 Closing the cover Slide the cover as i...

Page 97: ... 32 times the normal speed The picture is reversed by one frame each time the button is pressed in the pause mode DVD only button Switches between play and pause MENU button Video CD Switches between PBC ON and OFF DVD Displays the DVD menu SETUP button Displays the SETUP initial setting screen button Selects MP3 WMA AAC WAV folders RETURN button Returns to the selection screen just prior to the c...

Page 98: ...ointed object such as a ballpoint pen Playing a disc while driving on a very bumpy road may result in skips but this will not scratch the disc or damage the player Irregular Shaped Discs Be sure to use round shaped discs only for this unit and never use any special shaped discs Use of special shaped discs may cause damage to the mechanism New Discs To prevent the disc from jamming DISC ERROR is di...

Page 99: ...r or this unit discs recorded under unstable conditions discs on which a recording failed or a re recording was attempted copy protected CDs which do not conform to the audio CD industry standard Use discs with MP3 WMA AAC WAV files written in a format compliant with this unit For details see pages 100 and 101 To customers using CD R CD RW If a CD R CD RW cannot be played back make sure the last r...

Page 100: ...ion forms such as MP3 and AAC reduce part of the data to improve compression efficiency However FLAC can reconstruct compressed data to be an identical copy of the original data by performing lossless compression The compression ratio of FLAC is about 50 Method for creating MP3 WMA AAC FLAC USB Flash drive files Audio data is compressed using software with MP3 WMA AAC FLAC USB Flash drive codecs F...

Page 101: ...ack order of the folders and files is as follows The following numbers may differ from actually displayed numbers Terminology Bit rate This is the sound compression rate specified for encoding The higher the bit rate the higher the sound quality but also the larger the files Sampling rate This value shows how many times per second the data is sampled recorded For example music CDs use a sampling r...

Page 102: ...ins a movie shot from multiple angles the desired angle can be selected from the unit Multi story function With this function a single movie includes various story lines You can select different story lines to view various versions of the same movie Operation differs from disc to disc Story line selection screens including instructions appear during the movie Just follow the instructions These fun...

Page 103: ...103 EN List of Language Codes For details see page 69 ...

Page 104: ...are in is a primary signal area the antenna may not be grounded and connected properly Check your antenna connections make sure the antenna is properly grounded at its mounting location The antenna may not be the proper length Make sure the antenna is fully extended if broken replace the antenna with a new one Broadcast is noisy The antenna is not the proper length Extend the antenna fully replace...

Page 105: ...ears Various messages are displayed on the screen during operation In addition to the messages telling you the current status or providing guidance for the next operation there are also the following error messages If one of these error messages is displayed carefully follow the instructions in the solution column System If you are driving please pull over and park before using this function A set...

Page 106: ...ting with the Tuner Connect the Tuner or check the Tuner connection to the back of the unit Check Antenna The SiriusXM Satellite Radio antenna or cable is either damaged or not connected correctly to the SiriusXM Tuner Check that the SiriusXM antenna cable is connected to the SiriusXM Tuner and check that the antenna cable is not kinked or otherwise damaged Replace the antenna if necessary No Sign...

Page 107: ... circuit is activated at high temperature The indicator will disappear when the temperature returns to within operation range Leave the power OFF until the temperature decreases and then turn the power ON again LOADING ERROR EJECT ERROR Mechanism error 1 Press and eject the disc If the disc does not eject press again for at least 3 seconds and eject the disc If the disc still does not eject consul...

Page 108: ...bit rate Frequency Response CD 5 20 000 Hz 1 dB Wow Flutter WRMS Below measurable limits Total Harmonic Distortion 0 02 at 1 kHz Dynamic Range 95 dB at 1 kHz Channel Separation 65 dB at 1 kHz Horizontal resolution 500 lines or greater Video output level 1Vp p 75 ohms Video S N ratio DVD 60 dB Audio S N ratio 95 dB Wave length DVD 665 nm CD 800 nm Laser power CLASS II Battery Type CR2025 battery Wi...

Page 109: ...he actual user and to any third party The warranty on the System shall not extend to an exchange or refund due to misspelling omission of letters or any other cosmetic discrepancy in layout found in the System The right to use the System shall expire either when the user destroys this software or when any of the terms for use is violated and Alpine Space Machine and or HERE exercise the option to ...

Page 110: ...ranty and if the product was shipped to an Authorized Alpine Service Center or Alpine Alpine will pay the return shipping charges You should provide a detailed description of the problem s for which service is required You must supply proof of your purchase of the product You must package the product securely to avoid damage during shipment To prevent lost packages it is recommended to use a carri...

Page 111: ... aux fréquences radioélectriques RF CNR 102 de l IC Cet équipement émet une énergie RF très faible qui est considérée conforme sans évaluation de l exposition maximale autorisée MPE Cependant il est souhaitable qu il devrait être installé et utilisé en gardant une distance de 20 cm ou plus entre le radiateur et le corps humain México La operación de este equipo está sujeta a las siguientes dos con...

Reviews: