45
-EN
Camera Setup
[Camera]
is selected on the System Setup Menu screen in step 1. See
“System Setup” (page 44).
You can set up items related to the Camera.
Setting item:
Camera Select
Setting contents:
Off (Initial setting) / Front / Rear / Other / Camera Selector
*
When selecting Camera Selector, you can set the Front Camera/Rear
Camera/Side Camera to On/Off. For details, see “Setting Multi Camera
to On/Off ” (page 47).
When the camera is connected, the video input signal type can be
chosen.
Further setting item:
Camera Signal
Setting contents:
NTSC (Initial setting) / PAL
The video pattern can be changed when connected to Multi View
Camera.
When Camera Select is set to “Off ” or “Other,” you cannot select this
item.
Setting item:
Guide Adjustment
1
Touch
[Guide Adjustment]
.
The camera guide adjustment screen is displayed.
Multi View compatible Side Camera
2
Touch [Front] or
[Rear]
.
The view will change to the selected view.
Multi View compatible Front Camera/Rear Camera
2
Touch
[Back]
,
[Panorama]
,
[Corner]
, or
[Top]
.
The view will change to the selected view.
•
[Back]
will not appear for the Front camera.
• For an explanation of video patterns, see the camera Owner’s Manual.
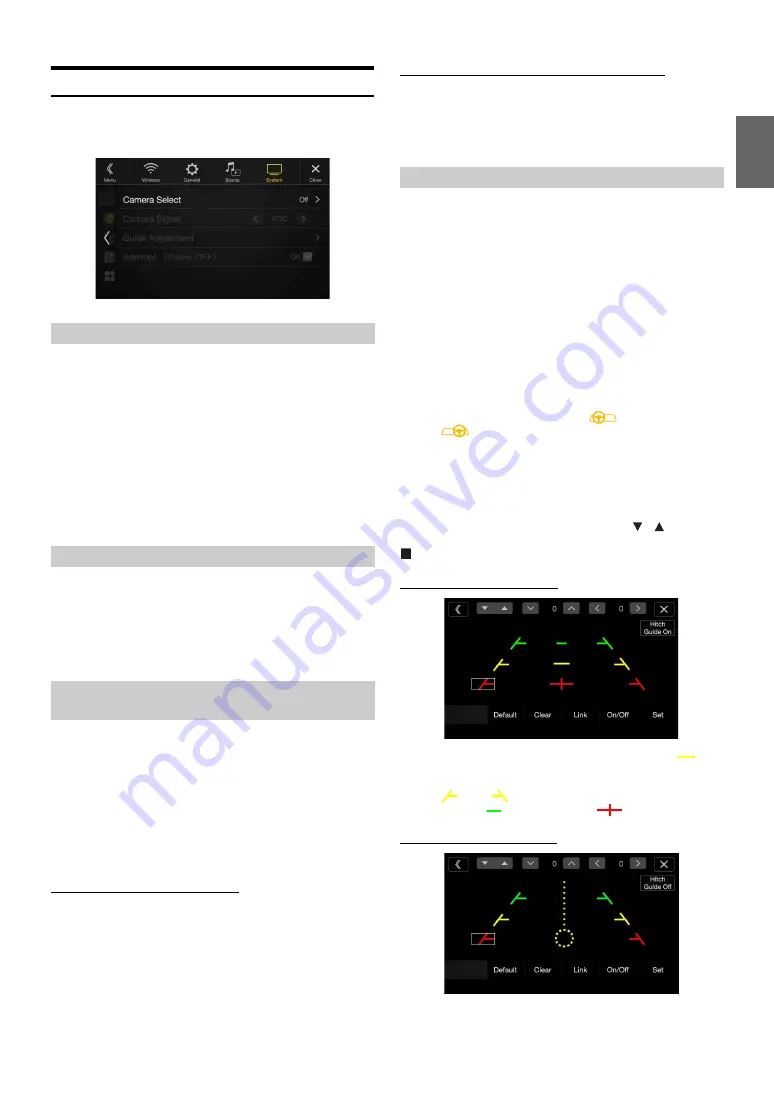
You can adjust the camera guide position.
Setting item:
Guide Adjustment
1
Touch
[Guide Adjustment]
.
The camera guide adjustment screen is displayed.
• If the video pattern is set to “Corner (Rear/Front Camera only),”
the camera guide will not be displayed.
• When you connect a Multi View compatible camera, select a
Video Pattern to make a guide adjustment.
• To adjust the guide position of the Rear Camera, touch
[Hitch
Guide On]
or
[Hitch Guide Off]
to display/hide the Hitch Guide.
You can adjust the Hitch Guide to mark the position of the
junction between your vehicle and your trailer.
• When you connect a Multi View compatible Side Camera, after
selecting the Video Pattern, touch
[
] (Left steering)
or
[
] (Right steering)
to make the guide adjustment that
matches the position of the steering wheel in your vehicle.
2
Touch
[Adjust]
.
• If
[Adjust]
does not appear, proceed to step 3.
3
Touch the guide you intend to adjust.
Guide line can also be selected by touching
[
]
[
]
.
Rear Camera screen example
When Hitch Guide is set to Off
• You cannot adjust the position of the yellow guide line “
” in
the center independently.
It is calculated to be centered between the two yellow guide lines
“
” and “
” on the left and right, and centered between the
green line “
” and red guide line “
”.
When Hitch Guide is set to On
• You can adjust the Hitch Guide to mark the position of the junction
between your vehicle and your trailer.
Setting the Camera Input
Front:
Front camera
Rear:
Rear camera
Other:
Side camera, Room camera, etc.
Camera
Selector*:
Front Camera/Rear Camera/Side Camera connected to
the optional Multi Camera Interface module.
Setting the Camera Signal Input
Switching Video Patterns for Multi View
Camera
Adjusting the Rear/Front/Side Camera Guide
Summary of Contents for X109D
Page 2: ......
Page 103: ...103 EN List of Language Codes For details see page 69 ...


