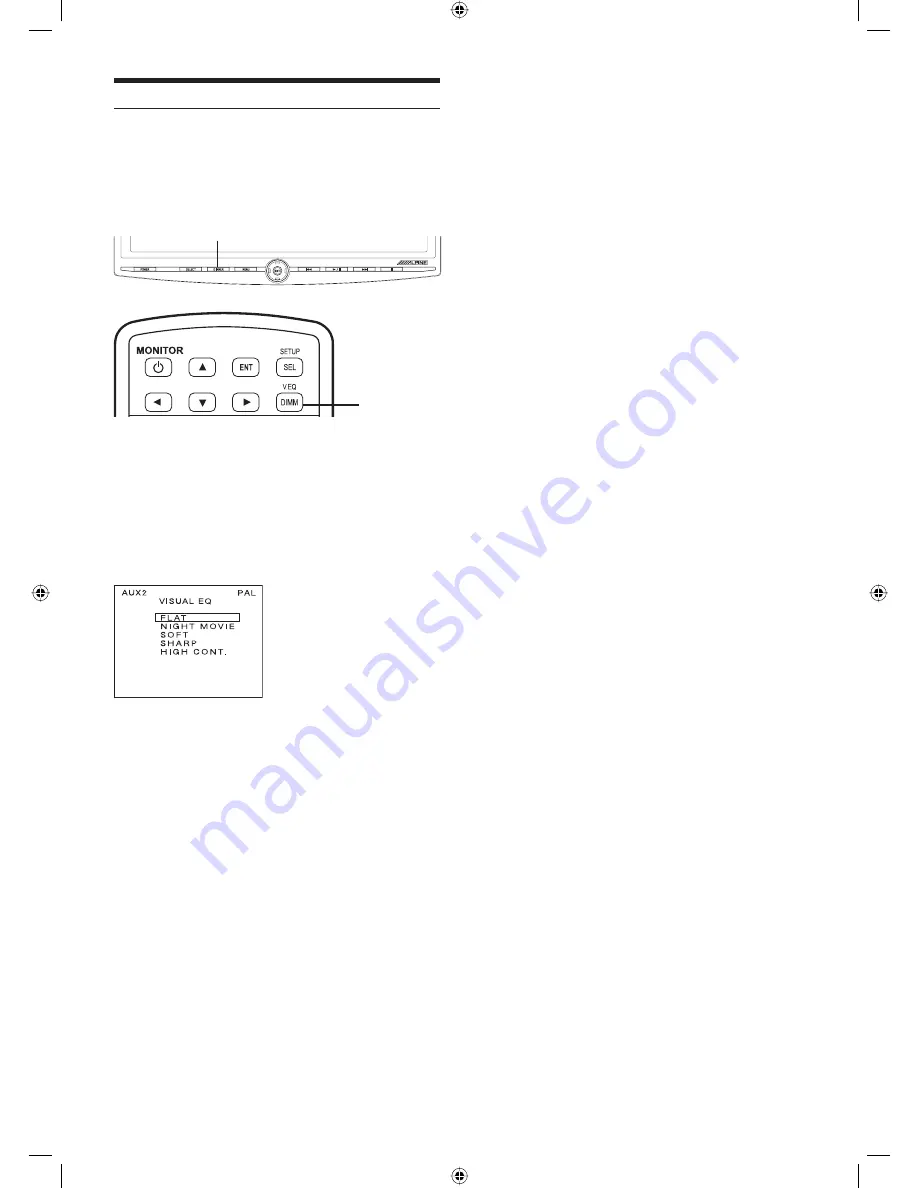
background image

8

-EN

VISUAL EQ Operation

You can select a mode suitable for the subject image.

• Each source can be adjusted individually.
• Adjusting should be made within 10 seconds, 

otherwise OSD (On Screen Display) will be 
automatically turned off.

                          DIMMER

Front Panel Controls

DIMMER

Remote Control

1

Press and hold 

DIMMER

 for at least 2 

seconds to show the VISUAL EQ OSD. 

2

To change VISUAL EQ, press 

DIMMER

 or 

press

S

 or 

T

to cycle through the OSD as 

FLAT, NIGHT MOVIE, SOFT, SHARP, HIGHT 
CONT, and FLAT. (Default: SHARP)

VISUAL EQ mode (manufacturer’s settings) selection 
(VISUAL EQ MODE)

FLAT:

Normal Setting (Visual EQ OFF)

NIGHT MOVIE: Suitable for movies in which dark 

scenes frequently appear.

SOFT: 

Suitable for CGs and animated 
movies.

SHARP:

Suitable for old movies where 
images are not clearly shown.

CONTRAST: 

Suitable for recent movies.

• “FLAT” will change to “CUSTOM”, when any of the 

picture modes (Brightness, Color, Tint, Contrast and 
Sharpness) has been adjusted.

• NIGHT MOVIE, SOFT, SHARP and CONTRAST 

DUH¿[HGYDOXHV7KH\FDQQRWEHVHWPDQXDOO\,IWKH

picture mode is changed, they automatically change to 
CUSTOM mode.

• To return FLAT mode, press RESET on the picture 

mode, or change values of BRIGHT, COLOR, TINT, 
CONTRAST and SHARPNESS to 0 manually.

3

Press

ENT

 to finish adjustments or wait 

10 seconds until OSD disappears; the 
adjustment will be saved automatically. 

PKG-850P_EN.indd   8

07.12.2006   11:57:47 Uhr

Summary of Contents for PKG-850P

Page 1: ...LPINE House Fletchamstead Highway Coventry CCV4 9TW U K Phone 0870 33 33 763 ALPINE ELECTRONICS BENELUX GmbH Leuvensesteenweg 510 B6 1930 Zaventem Belgium Tel 02 725 1315 ALPINE ELECTRONICS FRANCE S A...

Page 2: ...ILLOS POR INFRARROJOS RUE 4152 MANDO A DISTANCIA UNIVERSAL SOPORTE DE INSTALACI N ANILLO DE COLOCACI N PKG 850P Entertainment Paket f r den R cksitz TMX R850 MOBILER CINEMA MONITOR SHS N100 SINGLE SOU...

Page 3: ...nt 7 Switching Display Mode 7 Visual EQ Operation 8 System Setup Operation 9 DVD Player Control Playing and Pausing 10 Stopping 10 Skipping Forward 10 Skipping Backward 10 Selecting Menu 10 DVD Setup...

Page 4: ...n its designed application may result in UH HOHFWULF VKRFN RU RWKHU LQMXU KEEP SMALL OBJECTS SUCH AS BATTERIES OUT OF THE REACH OF CHILDREN Swallowing them may result in serious injury If swallowed co...

Page 5: ...an once carefully check all electrical connections for shorted circuitry Also have your vehicle s voltage regulator checked Maintenance If you have problems do not attempt to repair the unit yourself...

Page 6: ...ACC is turned back on the monitor returns to the power state memorized either ON or OFF Monitor Open Button Press Monitor Open Button to release the Monitor Panel The Panel will drop down slightly al...

Page 7: ...Turn on POWER on the headphone 2 Adjust the volume level by turning clockwise for louder and counter clockwise for lower on the headphone Refer to Wireless Headphone Page 11 Switching the Source 1 Pr...

Page 8: ...adjustments or wait 10 seconds until OSD disappears the adjustment will be saved automatically Adjusting Color Density 2 Press S or T and select COLOR 3 Press or to adjust the color density Change dep...

Page 9: ...lly turned off SELECT Front Panel Controls SELECT Remote Control 1 Press and hold SELECT for at least 2 seconds to show the SETUP menu 2 Press SELECT to switch to DISP MODE from PICTURE To change each...

Page 10: ...sual EQ OFF NIGHT MOVIE Suitable for movies in which dark scenes frequently appear SOFT Suitable for CGs and animated movies SHARP Suitable for old movies where images are not clearly shown CONTRAST S...

Page 11: ...selection skips to WKH QH W LQSXW 8 FDQQRW EH WXUQHG 2 AUDIO LEVEL 1 Setting for Aux1 Press and to select HIGH MID LOW Default HIGH AUDIO LEVEL 2 Setting for Aux2 Press and to select HIGH MID LOW Def...

Page 12: ...skip back to the previous chapter or track Press and hold to fast reverse movie or music Selecting Menu Front Panel Controls Press MENU to show the DVD Menu Use and ENT to control Press and Hold MENU...

Page 13: ...er Switch 5 Power Indicator LED Operation Read carefully to prevent damage to the headphone or your ears WARNING Before turning on the power remove headphones and turn the volume down as low as possib...

Page 14: ...of your system is properly connected or consult your authorized ALPINE dealer No function or display Car s ignition is off Turn the ignition on No fuse or blown fuse Check the cause and replace the f...

Page 15: ...60 pixels Effective Number of 99 9 or more Elements Back Light Cold Cathode Fluorescent Lamp GENERAL Operating Voltage 10 16 V DC Typical 12 V DC Power Consumption 1 1 A Power ON 140 mA Stand by Video...

Page 16: ...The wiring and installation of this unit requires special technical skill and experience To ensure safety always contact the dealer where you purchased this product to have the work done USE SPECIFIED...

Page 17: ...urce 1 is set to DVD White Brown REMOTE OUT 1 Corresponds to AUX1 To control ALPINE DVD player DVB T TV tuner or DVD HU connect to each REMOTE IN White Brown REMOTE OUT 2 Corresponds to AUX2 To contro...

Page 18: ...s into the headliner Vehicle Door polarity depends on the vehicle type The polarity can be changed by the Door SW polarity switch Default Negative Switched System Polarity When door open door signal i...

Page 19: ...ed 2 GND Black 3 POWER CONTROL Blue White 4 REMOTE IN White Brown 5 REMOTE OUT 1 White Brown 6 REMOTE OUT 2 White Brown ALPINE Mobile Multimedia Station ALPINE Mobile Cinema Monitor ALPINE DVD Player...

Reviews: