Alpine IVX-W200E Owner'S Manual Download Page 19

About the Rear Camera Guide 

When the car is put into reverse gear, the monitor switches 
to the rear  view camera image. Guides appear to help 
visualize the car’s width and distance from the rear bumper. 

   Indication mark meaning. 
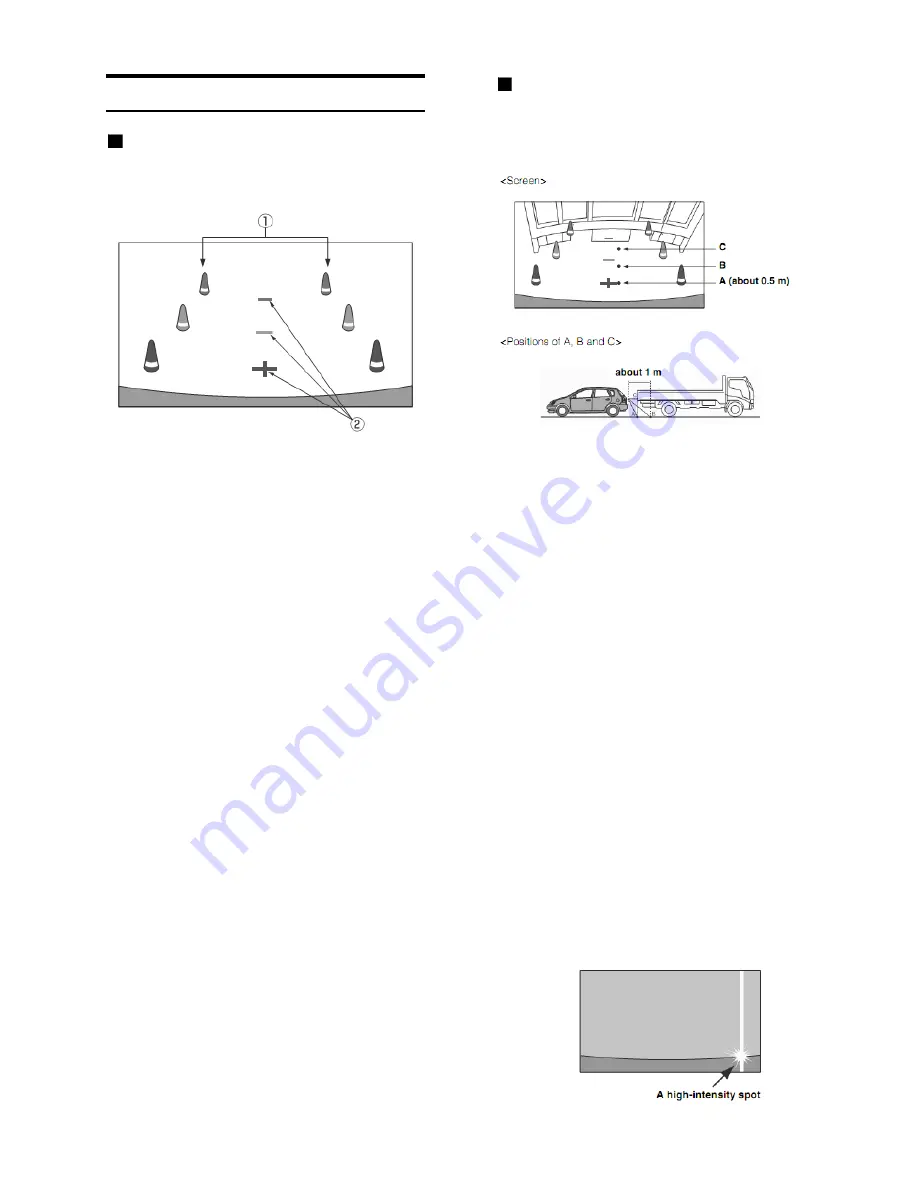
Car width extension marks (red, yellow and green in 

 order of distance) 

If properly calibrated, the marks indicate the car’s  width. 
This helps guide the car’s path when backing up in a 
straight line. 

The marks represent the distance from the rear of the car 
(from the rear end of the bumper). 

• The 

marks do not move in synchronization with the 

steering wheel. 

  Distance guidance marks 

The marks represent the distance from the rear of the car
(from the rear end of the bumper). 

•  The 

marks do not move in synchronization with the 

steering wheel. 

•   Each center 

position of the mark represents about 0.5 m 

(red), about 1 m (yellow) and about 2 m (green) behind. 

•   Depending 

on the condition of the car or road surface, 

the range of  vision may vary. 

•  The 

camera has a limited range of vision. Objects at

extreme angles  to the camera (e.g. under the bumper or
at opposite ends of the bumper) may not be in the its 
field-of-vision. 

• The 

rear camera image may have a tint which is different

from the  actual surroundings. 

•   Depending 

on the car, the guidance may deviate to the 

right or left.  This is not a malfunction. 

The distance guides represent the ground level distance 
from the rear bumper. It is difficult to accurately estimate 
the distance to objects  
above ground level. 

   Distance guidance mark 

In the screen, according to the distance guidance marks,  
the truck seems to be parked about 1 m away (at the  
position B). In actual fact, however, if you reversed to  
position A, you would collide with the truck. 
In the screen, positions A, B and C seem to be located in  
order of proximity. However, in actual fact, the position A  
and C are the same distance, and B is farther away than  
positions A and C.  

•  The car width extension mark represents the distance to the 

road surface. The distance to an object on the road is not 
accurately represented by the guides. 

• 

 In the following conditions, screen visibility may be impaired. 

This is not a malfunction. 

   -   When it is dark (during the night, etc.). 
   -   Under very high or very low temperature conditions. 
   -   When water drops adhere to the camera, or when the   

      humidity is high (such as rainy weather, etc.). 

   -   When foreign bodies (such as mud, etc.) adhere to the  

      camera or its peripheral area. 

   -   When sunlight or headlights directly strike the camera   

      lens. 

   -   When a CCD camera is connected, smearing* may occur.  

  This phenomenon is peculiar to CCD cameras. 

*  Smear phenomenon: 

A phenomenon which occurs when a high-intensity 
spot (such as a reflection of the sunlight on a car body) is 
shot by the camera. The picture below is an example of 
’vertical smear’ common to CCD cameras. 

19

Summary of Contents for IVX-W200E

Page 1: ...INE ELECTRONICS OF ASIA PACIFIC CO LTD 555 Rasa Tower 1 Unit 2601 2602 Phaholyothin Road Chatuchak Bangkok Thailand Phone 02 937 0505 ALPINE ELECTRONICS OF AUSTRALIA PTY LTD 161 165 Princes Highway Ha...

Page 2: ...WARNING 4 CAUTION 4 PRECAUTION 5 Getting Started Accessory List 6 Location of Controls 6 Initial System Start up 7 Setting the Clock 7 Turning Power On or Off 7 Adjusting the Volume 7 Touch operation...

Page 3: ...uxiliary Device Setup Sound Effect Setup Operation 26 26 26 27 27 Displaying the rear view video 18 while the car is in reverse Switching the Image Pattern for the 18 Rear Camera 18 Adjusting the Rear...

Page 4: ...ignals train crossings etc can be dangerous and may result in an accident LISTENING AT LOUD VOLUME LEVELS IN A CAR MAY ALSO CAUSE HEARING DAMAGE MINIMIZE DISPLAY VIEWING WHILE DRIVING Viewing the disp...

Page 5: ...jected immediately after initial loading use your finger to feel around the inside of the center hole and outside edge of the disc If you feel any small bumps or irregularities this could inhibit prop...

Page 6: ...ortable music player etc to the system For details see Operating Auxiliary Devices Microphone Accessory List IVX W200E 1 Power Cable 1 CAMERA AUX PREOUT cable 1 Face plate 1 Remote Control 1 Battery 1...

Page 7: ...it 2 Press and hold SOURCE for at least 3 seconds to turn off the unit Adjusting the Volume Adjust the volume by pressing the Volume Up Down button Volume decreases increases continuously by pressing...

Page 8: ...ively In manual mode touch and hold to change the frequency continuously Radio Presetting Stations Manually 1 Tune in a desired radio station you wish to store in the preset memory by manual or automa...

Page 9: ...h The unit searches for a station broadcasting the PTY You cannot use this function in countries regions where No PTY data is available TA Traffic Announcement Traffic information can be received manu...

Page 10: ...he driver will be able to watch the Video while driving the vehicle and may be distracted from looking ahead causing an accident The driver or other people could be severely injured Playback 1 Press t...

Page 11: ...vice is successfully paired the next time when the ignition key of the car is turned to on the unit will automatically connect to the previously connected device However the connection may fail If the...

Page 12: ...r s Manual are based upon the latest available information and are believed to be accurate at the time of printing Alpine reserves the right to change or modify any information or specifications witho...

Page 13: ...e call is started Dialing a Number In the Phone Book You can use the phone book of the mobile phone to make a phone call Before using you need to transfer the phone book from the mobile phone to the s...

Page 14: ...u can synchronize the system s phone book with the mobile phone s phone book 1 Press the button The phone menu screen is displayed 2 Touch 3 Touch Synchronization of the phone books starts You can sto...

Page 15: ...Music main screen Play List Album Art Music title artist name album name Current state of random and repeat Time and progress bar Playback 1 Press the USB button 2 Touch or to select the desired trac...

Page 16: ...buttons will be disappeared without any action more than 5 seconds Playback 1 Press the USB button Touch to display sequentially images of current list 2 Touch or to select the desired file Go back t...

Page 17: ...of random and repeat Time and progress bar Playback 1 Press the USB button 2 Touch or to select the desired track file Returning to the beginning of the current track file Touch Advancing to the begi...

Page 18: ...rom the rear camera is displayed The operation screen is displayed on the screen After a 5 second time out the operation screen returns to the camera display screen 2 Touch Rear Panorama Corner or Top...

Page 19: ...is not a malfunction The distance guides represent the ground level distance from the rear bumper It is difficult to accurately estimate the distance to objects above ground level Distance guidance m...

Page 20: ...s are displayed closer to the rear bumper than the actual distance For example if there is an obstacle on the upward slope it may appear farther away than its actual position Also an error may occur b...

Page 21: ...by this unit You can choose HDMI Mode For details refer to HDMI Setting on page 25 HDMI Device Mirror DTV 1 Press the button The HDMI menu screen is displayed Display example for mirror mode screen M...

Page 22: ...F Otherwise the settings may not be changed Dimmer Setting Dimmer is selected on the Display setup menu in step 3 Refer to Display Setup Operation Setting the Brightness of the Backlighting The illumi...

Page 23: ...justment screen to the initial setting If you touch Cancel on the adjustment screen no adjustment is done and the Display Setup screen is restored Screen Setting Operation Screen Setting is selected o...

Page 24: ...tion etc for this unit can be changed to appear in the selected language Setting item Language Selection Setting contents English Initial Setting Thai Arabic Indonesia Touch to confirm the language an...

Page 25: ...utomatically When a call is received you can set whether to answer it automatically or not Setting item Auto Reception Setting contents Off Initial Setting On On When a call is received it will be ans...

Page 26: ...omatically do not turn the ignition key to OFF Otherwise the settings may not be changed Sound Effect Setting Sound Effect is selected on the Sound setup menu in step 3 Refer to Sound Setup Operation...

Page 27: ...can be adjusted Touch volume bar to adjust the subwoofer output Equalizer Presets Setting item EQ Preset Setting contents Standard Classic Rock Pop Jazz Electric User Only one type can be set to ON W...

Page 28: ...pecified camera Guideline Setup Operation Guideline is selected on the User setup menu in step 3 Refer to Camera Setup Operation Setting of the Guideline You can set whether the rear camera guide line...

Page 29: ...to the previous screen Immediately after changing the settings of User Setup While the system is writing data automatically do not turn the ignition key to OFF Otherwise the settings may not be chang...

Page 30: ...te USB TUNER SECTION Frequency Response 5 20 000 Hz 3 dB Total Harmonic Distortion 0 1 at 1 kHz Dynamic Range 95 dB at 1 kHz Channel Separation 55 dB at 1 kHz Audio S N ratio 50 dB CD SECTION PICKUP W...

Page 31: ...D ACC HDMI IN Battery Ignition Key VIOLET BLACK REAR RIGHT SPEAKER GREY GREY BLACK FRONT RIGHT SPEAKER WHITE WHITE BLACK FRONT LEFT SPEAKER GREEN GREEN BLACK REAR LEFT SPEAKER PINK BLACK ILLUMINATION...

Page 32: ...tors FRONT LEFT It can be used as Front Output RCA Connectors Fuse Holder 10A Radio Antenna Receptacle REAR CAMERA Input RCA Connector Yellow Video Output Connector AUX OUTPUT Yellow Output the video...

Reviews: