background image

31

-EN

2

Touch 

[

]  (Audio)

[

] (Hands-free)

 or 

[

]  (Both)


of the device you want to connect from the list.

• You can register up to 5 Bluetooth compatible mobile phones.
• You can connect three Bluetooth Devices; two exclusively for 

Hands-Free Phone and one exclusively for Bluetooth Audio.

• When you register a Hands-Free Phone for the first time, Primary 

is set automatically. When you connect two Hands-Free Phones, 
select “Hands-free” or “Both.” You can then set the priority on the 
Primary/Secondary setting screen. For details, see “Hands-free 
Device Primary/Secondary Setting” (page 31).

3

When the device registration is complete, a message 
appears and the device returns to normal mode.

• The Bluetooth registration process differs depending on the device 

version and SSP (Simple Secure Pairing). If a 4 or 6 character Passcode 
appears on this device, enter the Passcode using the Bluetooth 
compatible device.
If a 6 character Passkey appears on this device, make sure the same 
passkey is displayed on the Bluetooth compatible device and touch “Yes.”

• If all 5 devices have been registered, you cannot register a 6th device. To 

register another device, you need to delete one of the other 
5 devices first.

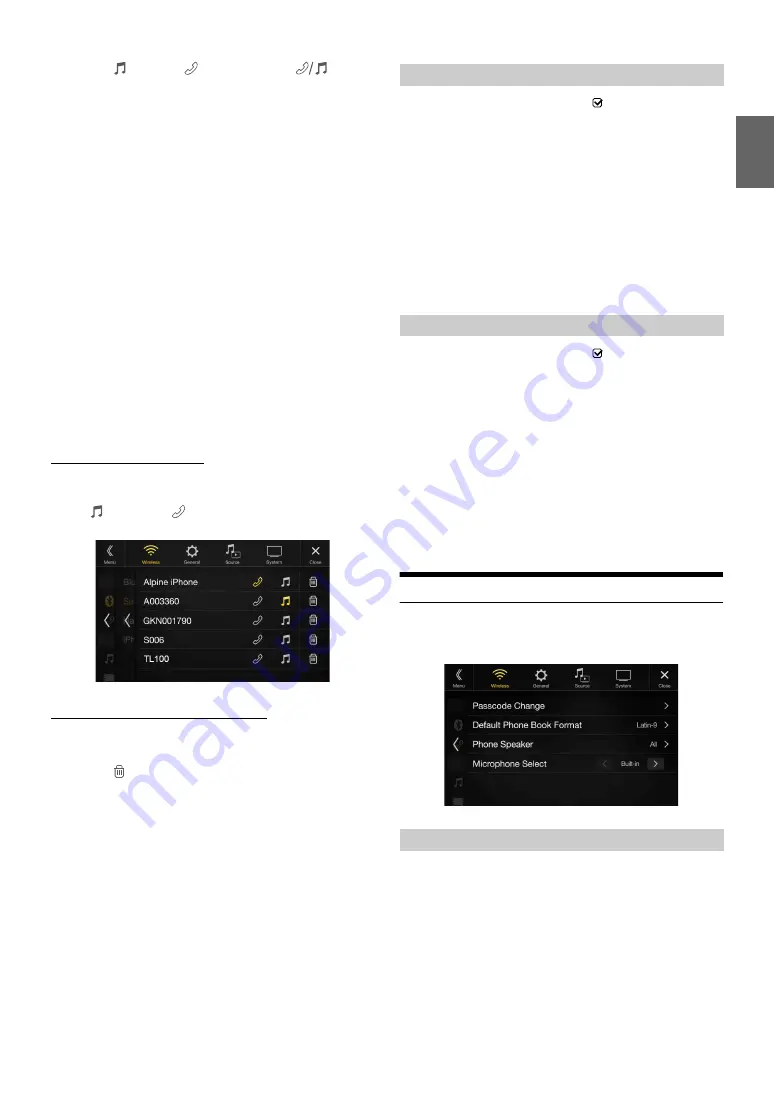
Setting the Bluetooth Device

Select one of 5 paired Bluetooth compatible devices that you previously 
registered.

Touch 

[

]  (Audio)

 or 

[

] (Hands free)

 of the device you 

want to connect from the Paired Device list.

Deleting a Bluetooth Device from the list

You can delete the information of a previously connected Bluetooth 
compatible device.

1

Touch 

[

] (Delete)

 of the Bluetooth compatible device 

to delete from the Paired Device list.

2

Touch 

[OK]

.

• Touching 

[Cancel]

 will cancel the setting.

Make sure the “Bluetooth” setting is “On” (

). See “Bluetooth Setup” 

(page 30).
When you connect two Hands-Free Phones, set the priority of the 
operation and the setting of incoming-outgoing calls.

Setting item:

Hands-free Device Priority

Setting contents:

Primary / Secondary

Touch the checkbox for Primary/Secondary of the device 
names that are registered to the unit to set them.

• When connected to two hands-free phones, operating restrictions apply 

to the hands-free phone registered to Secondary. For details, see 
“Hands-free Phone Control” (page 79).

Make sure the “Bluetooth” setting is “On” (

). See “Bluetooth Setup” 

(page 30).
When an iPhone is connected via USB and it is not on the Registered 
Device list, it will be paired automatically.

Setting item:

iPhone Auto Pairing

Setting contents:

On / Off (Initial setting)

• This setting supports iPhones with iOS Ver.5.5 or later.
• When more than 5 Bluetooth devices are registered, Auto Pairing does 

not start.

Device Setup

[Device]

 is selected on the Wireless Setup Menu screen in step 1. See 

“Wireless (Bluetooth) Setup” (page 30).
You can make various settings for a Bluetooth compatible device.

You can set the code for connecting with a Bluetooth compatible device. 

Setting item:

Passcode Change

1

Enter a 4-digit passcode (old), and then touch 

[OK]

.

• The initial number is 0000.
• For details on how to input the numeric keypad, see “Numeric 

Keypad Input Operations” (page 75).

2

Enter a 4-digit passcode (new), and then touch 

[OK]

.

Audio:

Sets for use as an Audio device.

Hands-free: Sets for use as a Hands Free Device. 

Both:

Sets for use as both an Audio device and Hands Free 
Device.

Hands-free Device Primary/Secondary Setting

iPhone Auto Pairing Setting

On:

Performs iPhone Auto Pairing setting.

Off:

Does not perform iPhone Auto Pairing setting.

Setting the Passcode

Summary of Contents for INE-W967HD

Page 1: ...DE DE REFERENCE RAPIDE GUfA DE REFERENCIA RAPIDA Please register your product at www alpine usa com registration for a chance to win prizes Enregistrez vous sur www alpine usa com registration et tent...

Page 2: ...l 13 Map Functions 14 Navigation Menu 15 Setting a Destination 16 Specifications 17 IMPORTANT Please record the serial number ofyour unit in the space provided below and keep it as a permanent record...

Page 3: ...CARS WITH A 12 VOLT NEGATIVE GROUND Check with your dealer if you are not sure Failure to do so may result in fire etc KEEP SMALL OBJECTS SUCH AS SCREWS OUT OF THE REACH OF CHILDREN Swallowing them m...

Page 4: ...sure to use only the specified accessory parts Use ofother than designated parts may damage this unit internally or may not securely install the unit in place This may cause parts to become loose res...

Page 5: ...onnected to the optional iDatalink module MENU Power Off button Recalls the Menu screen 4 EN Press and hold this button for at least 5 seconds to turn the power off ForX110 J I button Press to seek do...

Page 6: ...Sources screen to a dedicated screen by touching the icon on one of the four edges of the screen or by swiping vertically or horizontally You can set the Sound Setup or Rear Seat Entertainment System...

Page 7: ...egory 6 EN G Changes to the Edit screen used for registering items or changing names You cannot edit any items on the Edit Menu screen while driving Favorite registration item Indicates the location o...

Page 8: ...Art HD Radio FM mode only Displays the Primary Image of the song currently being received or the Station Logo of the broadcast station L Preset mode button Touch or swipe to the right when you use th...

Page 9: ...right when you use the Full Search mode screen Touch or swipe to the right to use the Quick Search mode Current song no Total song no Information display Elapsed time Repeat Playback Random Play 111 1...

Page 10: ...w Station from the 1 currently received artist information Creates a New Station from the ___________ T currently received track information r Bookmark Artist Track Pandora information display Playing...

Page 11: ...swipe to the right when you use the Preset mode screen 1 Select channel number directly Changes text information Touch and hold for at least 2 Jump Memory Jump Recall seconds to activate deactivate To...

Page 12: ...enu screen _________ DisplaysTop Menu screen HDMI input switch 1 Switches Angle 1 Displays Menu control screen Switches Audio Tracks r j 1 4 111 IJ IJ l Switches Subtitles Repeat Playback DVD Setup sc...

Page 13: ...eginning of the current file Finds a previous file within one second after playback starts Fast reverses when touched for at least 1 second 12 EN Searching for a Music File Full Search Mode For exampl...

Page 14: ...n Audio device and Hands Free Device 6 When the device registration is complete a message appears and the device returns to normal mode You can register up to 5 Bluetooth compatible mobile phones The...

Page 15: ...this screen please see the Owner s Manual Next street 2D 2D North up 3D views Traffic Zoom Data fields Additional information Lane information Motorway services it Warning road sign If It I Destinati...

Page 16: ...oint New Rout Select your destination by entering an address or its coordinate or by selecting a Place a Saved Location or a Saved Route You can also look up your recent destinations from the History...

Page 17: ...ty or ZIP code 4 Enter the town name or postcode Touch to display the candidate list 5 Enter the desired street name w E R T y 0 p A s D F G H j K L z c v B N M f 123 G Span Touch to display the candi...

Page 18: ...der software bit rate HDMI SECTION Input Format Output Format GPSSECTION GPS Reception frequency GPS Reception sensitivity 480pNGA 480p 1 575 42 1 MHz 130 dB max Owner s manq ll _ Bluetooth SECTION Bl...

Page 19: ...SECTION Frequency Response Wow Flutter WRMS Total Harmonic Distortion Dynamic Range Channel Separation Horizontal resolution Video output level Video S N ratio Audio S N ratio PICKUP Wave length Laser...

Page 20: ...H PANDORA C Biuetooth MP3 AAC II l Made for iPod D iPhone Maps for life aASSENGINE s JI a HIGH DEFINITION MULTIMEDIA INTERFACE H5 R d This HD Radio receiver enables 1 a 10 PSD HD2 HD3 Digital Sound Ar...

Page 21: ...created and shared by Google and used according to terms described in the Creative Commons 3 0 Attribution License The Bluetooth word mark and logos are registered trademarks owned by the Bluetooth S...

Page 22: ...son s body Cet equipement est conforme aux limites d exposition aux rayonnements enoncees pour un environnement non contr61e et respecte les regles les radioelectriques RF de Ia FCC Iignes directrices...

Page 23: ...warranty and if the product was shipped to an Authorized Alpine Service Center or Alpine Alpine will pay the return shipping charges You should provide a detailed description of the problem s for whi...

Page 24: ...er par un produit neuf ou revise le tout sans frais pour vous Si les reparations sont couvertes par Ia garantie et si le produit a ete envoye a un centre de service Alpine ou a Alpine le paiement des...

Page 25: ...ECTRONICS DE ESPANA S A Portal de Gamarra 36 Pabell6n 32 01013 Vitoria Aiava APDO 133 Spain Phone 945 283588 Take a moment to protect your purchase by registering your product now at www alpine usa co...

Page 26: ...u will be informed of product and software updates if applicable special promotions news about Alpine and entered for a chance to win prizes Merci d avoir achet ce produit Alpine Nous vous invitons co...

Page 27: ...For X108U INE W967HD For X110...

Page 28: ...d 23 Favorite Function Using the Favorite Function 24 Editing the Favorite Screen 24 Registering Items 24 Changing Item Names 25 Changing Icons only the Shortcut Dialing and Navigation icons 25 Changi...

Page 29: ...Lock 43 Signal Strength Information 44 AUX Setup X108U INE W967HD only 44 Setting the AUX Mode 44 Setting the Auxiliary AUX Name 45 Switching the Visual Input Signal System 45 HDMI Setup 45 Setting t...

Page 30: ...66 Search Function 66 Selecting the Channel Directly 67 Storing the desired Song Artist 67 Receiving and Tuning to an Alert 67 Replay Function 67 Parental Lock Function 68 Using Jump Memory and Jump...

Page 31: ...n External DVD Changer 88 Operating the Mobile Digital TV Receiver DVB T 88 Operating a TV 89 Camera Operation Optional Rear Camera Operation 90 Displaying the Rear Camera Image from the Menu screen 9...

Page 32: ...7 EN If this Message Appears 106 Specifications 109 END USER LICENSE AGREEMENT HERE 111 LIMITED WARRANTY...

Page 33: ...nner and location before attempting operation Make certain that the volume level of the navigation system is set to a level which still allows you to hear outside traffic and emergency vehicles If the...

Page 34: ...PLACING FUSES Failure to do so may result in fire or electric shock DO NOT BLOCK VENTS OR RADIATOR PANELS Doing so may cause heat to build up inside and may result in fire USE THIS PRODUCT FOR MOBILE...

Page 35: ...oid installing the unit in locations with high incidence of moisture or dust Moisture or dust that penetrates into this unit may result in product failure NOTICE Product Cleaning Use a soft dry cloth...

Page 36: ...is currently available in the U S Australia and New Zealand HD Radio Technology manufactured under license from iBiquity Digital Corporation U S and Foreign Patents HD Radio and the HD HD Radio and Ar...

Page 37: ...te Function page 24 Favorite screen example Frequently used functions and useful functions can be customized for your convenience You can register up to 54 functions You cannot register a function mor...

Page 38: ...ge 17 1 The Search mode differs depending on the audio source For details see the operating instructions of the audio source 2 The screen also switches by pressing the Menu button Shortcut Setup Scree...

Page 39: ...m OM in the website at http www alpine usa com You can switch the left right positions of the Audio Visual screen and Navigation screen Each time you touch the positions of Audio Visual screen and Nav...

Page 40: ...ch The system of this unit is reset NAVI NAV button Recalls the navigation map screen Press again to switch to Navigation menu screen Press and hold this button for at least 2 seconds to change to Go...

Page 41: ...list screen vertically then touch your choice from the list of 23 languages Some of this unit s functions cannot be performed while the vehicle is in motion Be sure to stop your vehicle in a safe loc...

Page 42: ...3 5 Bluetooth Audio 1 or Factory Bluetooth Audio 2 Radio 1 When no USB flash drive iPod HDMI device Smartphone Bluetooth compatible device SiriusXM Tuner is connected this option is not available 2 No...

Page 43: ...ted item Switches to the menu screen or the previous screen Item select button Closes the window Displays the next list page When the next selection item does not exist the list item is not displayed...

Page 44: ...hone the incoming call screen is displayed Tone Adjustment mode BASS ENGINE SQ mode Button for changing the BASS ENGINE SQ mode screen Balance Fader Image area 1 To reset to the initial settings Balan...

Page 45: ...ource icon displayed on the Rear monitor Front The image and sound of the same visual source as the unit are output Off Stops output to the Rear monitor Illumination Color button 3 The color coordinat...

Page 46: ...one via this unit page 28 When there is no Notification No Notifications will be displayed Camera button 2 Displays camera images page 90 Setup button Displays the Setup screen page 29 Vehicle Info bu...

Page 47: ...ng screen This setting requires the following image format folder name and file name Usable file format BMP image Image size 800 480 pixels RGB 24 bit or less number of color bit 24 8 1 bit Compressio...

Page 48: ...en area Cursor position alteration switch Cancel Keypad mode finishes Delete Returns to the previous character and erases it Touching here for more than 2 seconds will erase all input characters Input...

Page 49: ...displayed touch Call For details see Calling by Favorite Function page 81 Editing the Favorite Screen 1 Touch Edit A checkbox is displayed on the upper left area of the registration icon and it chang...

Page 50: ...Displays the nearby search screen Place Categories Displays the selected Place Categories list For details of navigation operations refer to Navigation System OM in the website at http www alpine usa...

Page 51: ...move to another drag to the end of the screen and lift your finger after the page changes When deleting a selected item 1 Touch the checkbox at the left of the item you want to delete and place a che...

Page 52: ...aired Smartphone Please obey all local traffic laws while using this function When Setting the External Audio Processor page 49 is On this function is not available Facebook Notification Function Some...

Page 53: ...such as the unit is powered off or during a call etc Notification of the Smartphone will not be prompted by this unit Facebook screen is not displayed while driving Displaying Notification List You ca...

Page 54: ...anual To display the Setup Menu screen Your vehicle must be parked with the ignition key in the ACC or ON position To do this follow the procedures below 1 Bring your vehicle to a complete stop at a s...

Page 55: ...vice whenever this unit is turned ON See Registering the Bluetooth Device if no device is registered Make sure the Bluetooth setting is On See Bluetooth Setup page 30 You can display the Bluetooth dev...

Page 56: ...K Touching Cancel will cancel the setting Make sure the Bluetooth setting is On See Bluetooth Setup page 30 When you connect two Hands Free Phones set the priority of the operation and the setting of...

Page 57: ...Setting item 1 You can make this setting in the Sound Setup screen of the Shortcut Setup For details see Sound Setup Function page 19 Changing the Character Code of the Phone Book Latin 1 ISO 8859 1 L...

Page 58: ...e 1 1 When selecting either of the above setting items the Bal Fad screen is displayed 2 When the Sound Setup of the Shortcut Setup is selected to BASS ENGINE SQ you cannot perform the set up Fad Bal...

Page 59: ...andora correspond to Compressed Media Factory Media USB iPod Factory SiriusXM Factory Bluetooth Audio correspond to Factory Audio 10 typical equalizer settings are preset at the factory for a variety...

Page 60: ...Setup of the Shortcut Setup is selected to BASS ENGINE SQ you cannot perform the set up 1 Touch Channel to select the channel Each time you touch the channel switches The channel being adjusted is di...

Page 61: ...Setting contents Off Initial setting On Setting item Source Volume Setup Radio SiriusXM Compressed Media 1 iPod Music iPod Video or AUX 2 3 HDMI 3 4 Bluetooth Audio Factory Audio 5 Setting contents 14...

Page 62: ...ow pass filter Cuts the higher frequencies and allows the lower frequencies to pass Slope The level change in dB for a frequency change of one octave The higher the slope value the steeper the slope b...

Page 63: ...er s seat etc and measure the distance in meters between your head and the various speakers 2 Calculate the difference between the distance correction value to the farthest speaker and the other speak...

Page 64: ...e display shows MIN or MAX respectively Setting item Tint Setting content R15 to G15 Initial setting 0 Adjust the Color from R15 to G15 Setting item Contrast Setting content 15 to 15 Initial setting 0...

Page 65: ...m Screen Dimmer Level Setting content 15 to 15 Initial setting 0 You can adjust the level between MIN 15 and MAX 15 When it reaches the minimum or maximum point the display shows MIN or MAX respective...

Page 66: ...rom the system before operation Setting item Clear All Settings 1 Touch Reset of Clear All Settings 2 After the confirmation message appears touch OK The confirmation screen appears again 3 Touch OK T...

Page 67: ...g contents Normal Initial setting HiFi Stable Noise may be more noticeable when HiFi is set depending on the reception status In this case the Normal setting is recommended During manual tuning you ca...

Page 68: ...xt of the Team name Total registrations and Remaining number of registration slots is displayed for two seconds then the team is registered as a Favorite Team When you set a team that is registered as...

Page 69: ...displays the SiriusXM signal strength as Strong Good Weak or No Signal If the Signal Indicator reports Weak or No Signal and your vehicle is parked outside with no obstructions to the southern sky th...

Page 70: ...ector in Camera Select the setting item is different For details see Setting Multi Camera to On Off page 48 2 When Camera Select is set to Off you cannot select this item 3 You can select this item on...

Page 71: ...Rear Front Camera only the camera guide will not be displayed When you connect a Multi View compatible camera select a Video Pattern to make a guide adjustment To adjust the guide position of the Rea...

Page 72: ...ually When Hitch Guide is set to On Side Camera 1 Touch Link The 2 vertical guides of the currently selected guide link together allowing them to be adjusted simultaneously Turning Guide Display On Of...

Page 73: ...t You cannot set the source that is currently being played Select to pair the Bluetooth compatible phone with this unit or the connected iDataLink module Setting item Hands free Connection Setting con...

Page 74: ...he Rear monitor to Navi When set to Rear monitor you cannot operate them from this unit Make sure the Rear Seat Entertainment is set to On See Rear Seat Entertainment Setup page 49 For remote control...

Page 75: ...selected on the System Setup Menu screen in step 1 See System Setup page 45 Set TuneIt to USB iPhone when an iPhone is connected or set to Bluetooth Android when an Android Smartphone is paired Setti...

Page 76: ...joy high quality sound If there is no HD Radio signal in the current area after 10 seconds this unit will switch to receive the RBDS Radio signal automatically However the display is still HD Radio mo...

Page 77: ...least 2 seconds The selected station is stored 3 Repeat the procedure to store up to 11 other stations onto the same band To use this procedure for other bands simply select the desired band and repe...

Page 78: ...You can select and receive the currently receivable stations in the Program Type list screen Program Type list screen example For details on switching to the Program Type list screen see in Preset mo...

Page 79: ...ure Logos Digital CD quality sound HD Radio Technology enables local radio stations to broadcast a clean digital signal AM sounds like today s FM and FM sounds like a CD Program Service Data Contribut...

Page 80: ...current or previous track file Touch Fast reverse Touch and hold Advancing to the beginning of the next track file Touch Fast forward Touch and hold The buttons provide the same functions above 3 To p...

Page 81: ...h your desired Folder name 2 or File name When you select a File name the selected song is played When you select a Folder name repeat the same procedure to select another Folder name or File name 2 W...

Page 82: ...16GB 32GB Ver 3 1 3 iPod nano 7th generation 16GB Ver 1 0 2 iPod nano 6th generation 8GB 16GB Ver 1 2 iPod nano 5th generation video camera 8GB 16GB Ver 1 0 2 iPod nano 4th generation video 8GB 16GB V...

Page 83: ...To pause playback touch If a song is playing on the iPod iPhone before it is connected to the unit it will continue playing when it is connected An episode may have several chapters The chapter can be...

Page 84: ...earching for a Desired Video File You can select a movie music video etc from the list screen Video search mode depends on the iPod iPhone If the specification of the iPod iPhone is changed the search...

Page 85: ...normal picture wider to fit in a wide screen monitor by evenly stretching out the picture horizontally Cinema mode In Cinema mode the monitor displays a normal picture by stretching out the picture h...

Page 86: ...on mode Track Artist bookmark icon QuickMix indicator Station name Artist Name Song Name Album Name Playing time Artwork display Listening to Pandora 1 Launch the Pandora on the smartphone 2 Press the...

Page 87: ...artist a personalized Pandora station can be created The new station will play more music like it Free word 1 During playback touch New Station The Key Pad screen is displayed You can enter a keyword...

Page 88: ...t Bluetooth connection will start 1 Touch Settings The Device Setting select pop up screen is displayed 2 Touch Disconnect The Bluetooth connection is disconnected If multiple Bluetooth devices are re...

Page 89: ...g Channel Name Category Name Song Info Mode Artist Name Song Name Album Name Album Art The image that corresponds with the channel currently being received is displayed You can change the artwork posi...

Page 90: ...3 Select the desired channel If no operation is performed for 10 seconds the category browsing mode is canceled Changing the Display Text information such as the channel name artist name feature and...

Page 91: ...SiriusXM Tuner SXV200 is connected or later is connected When Tuner SXV200 is connected this function is available only for Preset channels 1 6 When Tuner SXV300 is connected this function is availab...

Page 92: ...tist song is not available to be stored Artist Song Saved is displayed if this Artist Song was previously stored If there is no memory space Alert Memory Full is displayed and then you are asked wheth...

Page 93: ...3 The initial number is 0000 If you input a wrong passcode Incorrect Pass Code entered is displayed After entering the correct passcode you can access all locked channels without entering the passcode...

Page 94: ...8U INE W967HD DVE 5300 Insert the disc until it is automatically pulled into the unit Do not touch the surface of the disc directly with your fingers Before inserting or removing the disc always turn...

Page 95: ...io may be distorted Returning to the Initial Setting You can return the contents you previously set to the initial factory settings Setting item Setup Initialize Setting contents Yes No Initial settin...

Page 96: ...etup Bitstream Select Bitstream when you want to connect a digital audio processor to play Dolby Digital or DTS audio When Bitstream is selected the HDMI audio will be muted The DVE 5300 DVD Player op...

Page 97: ...cted by DRM Digital Rights Management copy protection cannot be played back on this unit If a disc contains both audio data and MP3 WMA AAC WAV data this unit plays back only the audio data The track...

Page 98: ...nter When selecting Folder select File following same procedure then touch Enter When there are 9 or more names on the list a page number is displayed Touch or to change the page Touch or to change th...

Page 99: ...io can be heard while driving DVD Commercial Video discs used for the distribution of movies etc or a DVD R DVD RW DVD R DVD RW recorded in a video mode can be used Video CD discs can be used WARNING...

Page 100: ...u operation mode The numeric keypad input mode screen appears 2 Touch a desired number Touch to delete an entered number To delete all the numbers you have entered touch for at least 2 seconds 3 Touch...

Page 101: ...s touched 2 Touch to return to normal mode No sound is output during forward frame by frame playback You can only execute reverse frame by frame playback when playing DVD V Repeat Playback Use this fu...

Page 102: ...orded on the disc every time the button is touched The alternate track selected becomes the default setting every time the power is turned on or the disc is replaced If the disc does not include that...

Page 103: ...ge 60 You cannot operate them while driving Switching the source when two HDMI devices are connected You can switch the source only when you have connected the HDMI selector and Setting the HDMI Selec...

Page 104: ...Additionally certain features may not be activated by your service provider and or the provider s network settings may limit the feature s functionality Always contact your service provider about fea...

Page 105: ...play it again Touch or swipe downward on on the upper part of the screen During an incoming call or a conversation on the Primary Secondary Hands Free Phone if there is an incoming call on the Seconda...

Page 106: ...page 24 1 Press the Favorite button The Favorite screen is displayed Favorite screen 2 Touch the Short Cut icon A contact s name phone number and a confirmation message of the phone number are display...

Page 107: ...e In that case touch the microphone icon in the center of the Voice Control mode screen You can continue to use the Voice Control mode 3 To finish the Voice Control mode touch or press and hold the AU...

Page 108: ...ber You can transmit a Touch Tone signal during a call Phone Book Function Phone Book screen example Use to search by directly inputting a name or phone number with the Keypad For details see How to I...

Page 109: ...reen is displayed 4 Touch The phone call is started For details of how to input characters using the keypad see How to Input Characters and Numbers Keypad page 23 If there are fewer than five register...

Page 110: ...n Operations may differ depending on the connected Bluetooth compatible device Search Function Available for AVRCP Ver 1 4 and 1 5 only The displayed list differs with the connected Bluetooth device Y...

Page 111: ...connection will start 1 Touch Settings The Device Setting select pop up screen is displayed 2 Touch Disconnect The Bluetooth connection is disconnected If multiple Bluetooth devices are registered in...

Page 112: ...e video display area Example for AUX AUX DVD GAME USB Player mode display Display Mode For details see Switching Display Modes During Video File Play Back page 60 You cannot operate them while driving...

Page 113: ...reen are the same as the external DVD player operation screen See Operating an External DVD Player External DVD changer screen example Disc1 Disc6 Selects a Disc Touch the left side of the operation s...

Page 114: ...witches the band Tune Channel or Preset or Manual Switches amongst Channel mode Preset mode and Manual mode Auto Preset The tuner automatically seeks and stores stations Display Mode You can set the D...

Page 115: ...ing a Default Camera page 48 to Rear If you connect a Front Camera and Side Camera at the same time touch Front or Side in the Rear Camera image to switch the Camera image You can also switch the Came...

Page 116: ...ou measure the actual distance to the marks when parked on a level surface Depending on the condition of the car or road surface the range of vision may vary The camera has a limited range of vision O...

Page 117: ...ge is being displayed and touch or to return to the main source screen or previous screen You can perform a Guide Adjustment For details see Adjusting the Rear Front Side Camera Guide page 46 If you c...

Page 118: ...tton only when you set Setting a Default Camera page 48 to Side If you connect a Rear Camera and Front Camera at the same time touch Rear or Front in the Rear Camera image to switch the Camera image Y...

Page 119: ...is being displayed You can use the MUTE button or the DOWN UP button to control the volume of Voice Information Operation of the Remote Control unit supplied with the DVD Player or sold separately is...

Page 120: ...ion is displayed only when the Front camera or Rear camera is interlocked Parking Sensor Camera interlock screen example Rear camera You can check for obstacles through an interlocked camera image by...

Page 121: ...y screen When changing the name Touch the icon name then input characters into Edit Name Keypad You can also select a basic name from the Template of the Keypad For details on how to input characters...

Page 122: ...n direct sunshine Battery Replacement Battery type CR2025 battery or equivalent 1 Opening the battery case Slide out the battery cover while firmly pressing in the direction of the arrow 2 Replacing t...

Page 123: ...32 times the normal speed The picture is reversed by one frame each time the button is pressed in the pause mode DVD only button Switches between play and pause MENU button Video CD Switches between P...

Page 124: ...a pointed object such as a ballpoint pen Playing a disc while driving on a very bumpy road may result in skips but this will not scratch the disc or damage the player Irregular Shaped Discs Be sure t...

Page 125: ...e car or this unit discs recorded under unstable conditions discs on which a recording failed or a re recording was attempted copy protected CDs which do not conform to the audio CD industry standard...

Page 126: ...on forms such as MP3 and AAC reduce part of the data to improve compression efficiency However FLAC can reconstruct compressed data to be an identical copy of the original data by performing lossless...

Page 127: ...files is as follows The following numbers may differ from actually displayed numbers Terminology Bit rate This is the sound compression rate specified for encoding The higher the bit rate the higher...

Page 128: ...ages The desired language can be selected from the unit Subtitles function page 77 Movies can include subtitles in up to 32 languages The desired subtitle language can be selected from the unit Multi...

Page 129: ...Sundanese CY 6789 Welsh LN 7678 Ungala sv 8386 Swedish DA 6865 Danish LO 7679 Laothian sw 8387 Swahili DE 6869 German LT 7684 Uthuanlan TA 8465 Tamil DZ 6890 BhutanI LV 7686 Latvian Lettish TE 8469 Te...

Page 130: ...primary signal area the antenna may not be grounded and connected properly Check your antenna connections make sure the antenna is properly grounded at its mounting location The antenna may not be th...

Page 131: ...ears Various messages are displayed on the screen during operation In addition to the messages telling you the current status or providing guidance for the next operation there are also the following...

Page 132: ...unicating with the Tuner Connect the Tuner or check the Tuner connection to the back of the unit Check Antenna The SiriusXM Satellite Radio antenna or cable is either damaged or not connected correctl...

Page 133: ...ature The indicator will disappear when the temperature returns to within operation range Leave the power OFF until the temperature decreases and then turn the power ON again LOADING ERROR EJECT ERROR...

Page 134: ...rements USB 2 0 Max Power Consumption 1 500 mA CDP Support USB Class USB Play From Device USB Mass Storage Class File System FAT16 32 Number of Channels 2 Channels Stereo Frequency Response 1 5 20 000...

Page 135: ...se CD 5 20 000 Hz 1 dB Wow Flutter WRMS Below measurable limits Total Harmonic Distortion 0 02 at 1 kHz Dynamic Range 95 dB at 1 kHz Channel Separation 65 dB at 1 kHz Horizontal resolution 500 lines o...

Page 136: ...sspelling omission of letters or any other cosmetic discrepancy in layout found in the System The right to use the System shall expire either when the user destroys this software or when any of the te...

Page 137: ...anty and if the product was shipped to an Authorized Alpine Service Center or Alpine Alpine will pay the return shipping charges You should provide a detailed description of the problem s for which se...

Page 138: ...tion aux fr quences radio lectriques RF CNR 102 de l IC Cet quipement met une nergie RF tr s faible qui est consid r e conforme sans valuation de l exposition maximale autoris e MPE Cependant il est s...

Page 139: ...uct safely to prevent harm to you and others and to protect against damage to property These symbols and their meanings are listed below Make sure you fully understand these symbols before you begin r...

Page 140: ...cing fuses be sure to use fuses with the specified current rating Failing to do so could lead to an accident or fire Forbidden Mandatory Only connect the product to a 12 VDC negative ground car Failin...

Page 141: ...the like could lead to an accident or damage equipment Caution Connect the product properly according to the instructions Failing to do so could lead to fire or an accident Forbidden Do not sandwich c...

Page 142: ...Chevrolet GMC FULL SIZE TRUCK z 4 17 Tools Required Panel Removing Tool Pliers T15 Torx Screwdriver 2 Phillips Screwdriver 7mm Screwdriver Wire Cutters 7mm 10mm Socket Extension Ratchet...

Page 143: ...110 G Display Monitor X110 G Source Unit HDMI Cable Bracket 8mm x 8 Screws GPS Antenna USB Extension Cable Pre Out Harness Direct Camera Adapter Display Cable DVD Player Box Parts DVE 5300X HDMI Cable...

Page 144: ...l Key Harness Display Mounting Brackets Vent Covers DVD Player Mounting Brackets Source Unit Mounting Brackets iDatalink Maestro Box Parts ALP MRR V2 0 ALP HRN GM3 Main Harness Antenna Adapter Factory...

Page 145: ...COUNT Go to idatalinkmaestro com register and complete the registration process FRQ UPDWLRQ HPDLO ZLOO EH VHQW WR RX UHTXLULQJ YDOLGDWLRQ For existing customers click log in 3 CONNECT YOUR MAESTRO MOD...

Page 146: ...screws from the radio and climate control bezel MENU TEMP BACK RADIO MEDIA A C 4 Disconnect and remove the radio tuner by lifting the center tab Use a pair of pliers to remove the FM and SXM antenna c...

Page 147: ...rx screws 9 Unclip the USB cable from the metal bar support and disconnect the green connector from the HMI box may not be available on center console equipped trucks 10For trucks equipped with OEM ca...

Page 148: ...tor To OBDII Connector Power Speaker 16 pin Green Connector OEM Audio 20 pin Gray Connector Main Harness Blue Power Antenna Blue White Amp Turn on Direct Camera Input Key Harness External Display DVD...

Page 149: ...nterface Sold Separately KCE 220UB For USB Charging ONLY Sold Separately KCU 610HD HDMI Cable Sold Separately KCE 461iV USB to Lightning Cable Sold by Apple Lightning Digital AV Adapter Remote In DVE...

Page 150: ...70mm metal plate Keep the GPS antenna cable away from the FPD Display Maestro module and SXM tuner as these generate interference and will decrease GPS performance Route the GPS antenna cable down to...

Page 151: ...factory HVAC controller by clipping it to the X110 G Restyle bezel 2 Attached the top and bottom brackets to the X110 G display using the provide 8mm screws 3 Mount the display monitor to the restyle...

Page 152: ...T Harness 2 Slide the X110 G radio tuner into the factory tuner location and connect it to the main harness 3 Attached the updated Maestro module to the main harness and plug the main harness to the...

Page 153: ...harness and antenna connections 8 Connect the X110 G display and snap into place Display Cable Power Key Harness Climate Control 9 Secure the X110 G restyle bezel using 4 7mm factory screws 10Attach...

Page 154: ...hifted into reverse the AUDIO will MUTE If this feature is not desired turn it off in the AUDIO MENU MENU SETUP SOUND MUTE WHILE BACKING UP 7 Set the DVD player MENU SETUP SOURCE HDMI 8 When the KCX 6...

Page 155: ...ive When you press the Onstar button on the mirror noises in the vehicle may be recognized as voice commands In addition radio key presses may also be recognized as voice commands while the Onstar is...

Page 156: ...User Manual Alpine Navigation System Navigation software for the Alpine Navigation System English March 2015 ver 1 0...

Page 157: ...n and signposts 18 2 3 7 Junction view 19 2 3 8 Tunnel view 19 2 3 9 Freeway services 20 2 3 10 3D object types 20 2 3 11 Traffic events 21 2 4 Navigation menu 21 3 Using the navigation 24 3 1 Selecti...

Page 158: ...route 52 3 5 Saving a location 53 3 5 1 Editing a Saved Location 54 3 6 Adding an Alert Point 54 3 7 Running a Simulation 56 3 8 Off road navigation 57 3 8 1 Switching to off road navigation 57 3 8 2...

Page 159: ...rences 70 4 3 1 1 Vehicle profile 70 4 3 1 2 Route Planning Method types 72 4 3 1 3 Navigation Mode 72 4 3 1 4 Road types 72 4 3 2 Sound 73 4 3 3 Warnings 75 4 3 4 Navigation View 76 4 3 5 Regional 78...

Page 160: ...ok at the display only when it is safe to do so If you are the driver of the vehicle we recommend that you plan and review your route before you start your journey Plan the route before your departure...

Page 161: ...content for your navigation system Use the Toolbox application with your product connected and download the new map data To update your navigation software and its maps you need a PC with Internet acc...

Page 162: ...speaker used for voice guidance messages Later you can change it in Regional settings page 73 Tap to continue 5 If needed modify the time format and unit settings Later you can change them in Regional...

Page 163: ...stem 2 2 Screen controls The following sections describe the functionality and use of buttons sliders and other screen controls in Alpine Navigation System 2 2 1 Using the buttons and other controls T...

Page 164: ...keyboard layouts for example English Greek or numerical Only those keyboard buttons are active that can be used to type a name that is available on the map The other keys are grayed out Action Functi...

Page 165: ...w Tap and hold any of the following buttons on the Navigation view to rotate tilt or scale the map continuously Tap and hold the following button on keyboard screens to quickly delete several characte...

Page 166: ...displayed on the screen Alpine Navigation System uses maps that let you examine the locations at various zoom levels always with optimized content It always displays street names and other text with t...

Page 167: ...g direction This is the default orientation in 3D map view mode In North up mode the map faces North Checking the compass The direction of the compass shows North Selecting additional options Open a l...

Page 168: ...not simply the computerized versions of traditional paper maps Similarly to paper road maps the 2D mode of digital maps shows you streets and roads Elevation is also illustrated in color The navigatio...

Page 169: ...distance See page 17 6 Next street It displays the name of the next street See page 17 If you have not selected a route destination you can see nearby house numbers 7 2D 2D North up 3D views You can s...

Page 170: ...l information It shows the Freeway services Parking around destination or the Destination menu button if they are available during navigation 19 Street name It shows the current street name By tapping...

Page 171: ...ent position displayed on the map If a vehicle is selected for route calculation and roads are near the arrow jumps to the nearest road The dot near the arrow shows the exact GPS position Normally if...

Page 172: ...n are displayed A smaller icon shows the type of the second next maneuver if it is near the first one Otherwise only the next maneuver is displayed 2 3 5 Maneuver icons During navigation the next mane...

Page 173: ...ction you need to take Where additional information is available arrows are replaced by signposts Signposts are displayed at the top of the map The color and style of the signposts are similar to the...

Page 174: ...urrently displayed junction and return to the Navigation view tap the picture Junction view can be turned off in See page 76 2 3 8 Tunnel view When entering a tunnel the map is replaced with a generic...

Page 175: ...u can change the icons in See page 76 2 3 10 3D object types Alpine Navigation System supports the following 3D object types Type Description 3D terrain Alpine Navigation System displays 3D hills and...

Page 176: ...d when traffic events are not received It is displayed when traffic events are received but they do not affect the planned route It shows the type of the next traffic event with the expected delay It...

Page 177: ...tion Customize the way the navigation software works With a planned route the following menu options are also available Button Function Add an intermediate destination to your route See route alternat...

Page 178: ...play additional features Tap it to open the list of additional features on certain screens Tap the Back button to return to the previous screen You can also press and hold this button to quickly retur...

Page 179: ...view and modify the route or use navigation related features with the help of the touch screen 3 1 Selecting a destination You can choose your destination by selecting one of the following options Us...

Page 180: ...country or state start entering the country state and the town b Tap to see the whole list of the matching results 4 With the proper search area displayed start entering the name address or category o...

Page 181: ...provider Tap the Online Providers button to start the new search using the Online Search facility Wait for the results and select an item from the list Tip To search for an intersection in the Freefo...

Page 182: ...on perform the following steps 1 Press the navigation hardkey button to access the Navigation menu 2 Tap 3 Select the country by performing the following steps a By default the Alpine Navigation Syste...

Page 183: ...the string appear in a list b Tap to open the list of results Select the street from the list c Enter the house number or crossing street on the keyboard To enter letters tap d Tap the selected addres...

Page 184: ...ming the following steps a Tap and start entering the first few letters of the town or the first few numbers of the ZIP code The names that match the string appear in a list b To open the list tap and...

Page 185: ...street name on the keyboard The names that match the string appear in a list 4 Tap to open the list of results Select the street from the list 5 Start entering the name of the crossing street tap to e...

Page 186: ...a Place of Interest You can search for Places of Interest Places in the menu Using the same screen you can find a Place by selecting one of the following options Finding frequently searched types of...

Page 187: ...planned route exists restaurants are searched along the route If a planned route exists parking lots are searched around the destination If there is no planned route destination is not selected the s...

Page 188: ...on hardkey button to access the Navigation menu 2 Tap and 3 Select the area around which you would like to search for the Place by tapping By default the search area is around the current position or...

Page 189: ...modation then browse the subcategories for example Hotel or Motel to find your destination 6 You can turn the Category View off at any level to list all Places around the selected location or along th...

Page 190: ...d like to search for the Place By default the search area is around the current position or if it is not available around the last known position In this case the result list is ordered by the distanc...

Page 191: ...the name of the Place or browse in the categories 2 After entering a few letters tap to open the list of Places or Place categories with names containing the entered character sequence 3 Browse the li...

Page 192: ...r repair and roadside assistance services Medical and emergency services Police stations Gas stations 3 Tap any of the quick search buttons to get an instant list of those types of Places 4 optional T...

Page 193: ...re set categories Home and Work 4 Tap the location that you want to set as your destination If necessary browse the list to see more results 5 optional If needed tap to enable the editing option so th...

Page 194: ...all the History items tap The list of recent destinations appears The list begins with the three most likely destinations that are selected based on your previous routes Smart History The rest of the...

Page 195: ...e and longitude values in any of the following formats decimal degrees degrees and decimal minutes or degrees minutes and decimal seconds Tap Tip optional If necessary tap then and enter the coordinat...

Page 196: ...appears there 3 optional If needed tap to list the Places near the selected point or to save this location Tip If you already have a planned route tap and to add the selected location to your route 4...

Page 197: ...e which is normally the current GPS position 4 Tap to select the destination 5 The New Route to screen appears where you can select the destination of the route the same way as described in the previo...

Page 198: ...the planned route perform the following steps 1 Press the navigation hardkey button to access the Navigation menu 2 In the Navigation menu tap 3 The planned route is displayed in its full length on t...

Page 199: ...of week if suitable data can be found on the device In addition real time traffic information can help you avoid current traffic events like temporary road closures or traffic jams caused by an accid...

Page 200: ...ls and to display the affected road segment in its full length on the map To display real time traffic information on the map perform the following steps 1 On the Navigation view tap the traffic icon...

Page 201: ...time of day to see the desired period 3 4 Editing the route When navigation has already started there are several ways to modify the planned route You have the following options Setting a new startin...

Page 202: ...an the current GPS position 1 Press the navigation hardkey button to access the Navigation menu 2 In the Navigation menu tap 3 The first line from the bottom is the start of the route normally the cur...

Page 203: ...new destination as described in the above sections the route to the previous destination is deleted and a new route is calculated To add a new intermediate destination to the planned route perform on...

Page 204: ...s or the route Tap the name of the intermediate destination to move it up or down in the list to save the location or to delete it from the list If you have a route with at least one intermediate dest...

Page 205: ...te You have the following two options to delete the navigated route If you already have a planned route and you select a new destination as described in the above sections the route to the previous de...

Page 206: ...r and go to the route confirmation screen 2 Tap 3 You can see the basic details of route alternatives Tap any of them to see it on the map 4 To view more suggestions tap and scroll down for other alte...

Page 207: ...the basic details of a few route alternatives Tap any of them to see it on the map If there are suitable alternatives calculated with the route planning method that is selected in Route preferences pa...

Page 208: ...on 2 When the map appears with the route tap 3 Tap 4 optional Using the keyboard you can change the name offered for the Saved Location 5 Tap to save the location To add your home and work address to...

Page 209: ...on on the keyboard then tap Note In Saved Locations Home and Work cannot be renamed To change your home or work location tap or and confirm the address change 5 Tap Adding a location to the list of Sa...

Page 210: ...feature is legal in the country where you intend to use it 1 Return to the Navigation view and select the Alert Point The red cursor appears there 2 Tap 3 Scroll down the list and tap 4 Select the ty...

Page 211: ...menu tap 3 Tap 4 Tap The simulation starts from the starting point of the route and leads you through the whole planned route using a realistic speed optional You have the following controls during th...

Page 212: ...navigation hardkey button and tap and 2 Tap and select Most of the procedures described for on road navigation also apply to off road navigation However there are some that are not available in this n...

Page 213: ...n switch back to on road navigation by tapping and 3 9 Updating the navigation software and the maps To update your navigation software and its maps you need the following A PC equipped with the follo...

Page 214: ...dditional extras at your convenience For instructions on using the Toolbox see the Toolbox How to Guides at alpine naviextras com shop portal support d Once the download is complete remove the USB sto...

Page 215: ...s Every phrase that occurs in voice guidance messages is recorded in a studio with a real person The advantage of pre recorded voice is that it sounds really natural but the range of instructions that...

Page 216: ...with any other given point See page 47 Once the destination has been selected Alpine Navigation System calculates the route based on your preferences These preferences are the route planning method th...

Page 217: ...re available Audio warning You receive a verbal warning when you exceed the speed limit with the given percentage Visual warning The current speed limit is shown on the map when you exceed it for exam...

Page 218: ...route considering the most up to date traffic conditions For information on traffic icons see page 21 To fine tune this service you have the following options in Traffic settings page 80 Set the mini...

Page 219: ...pt the recommended detour by tapping 4 1 9 2 Real time alternative routes Alpine Navigation System may offer an alternative route on normal roads in case of a traffic jam The possible alternative rout...

Page 220: ...cupancy of some parking facilities If the online parking service is not available Alpine Navigation System is searching for parking places in the Places of Interest 4 1 9 4 Hints upon detour If you le...

Page 221: ...st of countries with useful driving information about the selected country for example speed limits maximum blood alcohol level Shows statistical data of your trips like the start time end time and av...

Page 222: ...ormation is shown on the Where Am I screen Address details when available of the current position Latitude and Longitude coordinate of the current position in WGS84 format The nearest town Next crossi...

Page 223: ...enable saving the trip logs automatically or you can save the trip logs manually See page 81 By tapping your recorded trip on the Trip Monitor screen you can check information such as time speed alti...

Page 224: ...asurement units the time and date and formats and customize the application for your local language Enable or disable menu animations set separate themes for daytime and nighttime use Enable or disabl...

Page 225: ...3 1 1 Vehicle profile You can select the following vehicle types Button Description Maneuver restrictions and directional constraints are taken into account when planning a route Roads are used only...

Page 226: ...ble to set up vehicle parameters used in route planning You can have several profiles for the same vehicle To add a new vehicle profile perform the following steps 1 Tap browse the list of vehicles an...

Page 227: ...the benefits of Fast and Short Alpine Navigation System calculates as if it were calculating the Fast route but it takes other roads as well to save fuel Depending on the vehicle type some methods ma...

Page 228: ...example in Switzerland Carpool or HOV lanes can be used if a given number of passengers is traveling in the vehicle Check whether you are allowed to use carpool lanes before enabling this road type Al...

Page 229: ...unce the maneuver only Set whether you want an immediate announcement for the next maneuver after each turn or it is enough to receive the information when the turn is near Set the verbosity of the vo...

Page 230: ...higher This setting lets you decide whether you wish to receive visible and or audible warnings The following warning types are available Visual warning the current speed limit is shown on the map wh...

Page 231: ...are below or above the given speed limit Only when speeding The audio warning is only played when you exceed the given speed limit When approaching The audio warning is always played when approaching...

Page 232: ...ow on the map while navigating Too many Places make the map crowded so it is a good idea to keep as few of them on the map as possible Tap the name of the Place category to show hide it or to open the...

Page 233: ...a tunnel instead of the map A top down overview of the tunnel and the remaining distance are also displayed In certain situations Alpine Navigation System offers a detour when there is a traffic jam...

Page 234: ...above mentioned profiles it can also be used for voice recognition You can set the measurement units and time date format to be used Alpine Navigation System may not support all the listed units in so...

Page 235: ...erns This locally stored information can be very useful in normal circumstances but for example on public vacations it may be better to turn it off in order not to take account of normal weekday traff...

Page 236: ...yed on the map You can let the application save track logs whenever it saves a trip This is not a button This line shows the current size of the trip database the sum of all trip and track logs saved...

Page 237: ...the end user hereinafter User and the business entity distributing selling the Device together with the Navigation Product under its own name and or branding hereinafter Licensor This Agreement sets...

Page 238: ...any medium thereof shall be deemed parts of the Navigation Product 4 3 Error corrections updates or upgrades or any other modifications to the Navigation Product used by the User following the conclus...

Page 239: ...roduct is for the User s personal purposes only 6 2 In the event that the Navigation Product comes preinstalled on or otherwise licensed together with the Device or acquired from Licensor by the User...

Page 240: ...y responsibility for damages incurred due to the Navigation Product not being applicable for any defined purpose or due to the error or incompatibility of the Navigation Product with any other system...

Page 241: ...terms at the website and the User is obliged to use the services in line with those terms In the event of conflict between this Agreement and such additional terms the additional terms shall prevail...

Page 242: ...rs The Navigation Product may allow the User to access and communicate third party servers directly In such cases use of such servers is for User s own risk entirely Licensor shall not undertake any l...

Page 243: ...e geographic position of the User s device may be used for providing better search results Also the search result chosen by the User may be processed anonymously by the Service supllier for statistica...

Page 244: ...rt be reproduced or transmitted in any form either electronically or mechanically including photocopying and recording without the express written consent of Alpine Electronics Inc 2015 Alpine Electro...

Page 245: ...HERE Maps Update 68 29530Z26 A Y_240x180...

Page 246: ...ormed of map updates and special offers To register complete and return this card or visit here com Please tick the box Email ok if you would like to receive information by email here com 2014 HERE Al...

Page 247: ...Country Pays Pals Telephone Telephone Telefono Mobile telephone Telephone mobile Telefono m6vil Fax Number Telecopie Numero de fax Purchase date Date d achat Fecha de adquisici6n Car Make Model Year...

Page 248: ...ST CLASS MAIL PERMIT NO 363 OREM UT POSTAGE WILL BE PAID BY ADDRESSEE HERE PO BOX 1588 OREM UT 84059 9909 1111 1111 11 1 1 1111 1 1 1111 1111 11111 111111 1 111111111 111 NO POSTAGE NECESSARY IF MAILE...

Page 249: ...om registration Vous serez tenu informe des nouveaux produits des mises ajour logicielles le cas echeant des promotions speciales et des informations concernant Alpine L enregistrement de votre produi...

Page 250: ...th or damage to the product ATTENTION INSTALLER UNIQUEMENT DANS LES VOITURES INDIQUEES N installer ce produit que dans les installations prevues a cet effet et uniquement dans les voitures recommandee...

Page 251: ......

Page 252: ......

Page 253: ...nd the Limited Warranty please see the Limited Warranty which is printed in the owner s manual and also may be found at alpine usa com support We encourage you to register this product on Alpine s web...

Page 254: ...r par un produit neuf ou revise le tout sans frais pour vous Si les reparations sont couvertes par Ia garantie et si le produit a ete envoye a un centre de service Alpine ou a Alpine le paiement des f...

Page 255: ...e warranty and if the product was shipped to an Authorized Alpine Service Center or Alpine Alpine will pay the return shipping charges You should provide a detailed description of the problem s for wh...

Reviews: