background image

82

-EN

01GB07ICS-X7HD.fm

ALPINE ICS-X7HD 68-21057Z34-A (EN/FR/ES)

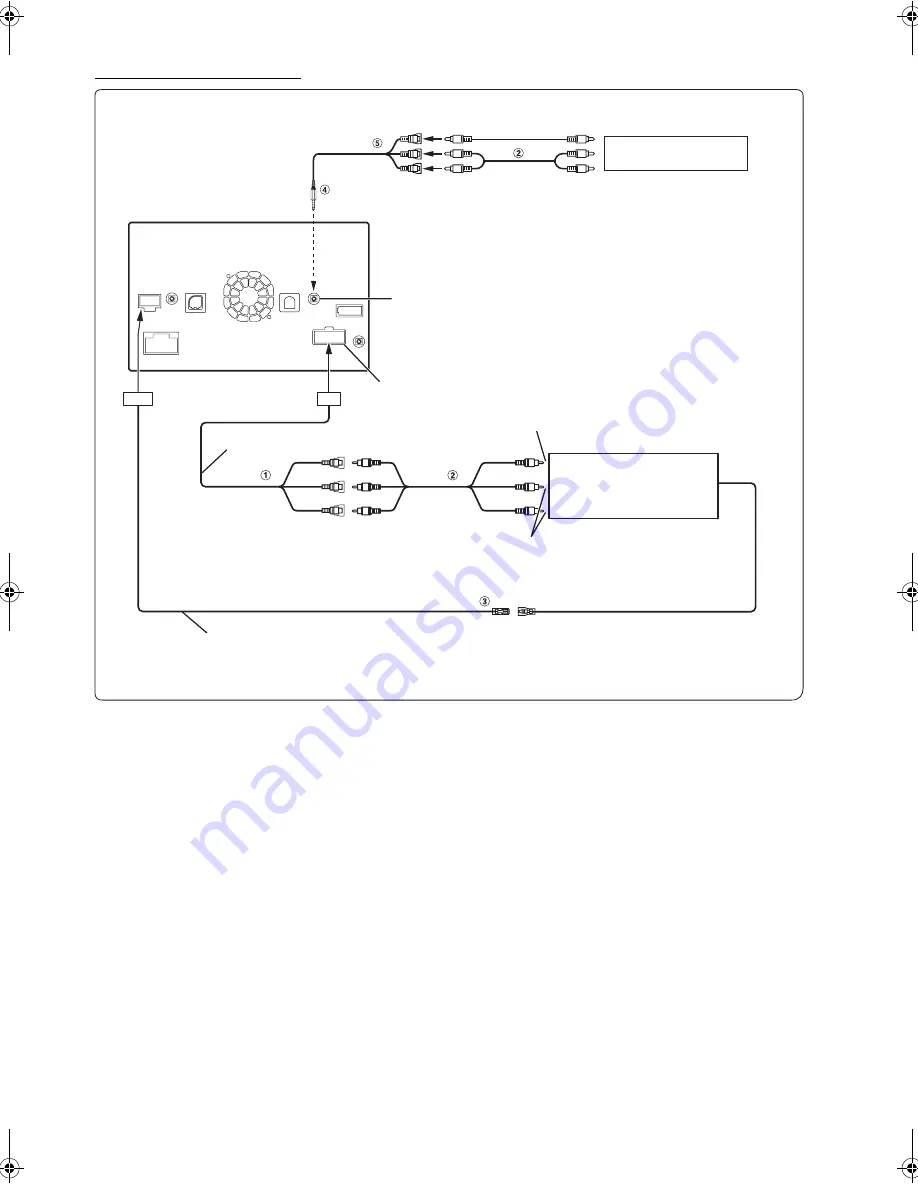
Connection of an External device

1

Video/Audio Input Connectors (AUX INPUT)

2

RCA Extension Cable (Sold Separately)

3

Remote Control Output Lead (Brown)

Connect this lead to the remote control input lead. This lead 
outputs the controlling signals from the remote control.

4

AV/RCA interface cable (4-pole mini AV plug to 3-
RCA) (sold separately)

5

Video/Audio Input Connectors

YELLOW is for input video, RED is right and WHITE is left 
input the audio.

You can change the name of an external device. Refer to “Setting the AUX Mode” (page 33).

To connect an external input device to the iPod VIDEO Connector, set “AUX3 In Sel.” to “AUX3.” Refer to “Setting the AUX3” (page 33).

AUX/PRE OUT Connector

AUX/PRE OUT Cable

(Yellow)

(Red)

(White)

To Video Output Terminal

To Audio Output Terminal

DVD Changer (Sold separately)

Remote Out/Reverse cable

REMOTE OUT

(Brown)

REMOTE IN

(White/Brown)

To Video Output Terminal

DVD Player 
(sold separately)

To Audio Output Terminal 

DVE-5207, etc.

iPod VIDEO Input Connector

01GB00ICS-X7HD.book  Page 82  Friday, October 12, 2012  5:20 AM

Summary of Contents for ICS-X7HD

Page 1: ...héant des promotions spéciales de l actualité d Alpine et vous aurez une chance de remporter des prix Gracias por adquirir este producto Alpine Con solo unos pocos pasos podrá proteger su producto registrándolo a través de la siguiente dirección www alpine usa com registration Recibirá información sobre nuevos productos y software promociones especiales novedades sobre Alpine y participará en el s...

Page 2: ...OF AUSTRALIA PTY LTD 161 165 Princes Highway Hallam Victoria 3803 Australia Phone 03 8787 1200 ALPINE ELECTRONICS GmbH Wilhelm Wagenfeld Str 1 3 80807 München Germany Phone 089 32 42 640 ALPINE ELECTRONICS OF U K LTD Alpine House Fletchamstead Highway Coventry CV4 9TW U K Phone 0870 33 33 763 ALPINE ITALIA S p A Viale C Colombo 8 20090 Trezzano Sul Naviglio MI Italy Phone 02 484781 ALPINE ELECTRON...

Page 3: ...Tuning to Preset Stations 18 Forced Analog Mode 18 Receiving a Multicast HD Radio Mode only 18 Storing the Tag Information HD Radio Mode only 19 Displaying Radio Text HD Radio RBDS Mode only 19 PTY Program Type Tuning RBDS Mode only 19 About the Feature Logos 19 Setup Audio Setup Audio Setup Operation 20 Setting the Balance Fader Subwoofer 20 Adjusting the Balance Fader 20 Turning Subwoofer ON OFF...

Page 4: ...AUX Mode 33 Setting the AUX3 33 Phone Setting 34 Setting Received Calls Automatically 34 Selecting the Output Speaker 34 Adjusting the Caller Volume 34 Adjusting the Microphone Level 34 Adjusting the Ring Tone Volume 34 SiriusXM Setting 34 Setting the Managing Artist Song and Sports Team Alerts 34 Setting the Favorite Sports Team Alerts 35 Setting the Parental Lock 35 Setting the Signal Strength I...

Page 5: ...els by Category 50 Storing Channel Presets 51 Tuning Channels Using Presets 51 Search Function 51 Direct Channel Tuning 51 Storing the Desired Song Artist 52 Receiving and Tuning to an Alert 52 Replay Function 52 Parental Lock Function 52 Using Jump Memory and Jump Recall Function 52 Storing the Tag Information 53 USB Memory Optional USB Audio Playback 54 Repeat Play 55 Random Play M I X 55 Random...

Page 6: ...ike Dislike Feedback 67 Recall the Previous Station 67 Content Search Function 68 15 sec rewind 30 sec skip 68 MirrorLink Operation Optional DISCLAIMER 69 Using MirrorLink 69 Displaying the Mirror Mode 70 Displaying the Car Mode 70 Displaying the Navigation Mode 70 Displaying the Music Application Mode 70 Information Product Software Update 71 In Case of Difficulty 71 If this Message Appears 71 Sp...

Page 7: ...ay may distract the driver from looking ahead of the vehicle and cause an accident DO NOT DISASSEMBLE OR ALTER Doing so may result in an accident fire or electric shock USE ONLY IN CARS WITH A 12 VOLT NEGATIVE GROUND Check with your dealer if you are not sure Failure to do so may result in fire etc KEEP SMALL OBJECTS SUCH AS SCREWS OUT OF THE REACH OF CHILDREN Swallowing them may result in serious...

Page 8: ...rrect performance using other USB products cannot be guaranteed If the USB connector is used be sure to use only the supplied connector cable with the unit A USB hub is not supported Depending on the connected USB memory device the unit may not function or some functions may not be performed The audio file format that can be played back on the unit is MP3 WMA AAC The video file format that can be ...

Page 9: ... revenue generation real time broadcasting terrestrial satellite cable and or any other media broadcasting streaming via internet intranets and or other networks or in other electronic content distribution systems such as pay audio or audio on demand applications An independent license for such use is required For details please visit http www mp3licensing com Pandora and the Pandora logo are regi...

Page 10: ... on the screen you are using The icon layout is customizable for your convenience Switching Between Simple Mode and Info Mode The media screen display has two options to select from Simple or Info mode Info mode has additional operation buttons in the display Features Home button Touch the Home button Press the Home button Home Screen see page 14 Favorites see page 15 Touch an application icon to ...

Page 11: ...ntrol button to select a song even if the main screen for the media is not being displayed The operation of the Media Control buttons may change depending on the media you are using A guide will display on the screen to show which switch controls what function In this owner s manual when the Media Control button guide and the onscreen button display are the same only onscreen button operations are...

Page 12: ...tivating this function will instantly lower the volume level by 20 dB Touch Operation You can operate the system by using the touch panel on the screen Be sure to touch the onscreen button lightly with the pad of your finger to protect the display If you touch a button and there is no reaction remove your finger from the display once and try again Onscreen buttons that cannot be operated appear du...

Page 13: ... time the language selection menu is displayed There are 15 languages to choose from Touch or to scroll the list and then touch the desired language You can also scroll through lists by touching the screen and sliding your finger up and down 2 Touch OK The radio screen is displayed Some of this unit s functions cannot be performed while the vehicle is in motion Be sure to stop your vehicle in a sa...

Page 14: ...ld an application icon for at least 1 second The display will change to Icon Rearrangement mode will display on the icon 2 Drag and drop the icon to the desired location The icon moves 3 Touch to return to the normal mode To move to the previous or next page drag the icon to the left or right edge of the Home screen Hold your finger down for at least 2 seconds after fixing the icon on the destinat...

Page 15: ...he display will change to Icon Rearrangement mode 3 Touch an icon in Favorites or displayed on the Home screen and drag and drop to the desired location in Favorites If you drag icons already inside the Favorites menu you can rearrange their order If you drag an icon displayed on the Home screen to the Favorites menu it will replace an icon in the Favorites menu 4 Touch to return to the normal mod...

Page 16: ...e screen displays various types of information like the current time The clock display You can switch between the 12 hour display and 24 hour display options see page 28 Lights up when connected to a BLUETOOTH compatible device BLUETOOTH connection to audio device BLUETOOTH connection to Hands Free Phone Blinks while reconnecting Does not display when connection is set to OFF Indicates the signal ...

Page 17: ...mode and Info mode refer to Switching Between Simple Mode Info Mode page 16 Listening to the Radio 1 Press the Home button The Home screen is displayed 2 Touch Radio The radio mode is activated and the display changes to the Radio mode screen 3 Touch Band to select the desired radio band Each touch changes the bands as follows 4 Press Media Control button 2 to choose the tuning mode There are two ...

Page 18: ... appears in the guide after pressing Media Control button 2 repeatedly touch or press Media Control button 1 or Media Control button 3 The preset station is received To toggle between preset buttons 1 3 and preset buttons 4 6 touch or on either side of the preset buttons You can check the selected Preset No via the Preset No Indicator Forced Analog Mode Activate the Compulsory Analog Radio mode to...

Page 19: ...de only Text messages from a radio station can be displayed 1 Tune in a radio station that transmits text messages 2 Touch the Info area pages 17 in FM radio mode repeatedly to switch to the desired display HD Radio RBDS PTY Program Type Tuning RBDS Mode only PTY tuning is available only in the Forced Analog mode 1 Touch PTY Search The Select PTY list screen is displayed 2 Touch the selected progr...

Page 20: ...vel when a Subwoofer is connected Setting item SubW LEVEL Setting contents 0 to 15 Initial setting 0 If the Subwoofer setting is Off the setting cannot be set The subwoofer output phase is toggled Subwoofer Normal 0 or Subwoofer Reverse 180 Setting item SubW Phase Setting contents 0 180 Initial setting 0 If the Subwoofer setting is Off the setting cannot be set Setup Audio Setup To display the Aud...

Page 21: ... and produces well balanced sound in all the bands MX PANDORA This corrects information that was omitted at the time of compression This reproduces a well balanced sound close to the original MX AUX AUX3 Choose the MX mode Compress Media Movie or Music that corresponds to the media connected MX HD Radio The medium to high frequencies become more clear and produces well balanced sound in all the ba...

Page 22: ...rection is selected on the Audio setup menu in step 3 Refer to Audio Setup Operation page 20 Before performing the following procedures refer to About Time Correction page 24 Setting item Time Correction 1 Touch msec or cm to select mode for making adjustments Each time you touch the onscreen button and correction mode changes msec Adjust time cm Adjust listening position and distance from each sp...

Page 23: ...elect the band to be adjusted You can select a band directly by touching the screen Adjusting the Frequency Touch or of Freq to adjust the frequency of the selected band Adjustable frequency bands 20 Hz to 20 kHz in 1 3 octave steps Adjusting the Level Touch or of Level to adjust the level of selected band Setting contents 7 to 7 Initial setting 0 Setting the Bandwidth Touch or of Q Adjust to sele...

Page 24: ...eat etc and measure the distance in meters between your head and the various speakers 2 Calculate the difference between the distance correction value to the farthest speaker and the other speakers L distance to farthest speaker distance to other speakers These values are the time correction values for the different speakers Setting these values to make each sound reach the listening position at t...

Page 25: ...tup screen appears You can display the Display Setup screen from each application screen Touch Display on any application screen video mode 3 Touch the desired application Video can be selected while a video is playing The camera names set under the AUX Camera settings are displayed The camera names are not displayed when Off is set page 32 4 Touch of the desired item Settable items differ dependi...

Page 26: ...anges made are reset their initial settings If any adjustments are made to the existing Visual EQ selections NIGHT M etc CUSTOM is displayed Setting item Bright Setting content 15 to 15 Initial setting 0 You can adjust the brightness between MIN 15 and MAX 15 When it reaches the minimum or maximum point the display shows MIN or MAX respectively Setting item Color Setting content 15 to 15 Initial s...

Page 27: ...etup While the system is writing data automatically do not turn the ignition key to OFF Otherwise the settings may not be changed Saving and Calling the Adjusted Picture Quality General Setup To display the General Setup Menu screen Your vehicle must be parked with the ignition key in the ACC or ON position To do this follow the procedures below 1 Bring your vehicle to a complete stop at a safe lo...

Page 28: ...up menu feedback information etc for this unit can be changed to appear in the selected language Setting item Language Sel Setting contents English German French Spanish Portuguese Italian Dutch Finnish Norwegian Swedish Russian Japanese Thai Arabic Chinese Touch OK to confirm the language and display the screen in the specified language About ICS X7HD Touch About on the General setup menu in step...

Page 29: ... BLUETOOTH Device 2 Touch Search of No Device The Device list displays up to 10 items 3 Touch Audio HFT or Both of the device you want to connect from the list You can connect pair up to 5 BLUETOOTH compatible mobile phones 4 When the device registration is complete a message appears and the device returns to normal mode The BLUETOOTH registration process differs depending on the device version an...

Page 30: ... or On is set the setting is also applied for the button lighting in Adjusting the Dimmer of Button Lighting at Night page 30 and Adjusting the Minimum Level of Backlight page 30 You can adjust the brightness of the button lighting at night with the dimmer Setting item Key Illumination Level Setting level 2 to 2 Initial setting 0 There are 4 colors available to select from for the Home button Sett...

Page 31: ...plication screen Touch to return to the previous screen Immediately after changing the Application Setup while the system is writing data automatically do not turn the ignition key to OFF Otherwise the settings may not be changed Adjusting the Touch Panel Application Setup To display the Application Setup Menu screen Your vehicle must be parked with the ignition key in the ACC or ON position To do...

Page 32: ... the adjustment is completed touch Set Adjusting guides simultaneously 1 Touch Link The 3 vertical guides of the currently selected guide link together allowing them to be adjusted simultaneously Turning guide display On Off Turning the selected guide off 1 Touch On Off The currently selected guide will turn off 2 To turn the guide on touch On Off again Guides that are turned off are still adjusta...

Page 33: ...gnal Setting contents Auto Initial setting NTSC PAL Connection with external input devices is available through the iPod VIDEO connector An optional adapter cable is required standard RCA to 3 5ø mini phono plug or 3 5ø to 3 5ø mini phono plug You can also play back video connecting with an optional AV cable 4 pole mini AV plug to 3 RCA Setting item AUX3 In Sel Setting contents iPod Video Initial ...

Page 34: ...ormation refer to Storing the Desired Song Artist on page 52 and Setting the Favorite Sports Team Alerts on page 35 Setting item Alert Setup Touch Alert Setup The display changes to Alert Setup menu screen Setting the Alert ON OFF individually for a Song Artist Sport Team You can manage the stored Alert Songs Artists Sports teams individually by this setting 1 Touch Alert List The Alert List scree...

Page 35: ...he locked Channels 3 Touch Clear all Locked Channels 4 Touch OK to clear the lock of all the locked channels Touch Cancel to cancel Setting the Lock status of individual channels 3 Touch Locked Channels The channels list screen is displayed 4 Touch or to select On Off Changing the Lock Passcode 3 Touch input of Edit Code The numeric keypad screen is displayed 4 Use the keypad to enter the current ...

Page 36: ...erformed for the Mirror mode Car mode Set On to enable the Media Control buttons Setting item Media Control button Setup Setting contents Off On Initial setting 1 Touch Media Control button Setup The Media Control button Setup screen is displayed 2 Touch or to set to On or Off The Guide Display of a mode set to Off is not displayed Media Control button Setup ...

Page 37: ...atures may not be activated by your service provider and or the provider s network settings may limit the feature s functionality Always contact your service provider about feature availability and functionality All features functionality and other product specifications as well as the information contained in the Owner s Manual are based upon the latest available information and are believed to b...

Page 38: ...the Home button The Home screen is displayed 2 Touch Phone The phone menu screen is displayed 3 Touch Recent Calls The Recent Calls screen appears Display example for Call History screen 4 Touch the name or the telephone number from the call history list The details screen of the call history is displayed 5 Touch The phone call is started You can use the phone book of the mobile phone to make a ph...

Page 39: ...ice output for calls is switchable between car speakers and the mobile phone speaker Touch or press Media Control button 2 Depending on the mobile phone this operation may not be possible Transmits a DTMF Touch Tone during a call 1 Touch Keypad The number input screen appears 2 Input number You can transmit a Touch Tone signal during a call Touching and holding 0 initiates tone transmission Phone ...

Page 40: ... the Phone Book 1 Press the Home button The Home screen is displayed 2 Touch Phone The Phone menu screen is displayed 3 Touch Phone Book The Phone Book screen is displayed 4 Touch Delete All The confirmation screen is displayed 5 Touch OK All entries of the phone book are deleted The unit s percent search function can be used to search for phone book more efficiently 1 Press the Home button The Ho...

Page 41: ...ayed 6 Touch Save The phone number is assigned to the selected Short Cut dialling number If Dial1 Dial2 or Dial3 is already registered it is overwritten Touch Delete to delete an assigned short cut dialling number Call Waiting Function If a call comes in from another phone during a call a notice is displayed on the screen This function can only be used if the connected mobile phone has a call wait...

Page 42: ... is required Not all functions work with all devices During a call sound on the BLUETOOTH audio source is muted Compatible AVRCP versions 1 0 1 3 1 4 Available functions may differ depending on the AVRCP version Playback 1 Press the Home button The Home screen is displayed 2 Touch BLUETOOTH 3 Touch or to select the desired track file Returning to the beginning of the current file Touch Fast backwa...

Page 43: ...VRCP Ver 1 3 and 1 4 only Touch Group or Group to select the group Operations may differ depending on the connected BLUETOOTH compatible device Search Function Available for AVRCP Ver 1 4 only The displayed list differs with the connected BLUETOOTH device 1 Touch Search during playback Select the track etc you want to listen to from the displayed list Operations may differ depending on the connect...

Page 44: ... screen in the AUX mode for 5 seconds after an operation has been performed To hide the AUX operation screen touch the video display area Touch the display panel to display the operation screen again Setting the AUX name for EXT DVD DVD CHG DVB T mode displays their individual operation switches and enables operation Refer to Setting the Primary AUX Name page 33 and Setting the Secondary AUX Name ...

Page 45: ...s the program playlist folder down Switches the program playlist folder up Calls up the menu operation mode Page 1 2 Changes the operation screen External DVD player display example 2 2 Info mode Touching during play initiates a pre stop Touching again stops play Display Calls up the Display Setup screen see Display Setup Operation on page 25 Angle Switches angle Audio Switches audio Sub T Switche...

Page 46: ...de screen When you touch the screen in the DVB T mode the operation screen is displayed For details on how to operate refer to the Owner s Manual of the connected Digital TV Receiver DVB T DVB T is only applicable in Europe Asia Menu operation mode screen display example Media Control button 1 Switches the Channel number Favorite channel number down Media Control button 2 Channel or FAV Switches b...

Page 47: ...eration screen is displayed on the screen After a 5 second time out the operation screen returns to the camera display screen 2 Touch Caution For each touch the caution location moves to the top or bottom of the screen About the Rear Camera Guide To display the guide set Guide Display ON OFF Setting page 47 to On Also to adjust the guide refer to Adjusting the Rear Camera Guide page 32 You can als...

Page 48: ...c adhere to the camera or its peripheral area When sunlight or headlights directly strike the camera lens When a CCD camera is connected smearing may occur This phenomenon is peculiar to CCD cameras Smear phenomenon A phenomenon which occurs when a high intensity spot such as a reflection of the sunlight on a car body is shot by the camera The picture below is an example of vertical smear common t...

Page 49: ...page 47 for the operations Calibration when Connected to HCE C305R Obstacle detection performance adjustment and guidance mark settings of HCE C305R ACTIVE VIEW REAR CAMERA SYSTEM require that camera installation information be entered and calibration performed If camera information is not entered accurate detection will not be possible so be sure to perform calibration For details on calibration ...

Page 50: ...r button will rapidly browse through the channels The same operations can be performed by pressing Media Control buttons 1 or 3 Refer to Using the Media Control buttons page 11 Checking the SiriusXM Radio ID Number To subscribe to the SiriusXM Satellite Radio service it is necessary to locate and identify the Radio ID of your SiriusXM Tuner The Radio ID contains 8 characters and can be found on th...

Page 51: ...een the information of the broadcasting channels will be displayed You can choose the desired channel from the artist name list or song name list Each time you touch the Info button the display changes as below Channel NO Channel Name Channel NO Artist Name Channel NO Song Title Channel NO Channel Name Searching by My Music 1 Touch My Music The artist names and song names that you have stored and ...

Page 52: ...You can set the alert for a stored Song Artist Sports team on off Refer to Setting the Managing Artist Song and Sports Team Alerts page 34 Replay Function In SiriusXM mode you can pause rewind and replay of live Satellite Radio 1 Touch to Pause playing of the channel content The and replay progress bar is displayed 2 Touch again to resume playing the content The time difference between the real br...

Page 53: ...information stored in this unit is forwarded automatically when connected to an iPod or iPhone If tag information can be stored the Tag indicator lights The Tag indicator blinks while tag information is being stored If tag information cannot be stored Tag dims and does not respond to touching If you try to save a new tag after the 50 tag limit has been reached the warning message Tuner memory full...

Page 54: ...SB memory device but it may take several minutes About operations during library creation Tag Search page 56 does not work properly while a library is being created The order in which songs are played during library creation may differ from the order in the USB memory device Display example for the USB Audio main screen Simple mode Info mode Current track no Total song no Status Indicator The Indi...

Page 55: ...ithin a selected category playlist album etc The songs within the category are played just once until all songs have been played If the M I X mode is activated during Repeat playback the Repeat Play mode will be cancelled If you select a track by using the search mode the M I X play mode will be cancelled Random Play M I X ALL This operation is available only if the most recent song search was a T...

Page 56: ...r example if you listen to a song from a selected album the album can be changed Touch or to select the desired Playlist Artist Album Genre Composer If an album is selected from an artist search the album can be searched For details on icon display refer to Direct Up Down Function page 63 If search selection mode is not activated Direct Up Down Function is not possible During M I X playback this o...

Page 57: ...ecrease Both Audio and Video files are counted if their formats are playable on this unit Media supported The media that this device can play back USB memory Corresponding File Systems This device supports FAT 12 16 32 The maximum nested folder depth is 8 including the root directory File names are limited to 256 characters including the extension Valid characters for folder file names are letters...

Page 58: ...emory 1 Touch during playback indicator is displayed 2 Press Media Control button 2 in the PRE STOP mode Playback starts from the position at which it was stopped USB Video WARNING It is dangerous for the driver to watch the USB Video while driving the vehicle The driver may be distracted from looking ahead and an accident could occur Install the ICS X7HD correctly so that the driver cannot watch ...

Page 59: ...ings of Files During playback touch or The file switches each time the button is touched and playback of the selected file starts The same operations can be performed by pressing Media Control buttons 1 or 3 Refer to Using the Media Control buttons page 11 Playing Still Frames Pausing 1 During playback Press Media Control button 2 2 Press Media Control button 2 to resume playback No sound is playe...

Page 60: ...title appears For some Video files the subtitles will be displayed even when this is set to OFF However the subtitle language may differ depending on the Video files About DivX DivX is a codec software to compress moving images while maintaining image quality using a highly advanced compression ratio and operating speed Official DivX Certified product ABOUT DIVX VIDEO DivX is a digital video forma...

Page 61: ...r 1 3 1 The following devices have been tested and shown to work with this unit Correct function of earlier versions cannot be guaranteed iPhone 4 16GB 32GB Ver 4 3 1 iPhone 3GS 8GB 16GB 32GB Ver 4 3 1 iPhone 3G 8GB 16GB Ver 4 3 1 iPhone 4GB 8GB 16GB Ver 3 1 3 For clarity in identifying your model of iPod please see Apple s own document Identifying iPod models at http support apple com kb HT1353 D...

Page 62: ...e screen appears 3 Touch Artists The Artists search screen is displayed 4 Select the desired artist To Play Back the Artist Directly 1 Touch of the artist s name All songs of the selected artist are played back To Search for the Album of the Artist 1 Touch the selected artist name The Albums search screen of the selected artist is displayed 2 Touch of the desired album s name All songs of the sele...

Page 63: ...tion If you touch of the album name in the search mode this album will be played back repeatedly To go to the previous or next Album use the Direct Up Down Function Touch or to select the desired Playlist Artist Album Genre Podcast Composer Direct Up Down switch icon You can use the Direct Up Down Function during video file playback The Direct Up Down Function switches in the video mode are If you...

Page 64: ... the artwork displayed in the center The file for the selected artwork is played Changing to App Direct App Direct lets you enjoy applications in an iPhone iPod touch displayed on the screen of the ICS X7HD This function can be operated on the iPhone iPod touch In the App Direct mode applications which can be operated on the unit such as Music Video or Aha cannot be operated on an iPhone iPod touc...

Page 65: ...n be performed by pressing Media Control buttons 1 or 3 Refer to Using the Media Control buttons page 11 The operation to replay a previous song is not available Pandora limits the number of skips allowed on their service If you attempt to skip songs beyond the limit No skips remaining is displayed Depending on the signal status song may be stopped during playback While ads are being received some...

Page 66: ...ired station Pandora will play that station Creating a New Station Based on the currently playing song or artist a personalized Pandora station can be created The new station will play more music like it Free word 1 During playback touch The Key Pad screen is displayed You can enter a keyword and search for Artist Song 2 Enter a keyword and touch OK The new station is automatically applied If ther...

Page 67: ...tation The playback screen appears Touch Back on the playback screen to return to the preset station selection screen Views on the station selection screen can be switched Refer to Setting the Presets View page 35 5 Touch to select the desired content 6 To pause playback press the Media Control button 2 Pressing the Media Control button 2 again will resume playback The same operations can be perfo...

Page 68: ...uch the desired content The content list can display the up to 100 items 15 sec rewind 30 sec skip You can rewind currently playing content 15 seconds or skip ahead 30 seconds Touch 15 Sec rewind The currently playing content jumps back 15 seconds Touch 30 Sec skip The currently playing content jumps ahead 30 seconds This operation may not be possible depending on the station ...

Page 69: ...l button differ depending on the mode Car Mode 1 Car Mode 2 Music Application Mode Navigation Mode Operable modes on this unit may differ from operations on your mobile phone depending on the connected mobile phone MirrorLink Operation Optional When using MirrorLink we recommend that you connect your mobile phone via both USB and BLUETOOTH For details on BLUETOOTH connection refer to Registering t...

Page 70: ...not operate the Mirror mode while driving All automotive applications in a mobile phone are displayed on ICS X7HD Touch Car Mode on the Home screen The display shows the Car mode screen If you have displayed a screen other than Car mode from the mobile phone ICS X7HD will display the Home screen Touch Navigation on the Home screen The display shows the Navigation mode screen If you have displayed ...

Page 71: ...t its mounting location The antenna may not be the proper length Make sure the antenna is fully extended if broken replace the antenna with a new one Broadcast is noisy The antenna is not the proper length Extend the antenna fully replace it if it is broken The antenna is poorly grounded Make sure the antenna is grounded properly at its mounting location The station signal is weak and noisy If abo...

Page 72: ...automatically Subscription Updated Press Any key to Continue Your subscription has been updated Press any button to clear this message Channel Locked A locked channel is selected Input the passcode on the number keypad screen refer to Setting the Parental Lock page 35 If wrong passcode is input Incorrect Lock Code will be displayed and the unit will revert to the previous channel Not enough memory...

Page 73: ... DivX file by Chapter Up Down To interrupt the playback touch YES or touch NO to not interrupt Audio format not supported The file being played is a DivX file with an unsupported audio format so only the video data is played Play a DivX file with a supported audio format Video framerate not supported The file being played is a DivX file with an unsupported frame rate Play a DivX file with a suppor...

Page 74: ...ivity IEC Standard 22 5 µV 27 dBf USB requirements USB 1 1 2 0 Max Power Consumption 1 000 mA USB Class USB Play From Device USB Mass Storage Class File System FAT12 16 32 MP3 Decoding MPEG 1 2 AUDIO Layer 3 WMA Decoding Windows Media Audio AAC Decoding AAC LC format m4a file Number of Channels 2 Channel Stereo Frequency Response 5 20 000 Hz 1 dB Total Harmonic Distortion 0 008 at 1 kHz Dynamic Ra...

Page 75: ...D INSTALL THEM SECURELY Be sure to use only the specified accessory parts Use of other than designated parts may damage this unit internally or may not securely install the unit in place This may cause parts to become loose resulting in hazards or product failure ARRANGE THE WIRING SO IT IS NOT CRIMPED OR PINCHED BY A SHARP METAL EDGE Route the cables and wiring away from moving parts like the sea...

Page 76: ... mounting sleeve and secure it 1 If the installed mounting sleeve is loose in the dashboard the pressure plates may be bent slightly to remedy the problem 2 The supplied face plate may be mounted Caution Do not block the unit s fan or heat sink thus preventing air circulation If blocked heat will accumulate inside the unit and may cause a fire Air ventilation hole Rear of the Unit Heat sink 0 30 C...

Page 77: ...of the unit to a clean metal spot using a screw already attached to the car s chassis Attach the Original Mounting Bracket to each side of the ICS X7HD using the screws supplied with ICS X7HD 5 Slide the ICS X7HD into the dashboard until it clicks This ensures that the unit is properly locked and will not accidentally come out from the dashboard This unit Bracket keys Included Ground Lead Chassis ...

Page 78: ...position and the battery may be discharged ICS X7HD Red Yellow SPST SW Optional FUSE 5A Optional FUSE 20A Optional Battery ACC BATTERY To prevent external noise from entering the audio system Locate the unit and route the leads at least 10 cm away from the car harness Keep the battery power leads as far away from other leads as possible Connect the ground lead securely to a bare metal spot remove ...

Page 79: ... input lead To power antenna Not used To the parking brake signal lead Green Black Yellow Red White Amplifier Amplifier Amplifier Rear Left Rear Right Front Left Front Right Subwoofers To Audio Output terminals R L To Video Output terminal Brown REMOTE OUT Microphone Included Green Front left Front right Rear right White Black White Gray Gray Black Violet Violet Black Speakers Antenna Yellow Black...

Page 80: ...ut USB Connector To USB Memory iPod iPhone or Mobile Phone MIC Input Connector To Microphone Included Power Supply Connector Remote Turn On Lead Blue White Connect this lead to the remote turn on lead of your amplifier or signal processor Audio Interrupt In Lead Pink Black Not used for this unit Parking Brake Lead Yellow Blue Connect this lead to the power supply side of the parking brake switch t...

Page 81: ...e Be sure to connect when in the App Direct mode Do not leave a iPod iPhone in a vehicle for a long time Heat and humidity may damage the iPod iPhone and you may not be able to play it again USB Connector USB Memory Sold separately USB Extension Cable I type Included Mobile Phone connection kit KCU 230NK Sold separately Mobile Phone Sold separately or USB Connector iPod VIDEO AV Extension Cable 1 ...

Page 82: ...or input video RED is right and WHITE is left input the audio You can change the name of an external device Refer to Setting the AUX Mode page 33 To connect an external input device to the iPod VIDEO Connector set AUX3 In Sel to AUX3 Refer to Setting the AUX3 page 33 AUX PRE OUT Connector AUX PRE OUT Cable Yellow Red White To Video Output Terminal To Audio Output Terminal DVD Changer Sold separate...

Page 83: ... left 3 Subwoofer RCA Connector 4 RCA Extension Cable Sold separately AUX PRE OUT Connector Power Supply Connector AUX PRE OUT Cable Red White Amplifier 4 ch Sold separately Input Input Front speaker Rear speaker REMO Blue White Power Cable Amplifier for subwoofer Sold separately Input Subwoofer Red White REMOTE ON Blue White REMOTE ON Blue White Red White ...

Page 84: ...Extension Cable HCE C200R included To Video Output terminal Yellow Camera with RCA video output sold separately Red White HCE C105 etc AUX PRE OUT Connector AUX PRE OUT cable To Video Output Terminal Yellow Control Unit Red White To plus side of the back lamp signal lead of the car Camera Control Lead AUX PRE OUT Connector AUX PRE OUT Cable REVERSE Orange White Orange Black ...

Page 85: ......

Page 86: ...he product was shipped to an Authorized Alpine Service Center or Alpine Alpine will pay the return shipping charges B You should provide a detailed description of the problem s for which service is required C You must supply proof of your purchase of the product D You must package the product securely to avoid damage during shipment To prevent lost packages it is recommended to use a carrier that ...

Reviews: