background image

67

English

Audio Processor
Operation

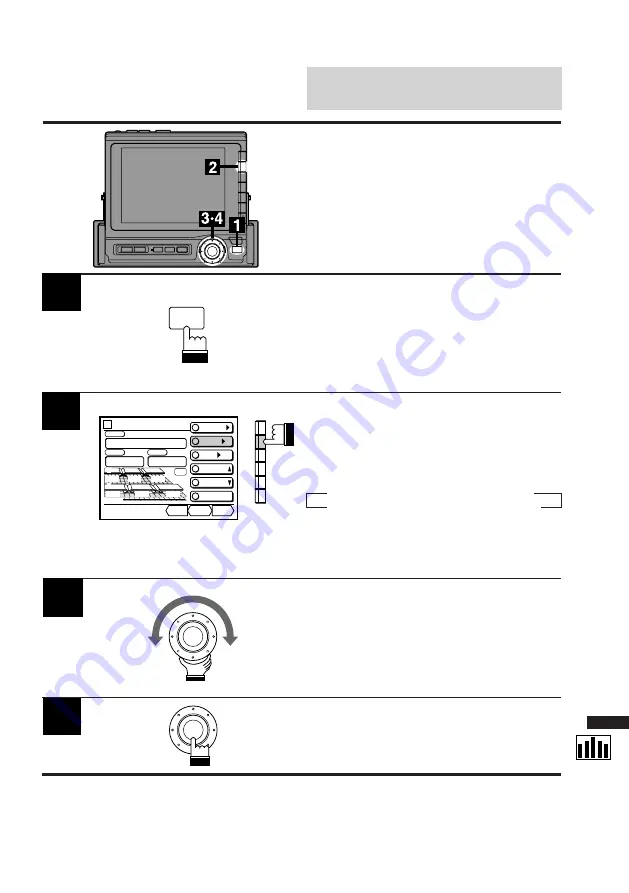
3

Turn the rotary switch and adjust to your
desired level.
To adjust other frequency ranges, follow Steps
2 and 3 above.

4

When the adjustments have been completed,
press the rotary switch.
The display returns to the Set Up screen.

Display the DIV. cont. screen and press the
FUNC button.
The contents of the Function Guide screen
changes.

1

2

Select the frequency range you want to adjust.
When the F2 (LEVEL) button is pressed once,
the display shows the adjustment value of the
level.
Each press changes the frequency ranges as
follows:

L-Low

R-Low

L-Mid

R-High

L-High

R-Mid

The level adjustment mode is activated and the
DN/RTN/UP menu is displayed.

Adjusting Levels of Fre-
quency Ranges

FUNC

Divider

CONT.

X-OVER/

LEVEL/

T-CR/

P.UP

P.DOWN

  C H

 STEP

    Custom


PSET

Fr/Rr

dB

DN

RTN

UP

-12


dB 

L-High

L

R

-12

-12

-12

-12

-12

-12

F

Summary of Contents for CVA-1000E

Page 1: ...MI Italy Tel 02 48 40 16 24 ALPINE ELECTRONICS FRANCE S A R L RCS PONTOISE B 338 101 280 98 Rue De La Belle Etoile Z I Paris Nord Il B P 50016 F 95945 Roissy Charles De Gaulle Cedex France Tel 01 48 63 89 89 ALPINE ELECTRONICS OF U K LTD 13 Tanners Drive Blakelands Milton Keynes MK14 5BU U K Tel 01908 61 15 56 ALPINE ELECTRONICS DE ESPAÑA S A Portal De Gamarra 36 Pabellón 32 01013 Vitoria Alava Ap...

Page 2: ...p using the system immediately and contact the dealer from whom you purchased the equipment Some problems which may warrant immediate attention include a lack of sound noxious odors or smoke being emitted from the unit or foreign objects dropped inside the unit DO NOT OPERATE THE EQUIPMENT WHILE DRIVING Do not change settings while driving If operation requiring a prolonged view of the display is ...

Page 3: ...Y OPERATION THAT COULD INTERFERE WITH YOUR DRIVING If the operation of this unit such as raising or lowering of the monitor etc interferes with your driving stop the vehicle in a safe location before attempting operation DO NOT MIX NEW BATTERIES WITH OLD BATTERIES INSERT WITH THE CORRECT BATTERY POLARITY Do not mix new batteries with old batteries and do not replace with other than specified batte...

Page 4: ... must be parked for the procedure described to be valid If the car is moving the warning CAN T OPERATE WHILE DRIVING will be displayed after pressing the SET UP button In addition to the SET UP button the SOURCE button operation is also slightly changed to simplify use while driving Pressing the SOURCE button while driving will immediately change the audio source without having to make a selection...

Page 5: ...djusting Tint of Picture 20 Adjusting Color of Picture Radio Operation 21 Manual Tuning 22 Automatic Seek Tuning 23 Manual Storing of Station Presets 24 Automatic Memory of Station Presets 25 Storing into Direct Access Preset D A P Band 26 Scanning Preset Stations 27 Mono Stereo Switching 28 Tuning In Preset Stations Using Function Buttons F1 through F6 28 Tuning In Preset Stations Using P UP P DO...

Page 6: ...If you have problems do not attempt to repair the unit yourself Return it to your Alpine dealer or the nearest Alpine Service Station for servicing Installation Location Make sure the CVA 1000E monitor receiver will not be exposed to Direct sun and heat High humidity Excessive dust Excessive vibrations Alpine products equipped with the Ai NET bus connected to the CVA 1000E can be operated from the...

Page 7: ... vehicle Be sure to remove the anti theft face cover when you drive 1 Initial System Start up Immediately after installing or applying power to the unit it should be initialized At the upper right corner of the screen front panel there is a small button Using a pencil or other pointed object press this reset button to complete the initialization procedure ...

Page 8: ... any pressure to the door while it is open This can cause damage to the mechanism Under low ambient temperature condi tions the display may be dark for a short period immediately after the power is turned on Once the LCD has warmed up the display will return to normal 1 Basic Operation Press the OPEN CLOSE button The unit will beep 3 times and lower the monitor automatically Note If the monitor to...

Page 9: ...e current even when its power switch is placed in the off position and the battery may be discharge Be sure to disconnect this lead from the battery post if the vehicle will be left unused for an extended period of time If an SPST switch sold separately is added place it in the OFF position when you leave the vehicle Place the SPST switch in the ON position first when you turn on the CVA 1000E For...

Page 10: ...nitor touches an obstacle while the angle is being adjusted the unit will beep for 2 seconds and stop the screen immediately Should this happen remove the obstacle and press the or button again The screen color will vary when viewed at certain angles Adjust the screen angle for the best viewing position If the voltage of the vehicle s battery power is low the screen may blink This is not a malfunc...

Page 11: ...ting the volume level will replace the bar graph Note You can adjust the volume level with the monitor closed by pressing the and button on the front panel These buttons are used to adjust the screen angle when the monitor is open 1 Press and hold the and buttons simultaneously to mute the unit 1 2 To cancel the mute mode press the or button Adjusting the Volume Level Muting the Sound or ...

Page 12: ...the bass sound 4 Press the F3 BASS button to select the BASS mode The DN RTN UP Down Return Up menu appears at the bottom of screen 3 RETURN LOUDNESS BASS TREBLE BALANCE FADER When the desired level is obtained press the rotary switch to set at that level The display returns to the set up screen 5 Turn the rotary switch to scroll the bottom menu and select and move Audio cont menu to the extreme e...

Page 13: ... treble sound When the adjustment has been completed press the rotary switch Note If two Alpine Channel Dividers are connected the menu BASS TREBLE in the display changes to BASS1 TREBLE1 and when the NEXT 0 button is pressed it changes to BASS2 TREBLE2 2 3 Adjusting Treble Note When an Ai NET compatible equalizer is connected the treble menu will not appear on the screen In this case adjust trebl...

Page 14: ...CE or F6 FADER button to select the BALANCE or FADER mode respectively The Left RTN Right or RR RTN FR Rear Return Front menu screen appears 2 3 When the desired level is obtained press the rotary switch to set at that level The display returns to the set up screen 4 Turn the rotary switch clockwise or counterclockwise to obtain the desired level on the selected mode RETURN LOUDNESS BASS TREBLE BA...

Page 15: ... Note When an equalizer is connected the Loudness menu will not appear on the screen In this case turn the loudness on or off using the equalizer connected 1 Display the Audio cont screen by referring to Steps 1 and 2 for Adjusting Bass on page 12 2 Press the F1 LOUDNESS button to turn the LOUDNESS mode on or off Each press toggles between the Loudness on and off modes RETURN LOUDNESS BASS TREBLE ...

Page 16: ... equalizer is connected the N F P menu will not appear on the screen In this case Turn the N F P mode on or off using the equalizer connected 1 3 Press the F1 OUTPUT button to turn the N F P mode on or off Each press toggles between the N F P on and off modes Press the SET UP button The Set Up screen appears 2 Turn the rotary switch and select the N F P cont menu then press the rotary switch x 1 O...

Page 17: ... VISUAL screen The Parking Brake must be ON to access the SET UP screen Trying to access this screen while driving will display the warning CAN T OPERATE WHILE DRIVING Adjusting Brightness of Picture Turn the rotary switch and select the AUX 1 or AUX 2 menu then press the rotary switch The AUX 1 or AUX 2 mode will be activated Press the SET UP button The Set Up screen appears 2 3 Turn the rotary s...

Page 18: ...stment mode will be activated and the DN RTN UP menu appears Turn the rotary switch clockwise or counterclockwise for the desired brightness When the adjustment has been completed press the rotary switch 5 Basic Operation 6 7 1 2 3 4 BACKGND BRIGHT TINT COLOR ...

Page 19: ...nt menu Then press the rotary switch The screen changes to the Visual cont screen Press the F3 TINT button The tint adjustment mode is activated and the DN RTN UP menu is shown 2 3 Turn the rotary switch to adjust to the desired tint 4 When the Tint adjustment is complete press the rotary switch 5 1 SET UP x 1 2 3 4 BACKGND BRIGHT TINT COLOR Adjusting Tint of Picture Tint adjustment can be made in...

Page 20: ...ont menu Then press the rotary switch The screen changes to the Visual cont screen Press the F4 COLOR button The color adjustment mode is activated and the DN RTN UP menu is shown 2 3 Turn the rotary switch to adjust to the desired color 4 When the color adjustment is complete press the rotary switch 5 Adjusting Color of Pic ture Color adjustment can be made in the AUX 1 or AUX 2 mode SET UP x 1 2...

Page 21: ... and select the RADIO menu and move the RADIO menu to the extreme end of right side Then press the rotary switch The radio mode is activated 2 x Press the rotary switch to select the desired radio band Each press changes the band as follows FM1 FM2 AM 3 4 Press the FUNC button Each press changes the Function guide menus FUNC DX A MEMO z L P UP P DOWN Press the F1 or F2 button to change the radio f...

Page 22: ...Local modes 2 1 Turn the rotary switch to the right or left to automatically seek a radio station upward or downward respectively When the unit finds a station it stops To automaticall move to the next station turn the rotary switch 3 Automatic Seek Tuning For this auto tuning you can select 2 signal reception sensitivities DX Distance mode with DX indicator ON Both strong and weak stations will b...

Page 23: ...on button into which you wish to store the station while the frequency display is blinking within 5 seconds The frequency display stops blinking indicating that the station has been memorized at the Function button pressed 3 4 Repeat the above procedure 1 to 3 to store 5 other stations onto the same band Notes If a preset memory has already been set in the same Function button it will be cleared a...

Page 24: ...hen the automatic storing has been com pleted the tuner goes to the station stored in the F1 button Note If no stations are stored the tuner will return to the original station you were listening to before the automatic storing procedure began The radio station names titles could be erased when Automatic Memory of Station Presets function is performed 2 1 Automatic Memory of Station Presets The tu...

Page 25: ... the Automatic or Manual Storing of Station Presets procedure above Note This function can be used together with the Automatic Memory Preset if you want to have all AM or all FM stations stored into D A P When the D A P mode is turned on or off the menu screen changes Storing into Direct Ac cess Preset D A P Band Any combination of AM or FM radio stations up to 6 stations can be manually preset on...

Page 26: ...r receivable the Preset Scan function will no longer stop on them Once the signal level increases to normal seek stop levels the Preset Scan function will find them again Activate the radio mode Press the FUNC button Press the NEXT 0 button The Function Guide screen changes 2 1 3 Press the F2 P SCAN button The tuner plays 10 seconds for each preset station When your desired preset station is found...

Page 27: ...ton The contents of the Function screen changes 2 1 3 Press the F1 MONO button STEREO indicator disappears and the monaural mode activates To return to the stereo mode press the F1 MONO button again Mono Stereo Switching Use the Mono monaural mode to reduce the noise level of noisy stereo broadcast due to weak signal FUNC 1 2 MONO P SCAN 4 TITLE 5 DAP ...

Page 28: ... radio station in memory 1 Tuning In Preset Stations Using Function Buttons F1 through F6 Press the FUNC button in the radio mode Note To activate the D A P band press F4 D A P button 1 Tuning In Preset Stations Using P UP P DOWN Buttons 2 Press the F3 P UP or F4 P DOWN button to select the desired preset station upward or downward respectively FUNC 1 2 3 4 5 6 FM 87 5 FM 90 1 FM 98 1 FM 106 1 FM ...

Page 29: ... controlled from the CVA 1000E Turn the rotary switch on the CVA 1000E to select the TAPE menu then press the rotary switch The display changes to the tape player control screen Insert a pre recorded tape into the tape player The tape player starts playing 2 To eject the cassette tape press the Eject button on the tape player Note When a metal cassette tape is inserted the player automatically adj...

Page 30: ...F2 REW button respectively Pressing the rotary switch PLAY PAUSE also stops fast forwarding or quick rewinding To change the tape direction to play the programs on the other side of the tape press F3 PROG button Press the rotary switch during tape play to temporarily pause the tape play To resume the tape play press the rotary switch B C A TAPE vol 0 PLAY METAL MODE F F REW PROG REPEAT DOLBY NR B ...

Page 31: ... to return to the beginning of the current selection If you wish to return to the beginning of a selection further back repeatedly turn the rotary switch until the desired selection is reached 1 Turn the rotary switch clockwise once to advance to the beginning of the next selection If you wish to advance to a selection further ahead repeatedly turn the rotary switch until the desired selection is ...

Page 32: ...d only on a selection being played 1 Blank Skip This feature allows you to skip over blank portions of the tape lasting 15 seconds or longer Press the FUNC button during tape play Press the F6 B SKIP button The tape player skips over blank portions lasting 15 seconds or longer To cancel the blank skip mode press the F6 B SKIP button 2 FUNC 1 TAPE vol 0 PLAY METAL MODE F F REW PROG REPEAT DOLBY NR ...

Page 33: ...he CVA 1000E Press the SOURCE button on the CVA 1000E to select a desired source unit The menu screen appears Note Pressing the SOURCE button while driving Parking Brake OFF will cause the audio source to change immedi ately The SOURCE Selection menu will not appear Press the SOURCE button repeatedly until you are in the CD Shuttle mode 1 Turn the rotary switch on the CVA 1000E to select the CHG m...

Page 34: ...ause modes Press the FUNC button in the CD Shuttle mode The contents of the Function Guide screen changes 1 2 Press the FUNC button in the CD Shuttle mode The contents of the Function Guide screen changes 1 2 Press the F1 FWD or F2 BWD button to quickly move forward or backward respectively to reach the desired music section on the disc Play Pause Fast Forward and Backward FUNC FUNC ...

Page 35: ...ning of a track further back repeatedly turn the rotary switch until the desired track is reached Turn the rotary switch clockwise once during the CD Shuttle play to advance to the beginning of the next track If you wish to advance to a track further ahead turn repeatedly until the desired track is reached 2 1 Music Sensor Skip This feature allows you to go to the beginning of a track ...

Page 36: ...7 to 12 loaded in the 12 disc Shuttle press the NEXT button first then press the Function buttons 1 Selecting Discs Using Function Buttons F1 through F6 Press the FUNC button in the CD Shuttle mode The contents of the Function Guide screen changes 1 Press the F3 DISC UP or F4 DISC DN button to select a disc loaded in the CD Shuttle upward or downward respectively Each press changes the disc number...

Page 37: ...Function Guide screen changes Press the F1 SCAN button The CD Shuttle plays the first 10 seconds of each track on the disc To cancel the Track Scan mode press the F1 SCAN button again 2 1 Track Scan In the Track Scan mode the CD Shuttle plays the first 10 seconds of each track on the disc SCAN TITLE ...

Page 38: ...the track will be repeatedly played until the repeat mode is cancelled If the CD Shuttle connected has the REPEAT ALL function and you select the REPEAT ALL menu the entire disc selected will be repeat edly played To cancel the repeat play press the F5 REPEAT button until the REPEAT and REPEAT ALL indications disappear 2 1 Repeat Play on Single Track or Entire Disc FUNC FWD BWD REPEAT M I X DISC U...

Page 39: ... select M I X ALL from the menu All the tracks on all the discs in the magazine will play back in a random sequence Once all the tracks have been played back once the CD Shuttle begins a new random sequence The M I X play continues until the M I X mode is cancelled To cancel the M I X play press the F6 M I X button until the M I X indicator disappears 2 1 M I X Random Play In the M I X mode the tr...

Page 40: ...or more 6 maximum Alpine CD Shuttles through Ai NET These CD Shuttles must be connected to the CVA 1000E using the Multi Changer Switching device KCA 400C If you use 1 Switching device you can connect up to 4 CD Shuttles If you use 2 Switching devices you can connect up to 6 CD Shuttles Turn the rotary switch on the CVA 1000E and select CHG from the menu Press the rotary switch The display changes...

Page 41: ...ws the selected changer number Note If the selected player changer is not connected the display shows NO CHG CHANGER2 CHANGER3 CHANGER4 CHANGER1 1 2 3 4 CHANGER5 5 CHANGER6 6 6D CHG 2 vol 35 DISC TRACK 07 20 45 TITLE ABCDEFGH 2 Press the SOURCE button on the CVA 1000E to deactivate the CD Shuttle selection mode 5 Press the AUDIO SEL button on the Remote Control to select other audio sources SOURCE...

Page 42: ...otary switch The display changes to the EQ cont Equalizer Control screen Note Unless you want to modify one of the curves the Factory Presets can be selected before pressing the rotary switch 2 SET UP SET UP BEEP OFF SPE ANA OFF CLK DISP OFF EQUALIZER Pops SURROUND Stadium B B E Custom L P S Front L TIME CORR Custom ON SUB WOOFER vol 0 LPS T CR SubW SystemCont BEE BBEP SPE ANA CLK DISP DEMO x SET ...

Page 43: ...eristic Curves You can create your own equalizer characteris tic curves The following is the procedure 4 5 FUNC MAKER S PRIVATE P UP P DOWN SEL SEL Press the F1 SEL or F2 SEL button to move to the frequency bar that you wish to adjust The color of the frequency bar changes The menu changes to the DN RTN UP Down Return Up menu Turn the rotary switch clockwise or counterclockwise to adjust the frequ...

Page 44: ... curve 1 Memorizing Characteris tic Curves This display example shows when the F2 button is selected Equalizer CONT PRIVATE1 PRIVATE2 PRIVATE3 PRIVATE4 PRIVATE5 PRIVATE6 vol 0 FREQ 50 140 310 800 2K 5K 11K LEVEL PRESET No 2 PSET RETURN 1 2 3 4 5 6 2 While the preset indicators are blinking press the Function button into which you wish to memorize the characteristic curve Now the characteristic cur...

Page 45: ... EQ cont screen Press the Function button that has your desired characteristic curve 1 Recalling Memorized Characteristic Curves Using Function Buttons F1 F6 Display the EQ cont screen Press the FUNC button 1 2 Press the F3 P UP or F4 P DOWN button to select a desired characteristic curve Recalling Memorized Characteristic Curves Using P UP P DOWN Buttons FUNC ...

Page 46: ...Factory curves Press the F6 PRIVATE button to activate the Personal characteristic curves The display shows the Personal curves Note You can toggle between the Factory curves and Personal curves by pressing the NEXT 0 button while the EQ cont screen is displayed 2 1 Switching Between Factory Maker s and Personal Private Characteristic Curves FUNC MAKER S PRIVATE P UP P DOWN SEL SEL ...

Page 47: ...nt Surround Control screen appears Note Unless you want to modify one of the settings the Factory Presets can be selected before pressing the rotary switch Select a desired surround mode from 6 factory preset modes and press the corresponding Function button F1 F6 2 3 Press the rotary switch when your selection has been made The display returns to the Set Up screen 4 SET UP x NORMAL STAD DANCE HAL...

Page 48: ...enu then press the rotary switch to display the SURR cont Surround Control screen Press the FUNC button The contents of the Function Guide screen changes 2 3 Press the F3 P UP or F4 P DOWN button to select a desired surround mode 4 SET UP x FUNC P UP P DOWN TIME LEVEL Factory Maker s Sur round Mode Preset Se lection Using P UP P DOWN Buttons ...

Page 49: ...r counterclockwise to increase or decrease the surround sound level or delay time Note This function is available only when an audio processor equipped with the surround sound level delay time adjustment function is connected 2 3 When your adjustments are complete press the rotary switch The display returns to the Set Up screen 4 Adjusting Surround Levels and Surround Delay Time You can adjust the...

Page 50: ...arper imaging If you make the BBE adjustments after adjusting the surround settings the audible processing result will be enhanced remarkably Press the SET UP button The Set Up screen appears Turn the rotary switch and select the BBE cont menu from the SET UP screen Press the rotary switch The display changes to the BBE cont BBE Control screen 2 1 3 Select a desired BBE mode and press the correspo...

Page 51: ... Press the F6 H LEVEL button to adjust the high level The DN RTN UP menu appears 1 Turn the rotary switch to the left DN to lower the level and to the right UP to raise the level to obtain your desired level The level can be adjusted in the range of 1 to 3 2 3 Customizing BBE Mode This function is operative only when an audio processor equipped with the BBE adjustment feature is connected BBE CONT...

Page 52: ...ing Position Selector Control screen 2 1 3 Press one of the Function buttons from F1 to F5 that has the optimum sound field When selection has been completed press the rotary switch The display returns to the Set Up screen 4 Selecting Listening Position You can select the listening position for optimum sound field depending on the number of passengers in the vehicle SET UP x OFF ALL FRONT FRONT L ...

Page 53: ... Right button to select the position you wish to adjust When the F1 button is pressed the menu display changes to show Rear RTN Front When the F2 button is pressed the menu display changes to show Left RTN Right 3 Turn the rotary switch to adjust to the desired position The ball indicator in the display shows the adjusted position When adjustment is complete press the rotary switch The display ret...

Page 54: ...S cont screen Press the FUNC button The contents of the Function Guide screen changes 1 Recalling Listening Position Memorized 2 Press the F3 P UP button or F4 P DOWN button to select the desired listening position in memory FUNC P UP P DOWN FR RR LT RT ...

Page 55: ... Press the FUNC button The contents of the Function Guide screen changes 3 Press the Function button F1 F4 that has the channel you wish to adjust The bottom menu changes to show DN RTN UP 4 R L R R P UP P DOWN F L F R FUNC Turn the rotary switch clockwise or counterclockwise to increase or decrease the Time Correction value respectively to your desired value 5 Time Cor CONT F L F R R L R R DN RTN...

Page 56: ...ink for 5 seconds Memorizing Time Correction Value Select the Function button into which you wish to memorize the adjusted Time Correction value while the indicators are blinking 5 seconds The preset indicators stop blinking indicating that memorizing has been completed To memorize other values repeat the above procedure 2 PRESET 1 PRESET 2 PRESET 3 PRESET 4 PRESET 5 PRESET 6 PRESET 1 PRESET 2 PRE...

Page 57: ...C button Press the F5 P UP button or F6 P DOWN button to select your desired Time Correction value memorized Recalling Memorized Time Correction Values Using P UP P DOWN Buttons PRESET 1 PRESET 2 PRESET 3 PRESET 4 PRESET 5 PRESET 6 FUNC R L R R P UP P DOWN F L F R Recalling Memorized Time Correction Values Using Function Buttons F1 through F6 ...

Page 58: ...the Audio cont Audio Control screen 2 Press the F2 DEFEAT button to turn the Defeat mode on or off Each press toggles between the Defeat on and off modes 3 Turning Defeat Mode On or Off Use the Defeat On mode when you want to bypass the BBE surround circuits in order to output the BBE surround signals directly and to have flat equalizer settings simultaneously SET UP x DEFEAT BALANCE FADER ...

Page 59: ... OUTPUT button The display changes from the OFF mode to the ACTIVE mode Press the F3 LEVEL button The bottom menu changes to DN RTN UP 4 5 Turn the rotary switch clockwise or counterclockwise to increase or decrease the subwoofer level respectively 3 Adjusting Subwoofer Level This function is operative only when an audio processor equipped with the subwoofer level adjustment feature is connect SET...

Page 60: ... Press the F2 PHASE button Each press of this button switches between the 0 degree phase and 180 degrees phase Switching Phase of Subwoofer This function is operative only when an audio processor equipped with the Phase switching feature is connected OUTPUT PHASE LEVEL ...

Page 61: ... menu Press the rotary switch The display changes to the DIV cont Divider Control screen Press the SET UP button The Set Up screen appears Adjusting Cross Over X Over Point of 2 Way Divider If optional Alpine Channel Divider s are connected you can control the Divider s from the CVA 1000E Use this procedure when one or two 2 way system channel dividers are connected Divider PRESET 2 PRESET 3 PRESE...

Page 62: ...elect the frequency range you want to adjust When the F1 X OVER button is pressed once the display shows the adjustment value of the crossover point Each press changes the frequency ranges as follows When only one divider is connected Low F High R High When two dividers are connected Low High The cross over adjustment mode is activated and the DN RTN UP menu appears Divider CONT X OVER LEVEL T CR ...

Page 63: ...frequency range you want to adjust When the F2 LEVEL button is pressed once the display shows the adjustment value of the level Each press changes the frequency ranges as follows When only one divider is connected L Low R Low F High L R High R R High L F High R When two dividers are connected L Low R Low L High R High The Level adjustment mode is activated and the DN RTN UP menu appears Adjusting ...

Page 64: ... dividers are connected L Low R Low L High R High The Time Correction mode is activated and the DN RTN UP menu is displayed 2 Adjusting Time Correction for 2 Way Speaker System Use this procedure to adjust the sound time difference between the speakers FUNC When the adjustments have been completed press the rotary switch Turn the rotary switch clockwise or counterclockwise to adjust the time corre...

Page 65: ... contents of the Function Guide screen changes 3 FUNC 4 Press the SET UP button The Set Up screen appears SET UP Select the frequency range you want to adjust When the F1 X OVER button is pressed once the display shows the adjustment value of the crossover point Each press changes the frequency ranges as follows Low Mid L Mid H High The Cross Over adjustment mode is activated and the DN RTN UP men...

Page 66: ...n Turn the rotary switch to adjust to your desired cross over point To adjust other frequency ranges follow Steps 2 to 4 above When the adjustments have been completed press the rotary switch The display returns to the Set Up screen 5 6 ...

Page 67: ...The contents of the Function Guide screen changes 1 2 Select the frequency range you want to adjust When the F2 LEVEL button is pressed once the display shows the adjustment value of the level Each press changes the frequency ranges as follows L Low R Low L Mid R High L High R Mid The level adjustment mode is activated and the DN RTN UP menu is displayed Adjusting Levels of Fre quency Ranges FUNC ...

Page 68: ...ction mode is activated and the DN RTN UP menu is displayed Adjusting Time Correction for 3 way Speaker System Use this procedure to adjust the sound time difference between the speakers FUNC 2 Turn the rotary switch clockwise or counterclockwise to adjust the time compensa tion value upward or downward To adjust other frequency ranges follow Steps 2 and 3 above When the adjustments have been comp...

Page 69: ...he divider setting while the indicator are blinking for 5 seconds Repeat the above steps to memorize 3 other divider settings 2 Memorizing Divider Settings You can store your settings of the divider s in memory when you have adjusted Divider PRESET 2 PRESET 3 PRESET 4 C H STEP PRESET No 4 PSET RETURN vol 35 PRESET 1 1 2 3 4 3 WAY This display example shows when the F4 is selected Divider PRESET 2 ...

Page 70: ...or F5 P DOWN button to select the desired divider setting upward or downward respectively Recalling Memorized Divider Settings Using Function Buttons F1 F4 Recalling Memorized Divider Settings Using P UP P DOWN Buttons Divider PRESET 2 PRESET 3 PRESET 4 C H STEP PRESET No 4 PSET RETURN vol 35 PRESET 1 1 2 3 4 3 WAY FUNC Divider CONT X OVER LEVEL T CR P UP P DOWN C H STEP PRESET No 4 PSET RETURN vo...

Page 71: ...he F6 Fr Rr button Each press switches between the Front and Rear speakers indicators Switching Front and Rear Speakers Using F6 Button You can switch the Front and Rear Speakers only when 2 channel dividers are connected Switching Front and Rear Speakers Using NEXT 0 0 0 0 0 Button You can switch the Front and Rear Speakers only when 2 channel dividers are connected FUNC Divider CONT X OVER LEVEL...

Page 72: ...ressing the SOURCE button while driving Parking Brake OFF will cause the audio source to change immedi ately The SOURCE Selection menu will not appear Press the SOURCE button repeatedly until you are in the auxiliary source mode Turn the rotary switch to select the desired auxiliary source connected AUX1 or AUX2 Then press the rotary switch The selected auxiliary source will be activated 2 x SOURC...

Page 73: ...h and select the System cont menu Press the rotary switch The display changes to the System cont System Control screen 2 3 x Press the NEXT 0 button The display changes to the NTSC PAL System switching screen Press the F1 AUX 1 or F2 AUX 2 button to select the auxiliary source connected Each press toggles between the NTSC and PAL Systems 4 PAL PAL AUX 1 AUX 2 ...

Page 74: ...d station frequencies are displayed 3 1 2 MONO P SCAN 4 TITLE 5 DAP 4 Select the station you want to title and press the corresponding Function button F1 F6 The display changes to the Title Input screen and the first digit position for inputting blinks 5 Characters are displayed at the bottom menu Turn the rotary switch and select the desired character for the first digit position To change betwee...

Page 75: ...N A a 1 NEXT BACK WRITE DELETE RETURN ALPINE 1 9 To end the Title Input mode press the rotary switch When the FUNC button is pressed after pressing the rotary switch the unit returns to the radio mode display Notes If the memory capacity for radio station titles is full and titling cannot be performed older titles must be erased to make room for the new ones Refer to Deleting Titles on next page t...

Page 76: ...ant to delete and press the corresponding Function button F1 F6 The display changes to the Title Input screen and the first digit position to be input blinks Press the F5 DELETE button The selected title is deleted 5 6 To deactivate the Title Delete mode press the rotary switch When the FUNC button is pressed after pressing the rotary switch the unit returns to the radio mode display 1 2 MONO P SC...

Page 77: ...ess the rotary switch The display changes to the System cont System Control screen Press the F3 CLK DISP button The current Time is displayed Note If the monitor display is kept on with the vehicle s engine off for an extended period of time the battery may discharge 2 3 Displaying Current Time x BEEP SPE ANA CLK DISP HOUR MINUTE RESET SET UP ...

Page 78: ...ockwise to adjust the minutes upward or downward respectively Notes To adjust the minutes and seconds to 00 when radio TV announcement of time is made press the F6 RESET button Though seconds are not displayed the clock begins counting the seconds at 00 If the F6 RESET button is pressed when the minute indication is showing between 30 and 59 the hour indication advances by 1 4 3 Resetting Time BEE...

Page 79: ...connected to the CVA 1000E you can see the spectrum analyzer screen BEEP SPE ANA CLK DISP HOUR MINUTE RESET Turning Guide Beep Sound On and Off When the guide beep sound mode is on and any button is pressed the monitor produces a beep sound to acknowledge the receipt of the command when a button switch on the monitor is pressed Display the System cont screen and press the F1 BEEP button Each press...

Page 80: ...follows AUX1 Screen AUX2 Screen Current Source Screen To change the settings of the audio source during simultaneous play press the SOURCE button To change the settings of the video source during simultaneous play press one of the Function buttons F1 F6 or rotary switch Notes During the simultaneous play the Title Input mode is inoperative After one switching cycle of the video sources the simulta...

Page 81: ...nd select the Visual cont menu Press the F1 BACKGND button Each press changes the 4 preset background screens one by one 2 3 Changing Background Screen You can choose one of 4 background screens preset at the factory They are the stone grain sky wood grain and gradation screens SET UP BACKGND BRIGHT TINT COLOR ...

Page 82: ...tch and select the System cont menu 1 2 Press the F4 DEMO button The unit starts the demonstration automatically Note The demonstration for the units not connected to the CVA 1000E will not be performed To end the demonstration press the rotary switch 4 3 Demonstration BEEP SPE ANA CLK DISP DEMO SET UP ...

Page 83: ...o source 5 MUTE Button Press to lower volume level by 20 dB instantly Press again to cancel 6 Remote Control Transmission Section 7 Operation Indicator 8 Multi function Button Rotate to increase or decrease the volume level 9 BAND PROG Button A PROC Button DEFEAT Button SELECT Switch f f VOL PWR ENT UP DN AUDIO SEL BAND PROG VISUAL SEL MUTE SELECT A V A PROC DEFEAT REMOTE CONTROL UNIT RUE 4160 CD ...

Page 84: ...AND PROG VISUAL SEL MUTE SELECT A V A PROC DEFEAT CD 3D 6D 2 3 4 1 1 FF REW operation 2 PLAY PAUSE Button 3 Pressing the button seeks a next or previous musical track following several tracks from the current track depending upon the number of the button pressed 4 Program Button Press the button to change playback direction 5 A position f f VOL PWR ENT UP DN AUDIO SEL BAND PROG VISUAL SEL MUTE SEL...

Page 85: ...sition f f VOL PWR ENT UP DN AUDIO SEL BAND PROG VISUAL SEL MUTE SELECT A V A PROC DEFEAT CD 3D 6D 1 5 2 4 3 Other Mode 1 Press the button to defeat the external audio processor A position 1 2 Press the button to call the external audio processor mode A position 1 3 The audio source stays on but the video source changes 4 A position f f VOL PWR ENT UP DN AUDIO SEL BAND PROG VISUAL SEL MUTE SELECT ...

Page 86: ...arrow direction and the cover will be removed Replacing the battery Remove the old batteries Insert new ones matching the and polarities as shown in the diagram inside the unit Closing the cover Push the cover in the arrow direction until a click is heard Replacing battery Applicable battery Use two AAA sized dry batteries ...

Page 87: ...ry power Check battery English In Case of Difficulty No sound or unnatural sound Incorrect setting of volume balance fader controls Readjust the controls Connections are not properly or securely made Check the connections and firmly connect Common Modes Symptom Cause and Solution If you encounter a problem please review the items in the following checklist This guide will help you isolate the prob...

Page 88: ...vement of displayed picture is abnormal Temperature in the vehicle is too high Allow the vehicle s interior temperature to cool Unclear or noisy display Fluorescent plate is worn out Replace the fluorescent plate Auxiliary sources inoperative Connections with the auxiliary sources are improper Check the connections with the auxiliary sources and connect the cables correctly and firmly English In C...

Page 89: ...tenna may not be grounded and connected properly Check your antenna connections make sure the antenna is properly grounded at its mounting location The antenna may not be the proper length Make sure the antenna is fully extended if broken replace the antenna with a new one Broadcast is noisy The antenna is not the proper length Extend the antenna fully replace it if it is broken The antenna is poo...

Page 90: ...le unfunctional Press the EJECT button and remove the CD Magazine When the error indication disappears re insert the CD Magazine If the CD Magazine cannot be removed see the Owner s Manual for the CD Shuttle Magazine ejection not possible Press the magazine eject button If the magazine does not eject see the Owner s Manual for the CD Shuttle ERROR 02 A disc is left inside the CD Shuttle Press the ...

Page 91: ...ono Usable Sensitivity 9 3 dBf 0 8 µV 75 ohms 50 dB Quieting Sensitivity 13 5 dBf 1 3 µV 75 ohms Alternate Channel Selectivity 80 dB Signal to Noise Ratio 65 dB Stereo Separation 35 dB Capture Ratio 2 0 dB AM TUNER SECTION Tuning Range 531 1 602 kHz Usable Sensitivity 22 5 µV 27 0 dB IEC Standard REMOTE CONTROL Battery Type AAA size batteries Battery Quantity 2 Dimensions W H D 44 30 153 mm 1 3 4 ...

Page 92: ...tor Section 1 93 kg 4 lbs 4 oz Tuner Section 1 12 kg 2 lbs 8 oz CHASSIS SIZE Monitor section Width 178 mm 7 Height 50 mm 2 Depth 186 5 mm 7 3 8 CHASSIS SIZE Tuner section Width 156 1 mm 6 1 8 Height 35 mm 1 3 8 Depth 225 1 mm 8 7 8 Note Due to continuous product improvement specifications and design are subject to change without notice Under maximum operating voltage and input signal into 4 ohms E...

Page 93: ...93 English Note ...

Page 94: ...94 t okfkd ...

Page 95: ...95 r q f l k ...

Page 96: ...96 rqflk pbq rm s J NMMMb p b q rm pbq rm k D q l m b o q b t e f i b a o f s f k d p b q r m plro b plro b plro b EorbJQNSMF ...

Page 97: ...KKKKKKKKKKKKKKKKKKKKKKKKKKKKKKKKKKKKKKKKKKKKKKKKKKK NNO KKKKKKKKKKKKKKKKKKKKKKKKKKKKKKKKKKKKKKKKKKKKKKKKKKKKKKKKKKKKKKKKKKKKKKKKKKKK NNP KKKKKKKKKKKKKKKKKKKKKKKKKKKKKKKKKKKKKKKKKKKKKKKKKKKKKKKKKKKKKKKKKKKKKKKKKKKKKKKKKKKK NNQ KKKKKKKKKKKKKKKKKKKKKKKKKKKKKKKKKKKKKKKKKKKKKKKKKKKKKKKKKKKKKKKKKKKKKKKKKKKK NNR KKKKKKKKKKKKKKKKKKKKKKKKKKKKKKKKKKKKKKKKKKKKKKKKKKKKKKKKKKKKKKKKKKK NNS KKKKKKKKKKKKKKKKKKKKK...

Page 98: ...98 0 SM R 01 imfkb imfkb s JNMMMb imfkb áJkbq s JNMMMb s JNMMMb 0 imfkb VOLUME MUTE SOURCE CVA 1000E SET UP V SEL FUNC SYSTEM CONTROL MONITOR RECEIVER 35Wx4 TFT COLOR LCD ...

Page 99: ...99 s JNMMMb s J NMMMb 0 1 01 ...

Page 100: ...100 lmbkL ilpb P O lmbkL ilpb 1 lmbkL ilpb P O lmbkL ilpb 1 OPEN CLOSE OPEN CLOSE ...

Page 101: ...101 mto 1 mto s JNMMMb s JNMMMb pmpq lcc s JNMMMb pmpq lk pmpq 2 DISCOVERTHEFUTUREOF MOBILE MEDIA CVA 1000E PWR PWR ...

Page 102: ...102 1 kdib UQ NMQ O ...

Page 103: ...103 slirjb P 1 1 2 ...

Page 104: ...E BALANCE FADER 0 5 ìÇáç ÅçåíK 2 SET UP SET UP BEEP OFF SPE ANA OFF CLK DISP OFF EQUALIZER Pops SURROUND Stadium B B E Custom L P S Front L TIME CORR Custom ON SUB WOOFER vol 0 LPS T CR SubW SystemCont BEE BBEP SPE ANA CLK DISP DEMO Audio vol 27 RETURN 0 BASS 0 TREBLE 0 BALANCE 0 FADER CONT LOUDNESS BASS TREBLE BALANCE FADER ...

Page 105: ...105 1 cQ qob_ib akLoqkLrm imfkb _ p p L q o b _ i b _ p p N L q o b _ i b N k b u q 0 _ pp OLqob_ib O 2 3 áJkbq LOUDNESS BASS TREBLE BALANCE FADER ...

Page 106: ...106 1 NMQ N O cR _ i k b cS c abo _ i k b c abo iÉÑíLoqkLoáÖÜí ooL oqkLco 2 3 0 4 RETURN LOUDNESS BASS TREBLE BALANCE FADER ...

Page 107: ...107 1 NMQ N O 2 cN ilrakbpp ilrakbpp RETURN LOUDNESS BASS TREBLE BALANCE FADER 01 0 ...

Page 108: ...108 1 3 cN lrqmrq kKcKmK kKcKm pbq rm 2 kKcKmK x 1 OUTPUT SET UP EkKcKmKF kKcKmK 0 kKcKmK kKcKmK ...

Page 109: ...109 1 SOURCE ru N ru O ru N ru O pbq rm 2 3 0 4 x SET UP x plro b lcc plro b plro b pbq rm E_êáÖÜíåÉëëF sfpr i lk pbq rm k D q lmbo qb tefib aofsfkdE ...

Page 110: ...110 cO _ofdeq akL oqkLrm 5 6 7 1 2 3 4 BACKGND BRIGHT TINT COLOR ...

Page 111: ...111 N O ru N ru O pbq rm cP qfkq akL oqkLrm 2 3 4 5 1 SET UP x 1 2 3 4 BACKGND BRIGHT TINT COLOR ru N ru O ...

Page 112: ...112 1 N O ru N ru O pbq rm cQ lilo akLoqkLrm 2 3 4 5 ru N ru O SET UP x 1 2 3 4 BACKGND BRIGHT TINT COLOR ...

Page 113: ...113 plro b l c c plro b plro b plro b o afl P 1 SOURCE DX A MEMO z L P UP P DOWN o afl o afl 2 3 4 crk cN cO 5 x FUNC FM1 FM2 AM ...

Page 114: ...114 N P crk cR EauF au au 2 1 3 0 au au au FUNC DX A MEMO z AL P UP P DOWN ...

Page 115: ...115 crk cN cS O 2 1 OQ S cjN cjO j aK KmK FUNC R 3 4 N P R 1 2 3 4 5 6 FM 87 5 FM 90 1 FM 98 1 FM 106 1 FM 108 0 FM 87 5 1 2 3 4 5 6 FM 87 5 FM 90 1 FM 98 1 FM 106 1 FM 108 0 FM 87 5 ...

Page 116: ...116 N P crk cS E K jbjl 0 S cN cS cN 2 1 0 S FUNC DX A MEMO L Band P UP P DOWN ...

Page 117: ...117 crk kbuq 0 2 1 3 cQ EaK KmKF aK KmK aK KmK j cj aK KmK aK KmK EaK KmKF j cj S aK KmK FUNC 1 2 MONO P SCAN 4 TITLE 5 DAP ...

Page 118: ...118 mK p k NM crk kbuq 0 2 1 3 cO EmK p kF NM cO EmK p kF FUNC 1 2 MONO P SCAN 4 TITLE 5 DAP ...

Page 119: ...119 crk pqbobl kbuq 0 2 1 3 cN EjlklF pqbobl c N EjlklF jçåç FUNC 1 2 MONO P SCAN 4 TITLE 5 DAP ...

Page 120: ... A MEMO Hz CAL Band P UP P DOWN cjN cjO j aK KmK aK KmK cQ EaK KmKF 1 cN cS crk aK KmK cQ EaK KmKF 1 mK rmLmK altk 2 cP EmK rmF cQ EmK altkF FUNC 1 2 3 4 5 6 FM 87 5 FM 90 1 FM 98 1 FM 106 1 FM 108 0 FM 87 5 ...

Page 121: ...h Operation s JNMMMb plro b l c c plro b plro b p l r o b E ëëÉííÉ mä óÉêF 1 imfkb s JNMMMb s JNMMMb s JNMMMb q mb 2 bàÉÅí 4 cR Eali_v koF x 3 TAPE vol 0 PLAY METAL MODE F F REW PROG REPEAT DOLBY NR B SKIP SOURCE ...

Page 122: ...cN EccF cO EobtF cN EccF cO EobtF mi vLm rpb L Ec ëí cçêï êÇáåÖF EnìáÅâ oÉïáåÇáåÖF cP EmoldF B C A TAPE vol 0 PLAY METAL MODE F F REW PROG REPEAT DOLBY NR B SKIP TAPE vol 0 PLAY METAL MODE F F REW PROG REPEAT DOLBY NR B SKIP ...

Page 123: ...123 English Operation 0 1 2 ...

Page 124: ...ish Operation cQ obmb q cQ Eobmb qF 1 NR crk cS _K phfm NR c S E _ K phfmF 2 FUNC 1 TAPE vol 0 PLAY METAL MODE F F REW PROG REPEAT DOLBY NR B SKIP TAPE vol 0 PLAY METAL MODE F F REW PROG REPEAT DOLBY NR B SKIP ...

Page 125: ...125 a a imfkb a P S NO s JNMMMb a s JNMMMb imfkb S a s JNMMMb s JNMMMb plro b lcc plro b p l r o b p l r o b a a pÜìííäÉ 1 SOURCE s JNMMMb ed a 2 x ...

Page 126: ...126 a FWD BWD REPEAT M I X DISC UP DISC DN a a a crk 1 2 a crk 1 2 cN EctaF cO E_taF FUNC FUNC ...

Page 127: ...127 a a a 2 1 ...

Page 128: ...128 a P cN cP S cN cS a a NO T NO kbuq 0 1 cN cS a crk 1 cP Eafp rmF cQ Eafp akF a afp rmLak FUNC FWD BWD REPEAT M I X DISC UP DISC DN 2 DISC 1 DISC 2 PLAYING DISC 6 DISC 3 DISC 4 ...

Page 129: ...129 a a kbuq 0 cN Ep kF a NM c N Ep kF 2 1 a NM SCAN TITLE ...

Page 130: ...130 a crk cR obmb q obmb q a obmb q ii obmb q ii cR Eobmb qF obmb q obmb q ii 2 1 FUNC FWD BWD REPEAT M I X DISC UP DISC DN ...

Page 131: ...131 a a crk cS EjKfKuKF jKfKuK a jKfKuK ii 0 jKfKuK ii 01 jKfKuK jKfKuK jKfKuK cS EjKfKuKF jKfKuK 2 1 jKfKuK jKfKuK FUNC FWD BWD REPEAT M I X DISC UP DISC DN ...

Page 132: ...JQMM F s JNMMMb N Q a S a 1 s JNMMMb plro b lcc Em êâáåÖ _ê âÉ lccF plro b plro b plro b a E a pÜìííäÉF SOURCE EorbJQNSMF rafl pbi a x AUDIO SEL s JNMMMb ed a AUDIO SEL BAND PROG VISUAL SEL MUTE SELECT A V A PROC DEFEAT CD 3D 6D 2 ...

Page 133: ... JNMMMb kbuq 0 a 3 4 2 a R EcNúcSF a klJ ed CHANGER2 CHANGER3 CHANGER4 CHANGER1 1 2 3 4 CHANGER5 5 CHANGER6 6 6D CHG 2 vol 35 DISC TRACK 07 20 45 TITLE ABCDEFGH 2 s JNMMMb plro b a rafl pbi SOURCE AUDIO SEL 5 ...

Page 134: ...UALIZER Pops SURROUND Stadium B B E Custom L P S Front L TIME CORR Custom ON SUB WOOFER vol 0 LPS T CR SubW SystemCont BEE BBEP SPE ANA CLK DISP DEMO 2 bn ÅçåíK bn ÅçåíK x SET UP BEEP ON SPE ANA OFF CLK DISP OFF EQUALIZER Pops SURROUND Stadium B B E Custom L P S Front L TIME CORR Custom ON SUB WOOFER vol 0 Systm Visual Audio EQ Cont SubW FLAT MALE FEMALE POPS ROCK NEWS 0 4 FLAT MALE ROCK NEWS FEMA...

Page 135: ...135 PRIVATE1 PRIVATE2 PRIVATE3 PRIVATE4 PRIVATE5 PRIVATE6 1K RETURN 1 2 3 4 5 6 bn ÅçåíK N O crk 2 1 3 4 5 FUNC MAKER S PRIVATE P UP P DOWN SEL SEL cN Epbi F cO Epbi F akL oqkLrm ...

Page 136: ...R 1 Equalizer CONT PRIVATE1 PRIVATE2 PRIVATE3 PRIVATE4 PRIVATE5 PRIVATE6 vol 0 FREQ 50 140 310 800 2K 5K 11K LEVEL PRESET No 2 PSET RETURN 1 2 3 4 5 6 2 0 PRIVATE1 PRIVATE2 PRIVATE3 PRIVATE4 PRIVATE5 PRIVATE6 1 2 3 4 5 6 cO ...

Page 137: ...137 MAKER S PRIVATE P UP P DOWN SEL SEL PRIVATE1 PRIVATE2 PRIVATE3 PRIVATE4 PRIVATE5 PRIVATE6 11K RETURN 1 2 3 4 5 6 bn ÅçåíK 1 EcNúcSF bn ÅçåíK crk 1 2 cP EmK rmF cQ EmK altkF mK rmLmKaltk FUNC ...

Page 138: ... 138 bn ÅçåíK crk cR j hboDp cS mofs qb bn ÅçåíK kbuq 0 2 1 FUNC MAKER S PRIVATE P UP P DOWN SEL SEL ...

Page 139: ...139 1 pbq rm Em êâáåÖ _ê âÉF lk pbq rm J kDq lmbo qb tefib aofsfkdE SET UP EcNúcSF S proo ÅçåíK proo ÅçåíK S EcNúcSF 2 3 4 x NORMAL STAD DANCE HALL LIVE CHURCH ...

Page 140: ... 140 1 pbq rm proo ÅçåíK 0 proo ÅçåíK crk 2 3 cP EmK rmF cQ EmK altkF 4 SET UP x FUNC P UP P DOWN TIME LEVEL mKrmLmK altk ...

Page 141: ...141 1 proo ÅçåíK crk cO EibsbiF cN EqfjbF akLoqkLrm 2 3 4 0 FUNC P UP P DOWN TIME LEVEL ...

Page 142: ... 142 BBE1 BBE2 BBE3 BBE OFF L LEVEL H LEVEL __b __b E_ êÅìë _Éêêó bäÉÅíêçåáÅëF 01 __b pbq rm pbq rm __b ÅçåíK __b __b ÅçåíK 2 1 3 __b cN cP __bJO __bJP __b cQ E__b lccF SET UP x ...

Page 143: ... H LEVEL N RTN UP 3 BBE1 BBE2 BBE3 BBE OFF L LEVEL H LEVEL bn ÅçåíK __b EcNúcPF cR EiJibsbiF cS EeJibsbiF akLoqkLrm 1 EakF ErmF N P 2 3 __b __b BBE CONT BBE1 BBE2 BBE3 BBE OFF L LEVEL H LEVEL DN RTN UP vol 0 LOW HIGH Custom L 1 H 3 PSET ...

Page 144: ... 144 pbq rm imp ÅçåíK imp ÅçåíK 2 1 3 cN cR 4 0 SET UP x OFF ALL FRONT FRONT L FRONT R ...

Page 145: ...145 imp ÅçåíK crk 1 2 cN cO cN oÉ êLoqkLcêçåí cO iÉÑíL oqkLoáÖÜí 3 4 P UP P DOWN FR RR LT RT FUNC ...

Page 146: ... 146 imp ÅçåíK crk 1 2 cP EmK rmF cQ EmK altkF FUNC P UP P DOWN FR RR LT RT ...

Page 147: ...q rm 1 SET UP qJ o qJ o ÅçåíK 2 x crk 3 EcNúcQF akLoqkLrm 4 R L R R P UP P DOWN F L F R FUNC 5 Time Cor CONT F L F R R L R R DN RTN UP vol 0 POS STEP Custom Fr Right 0 3 ms PSET P UP ms 0 0 0 0 0 3 0 0 P DOWN ...

Page 148: ... 148 1 EcNúcSF O R R 01 2 PRESET 1 PRESET 2 PRESET 3 PRESET 4 PRESET 5 PRESET 6 PRESET 1 PRESET 2 PRESET 3 PRESET 4 PRESET 5 PRESET 6 ...

Page 149: ...149 1 EcNúcSF 1 2 crk cR EmK rmF cS EmK altkF mK rmLmK altk PRESET 1 PRESET 2 PRESET 3 PRESET 4 PRESET 5 PRESET 6 FUNC R L R R P UP P DOWN F L F R cN cS ...

Page 150: ... 150 1 pbq rm ìÇáç ÅçåíK ìÇáç ÅçåíK 2 cO Eabcb qF 3 __b __b EaÉÑÉ í låF SET UP x DEFEAT BALANCE FADER ...

Page 151: ...151 pbq rm 1 pìÄï ÅçåíK pìÄï ÅçåíK 2 cN lrqmrq lcc qfsb cP ibsbi akLoqkLrm 4 5 3 0 SET UP x OUTPUT PHASE LEVEL OUTPUT PHASE LEVEL ...

Page 152: ... 152 1 pìÄï ÅçåíK cO me pb M NUM OUTPUT PHASE LEVEL ...

Page 153: ...çåíK afsK ÅçåíK pbq rm O EuJlîÉêF imfkb s JNMMMb O Divider CONT X OVER LEVEL T CR P UP P DOWN C H STEP Custom PSET RETURN vol 35 L R 2 WAY Divider PRESET 2 PRESET 3 PRESET 4 C H STEP Custom PSET RETURN vol 35 L R 2 WAY PRESET 1 1 2 3 4 ...

Page 154: ... 154 4 5 6 cN EuJlsboF içï cJeáÖÜ oJeáÖÜ içï eáÖÜ akL oqkLrm Divider CONT X OVER LEVEL T CR P UP P DOWN C H STEP Custom PSET vol 35 R 400 F Hz 400 31 5 DN RTN UP Low 31 5Hz ...

Page 155: ...FUNC cO EibsbiF L Low R Low F High L R High R R High L F High R L Low R Low L High R High akL oqkLrm Divider CONT X OVER LEVEL T CR P UP P DOWN C H STEP Custom PSET vol 35 R F R F 12 12 12 12 12 12 dB DN RTN UP F High R 12 dB L R ...

Page 156: ...oF qJ o i J i ç ï o J i ç ï cJeáÖÜLi oJeáÖÜLo oJeáÖÜLi cJeáÖÜLo i J i ç ï o J i ç ï i J e á Ö Ü o J e á Ö Ü akL oqkLrm Divider CONT X OVER LEVEL T CR P UP P DOWN C H STEP Custom PSET vol 35 R 30 F 30 R 30 F 30 30 30 ms DN RTN UP F High R 30 ms L R ...

Page 157: ... akL oqkLrm Divider PRESET 2 PRESET 3 PRESET 4 C H STEP Custom PSET RETURN vol 35 F PRESET 1 1 2 3 4 3 WAY Divider CONT X OVER LEVEL T CR P UP P DOWN C H STEP Custom PSET RETURN Fr Rr vol 35 F 3 WAY Divider CONT X OVER LEVEL T CR P UP P DOWN C H STEP Custom PSET Fr Rr vol 35 F Hz DN RTN UP Low 200 400 500 31 5 31 5Hz ...

Page 158: ...158 O Q 5 6 ...

Page 159: ...íK crk 1 2 FUNC cO EibsbiF i J i ç ï o J i ç ï i J j á Ç o J e á Ö Ü i J e á Ö Ü o J j á Ç akL oqkLrm Divider CONT X OVER LEVEL T CR P UP P DOWN C H STEP Custom PSET Fr Rr dB DN RTN UP 12 dB L High L R 12 12 12 12 12 12 F ...

Page 160: ... FUNC 2 O P 3 4 cP qJ o qJ o i J i ç ï o J i ç ï i J j á Ç o J e á Ö Ü i J e á Ö Ü o J j á Ç akL oqkLrm Divider CONT X OVER LEVEL T CR P UP P DOWN C H STEP Custom PSET Fr Rr F 30 30 30 30 30 30 ms DN RTN UP 30 ms L High L R ...

Page 161: ... O EcNúcQF R 1 R EcNJcQF P 2 Divider PRESET 2 PRESET 3 PRESET 4 C H STEP PRESET No 4 PSET RETURN vol 35 PRESET 1 1 2 3 4 3 WAY cQ Divider PRESET 2 PRESET 3 PRESET 4 C H STEP Custom PSET RETURN vol 35 PRESET 1 1 2 3 4 3 WAY ...

Page 162: ...crk cQ EmK rmF cR EmK altkF EcNúcQF mK rmLmK altk Divider PRESET 2 PRESET 3 PRESET 4 C H STEP PRESET No 4 PSET RETURN vol 35 PRESET 1 1 2 3 4 3 WAY FUNC Divider CONT X OVER LEVEL T CR P UP P DOWN C H STEP PRESET No 4 PSET RETURN vol 35 3 WAY ...

Page 163: ...163 afsK ÅçåíK kbuq 0 1 1 2 afsK ÅçåíK crk cS cêLoê cS O kbuq 0 O FUNC Divider CONT X OVER LEVEL T CR P UP P DOWN C H STEP PRESET No 4 PSET RETURN Fr Rr vol 35 F 3 WAY ...

Page 164: ...164 plro b lcc Em êâáåÖ _ê âÉ lccF plro b plro b plro b ìñáäá êó pçìêÅÉ 1 ru N ru O 2 x SOURCE ...

Page 165: ...165 kqp m i pbq rm 1 kqp m i SET UP póëíÉã ÅçåíK póëíÉã ÅçåíK 2 3 x kbuq 0 kqp Lm i cN E ruJNF cO E ruJOF E ìñáäá êó pçìêÅÉF kqp m i 4 PAL PAL AUX 1 AUX 2 ...

Page 166: ...L LNLCF 3 1 2 MONO P SCAN 4 TITLE 5 DAP FM 1 vol 27 PSET FREQ 87 5 MHz TITLE INPUT MODE Select PreSet No STATION FM 87 5 FM 90 1 FM 98 1 FM 106 1 FM 108 0 FM 87 5 RETURN FM 87 5 1 FM 1 vol 27 PSET FREQ FM 87 5 87 5 MHz TITLE INPUT MODE STATION A a 1 NEXT BACK WRITE DELETE RETURN Z Y A B 1 2 kbuq 0 FUNC ...

Page 167: ...27 PSET FREQ FM 87 5 87 5 MHz TITLE INPUT MODE STATION A a 1 NEXT BACK WRITE DELETE RETURN ALPINE 1 9 crk a crii a cN cS O FM 1 vol 27 PSET FREQ ALPINE 1 87 5 MHz DX STATION Band ON AIR FM 90 1 FM 98 1 FM 87 5 1 2 3 4 5 6 FM 106 1 FM 108 0 DELETE RETURN BACK WRITE A a 1 NEXT ...

Page 168: ... 168 crk 1 kbuq 0 2 FUNC cP qfqib 3 4 EcNúcSF 0 cR abibqb 5 6 0 crk 1 2 MONO P SCAN 4 TITLE 5 DAP DELETE RETURN BACK WRITE A a 1 NEXT ALPINE Company 123456 ABCDEFGH FM 107 9 FM 87 5 ...

Page 169: ...169 pbq rm 1 póëíÉã ÅçåíK póëíÉã ÅçåíK cP ih afpm 2 3 x BEEP SPE ANA CLK DISP HOUR MINUTE RESET SET UP ...

Page 170: ... 170 K póëíÉã ÅçåíK cQ elro 1 2 cR jfkrqb MM cS obpbq MM PM RV cS EobpbqF N 4 3 BEEP SPE ANA CLK DISP HOUR MINUTE RESET BEEP SPE ANA CLK DISP HOUR MINUTE RESET ...

Page 171: ... 1 póëíÉã ÅçåíK cO pmbJ k pmbJ k lk pmbJ k lk _ pmbJ k lcc ru N ru O s JNMMMb 0 01 póëíÉã ÅçåíK cN _bbm lk lcc lk _bbm lk 0 1 BEEP SPE ANA CLK DISP HOUR MINUTE RESET BEEP SPE ANA CLK DISP HOUR MINUTE RESET ...

Page 172: ... 172 1 V SEL sK pbi ruN pÅêÉÉå ruO pÅêÉÉå ìêêÉåí pçìêÅÉ pÅêÉÉå 0 plro b 0 EcNúcSF ...

Page 173: ...173 pbq rm 1 sáëì ä ÅçåíK cN _ hdka Q 2 3 Q Q SET UP BACKGND BRIGHT TINT COLOR ...

Page 174: ... 174 pbq rm póëíÉã ÅçåíK 1 2 cQ abjl s J NMMMb 0 4 3 BEEP SPE ANA CLK DISP DEMO SET UP ...

Page 175: ...WR ENT UP DN AUDIO SEL BAND PROG VISUAL SEL MUTE SELECT A V A PROC DEFEAT REMOTE CONTROL UNIT RUE 4160 CD 3D 6D 1 2 3 4 5 9 6 7 8 1 m t o 2 b k q b o 3 sfpr i pbi 4 rafl pbi 5 j r q b OM Ç_ 6 7 8 9 _ kaLmold K mol a b c b q p b i b q ...

Page 176: ...éçëáíáçå f f VOL PWR ENT UP DN AUDIO SEL BAND PROG VISUAL SEL MUTE SELECT A V A PROC DEFEAT CD 3D 6D 2 3 4 1 1 ccLobt 2 m i v L m r p b 3 4 5 Jéçëáíáçå f f VOL PWR ENT UP DN AUDIO SEL BAND PROG VISUAL SEL MUTE SELECT A V A PROC DEFEAT CD 3D 6D 1 2 3 4 5 ...

Page 177: ...ëáíáçå f f VOL PWR ENT UP DN AUDIO SEL BAND PROG VISUAL SEL MUTE SELECT A V A PROC DEFEAT CD 3D 6D 1 5 2 4 3 1 E JéçëáíáçåFGN 2 E JéçëáíáçåFGN 3 4 Jéçëáíáçå f f VOL PWR ENT UP DN AUDIO SEL BAND PROG VISUAL SEL MUTE SELECT A V A PROC DEFEAT CD 3D 6D 4 2 1 3 G N ...

Page 178: ...178 s JNMMMb orbJQNSM 1 2 3 Q ...

Page 179: ...179 0123 imfkb ...

Page 180: ...180 G G 01 23 45678 ...

Page 181: ...181 au 01 0 ...

Page 182: ...182 booloJe J booloJPN JPN kl j d wfkb a a booloJMN JMN a bgb q a a a a a booloJMO JMO a bgb q a a a kl ed a a a ...

Page 183: ...KKKKKKKKKKKKKKKKKKKKKKKK UM Ç_ KKKKKKKKKKKKKKKKKKKKKKKKKKKKKKKKKKKKKKKKKKKKKKKKKKKKKKKKKKKKKKKKKKKKKKKKKKKKKKKKKKKKKKKKKKKKKKKKKKKKKKKKKKKKKKKKKKKKKKKKKKKKKKKKKKKKKKKKKKKKKKKKKKKKKKKKKKKKKKKK SR Ç_ KKKKKKKKKKKKKKKKKKKKKKKKKKKKKKKKKKKKKKKKKKKKKKKKKKKKKKKKKKKKKKKKKKKKKKKKKKKKKKKKKKKKKKKKKKKKKKKKKKKKKKKKKKKKKKKKKKKKKKKKKKKKKKKKKKKKKKKKKKKKKKKKKKKKKKK PR Ç_ KKKKKKKKKKKKKKKKKKKKKKKKKKKKKKKKKKKKKKKKKKKK...

Page 184: ...KKKKKKKKKKKKKKKKKKKKKKKNKVP âÖ KKKKKKKKKKKKKKKKKKKKKKKKKKKKKKKKKKKKKKKKKKKKKKKKKKKKKKKKKKKKKKKKKKKKKKKKKKKKKKKKKKKKKKKKKKKKKKKKKKKKKKKKKKKKKKKKKKKKKKKKKKKKKKKKKKKKKKKNKNO âÖ KKKKKKKKKKKKKKKKKKKKKKKKKKKKKKKKKKKKKKKKKKKKKKKKKKKKKKKKKKKKKKKKKKKKKKKKKKKKKKKKKKKKKKKKKKKKKKKKKKKKKKKKKKKKKKKKKKKKKKKKKKKKKKKKKKKKKKKKKKKKKKKKKKKKKKKKKKKKKKKKKKKKK NTU ãã KKKKKKKKKKKKKKKKKKKKKKKKKKKKKKKKKKKKKKKKKKKKKKKKKKKKK...

Page 185: ...185 ...

Page 186: ...186 ...

Page 187: ...187 ...

Reviews: