background image


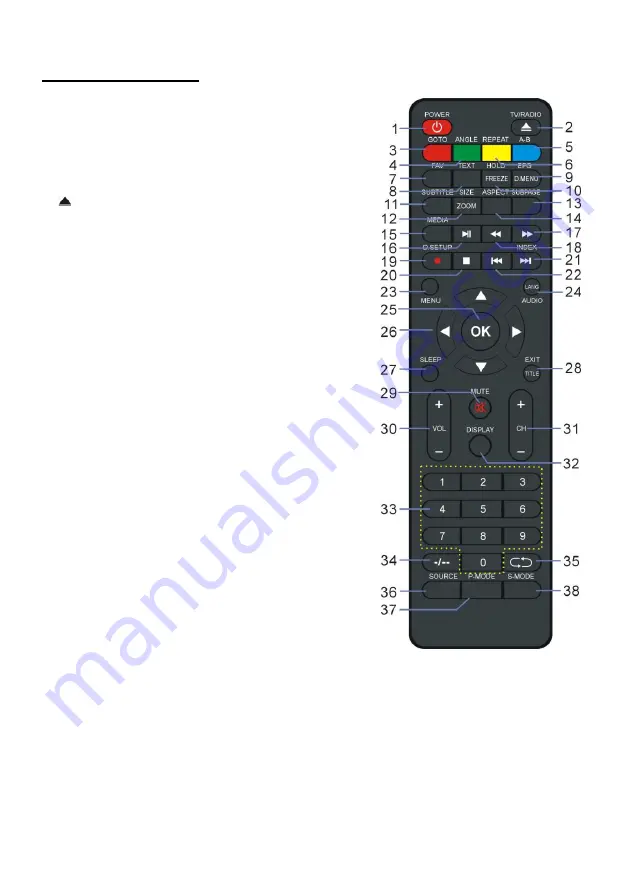
REMOTE CONTROL


1  POWER


Set the unit in standby mode; press it again to 
switch it on. 

2  TV/RADIO (DTV) 

Switch the unit between TV and Radio. 

(DVD) 

Insert/eject an available disc. 

3  RED button (TV) 

GOTO (DVD) 

Start playing from a certain point. 

4  GREEN button (TV) 

ANGLE (DVD) 

Change the viewing angle, if available. 

5  BLUE button (TV) 

A-B (DVD) 

Repeat playing between A and B. 

6  YELLOW button (TV) 

REPEAT (DVD) 

Change repeat mode. 

7  FAV 

Display the favorite channels list. 

8  TEXT 

Display the available Teletext. 

9  EPG (DTV) 

Display electronic program guide. 

D.MENU (DVD) 

Display the main disc menu. 

10  HOLD 

Hold the Teletext. 

FREEZE 

Hold the picture. 

11  SUBTITLE 

Enable/disable subtitles. 

12  SIZE (TV) 

Switch Teletext size. 

ZOOM (DVD) 

Shrink/enlarge the picture. 


Summary of Contents for 32ATC5000-H-SB

Page 1: ...32 LED TV Soundbar MODEL 32ATC5000 H SB USER MANUAL MANUAL DE UTILIZARE...

Page 2: ...EMOTE CONTROL 6 REMOTE CONTROL PREPARATION 9 BASIC CONNECTION 10 OPERATIONS BASIC OPERATIONS 15 MAIN MENU 22 FIRST TIME INSTALLATION 22 DTV MODE 23 ATV AND OTHER MODES 36 PC MODE 36 FOR REFERENCE MAIN...

Page 3: ...the unit to ensure sufficient ventilation Naked flame sources such as candles should not be placed near the device The device is intended for use only in a temperate climate Do not place the product o...

Page 4: ...nd used batteries should not be mixed The batteries must be installed according to the polarity If the battery is worn it must be removed from the product The battery must be safely disposed Always us...

Page 5: ...n Display Complete Control from Remote HDMI SCART YPBPR AV VGA PC AUDIO and CI Card Inputs EARPHONES and COAXIAL Output Recording Function TIME SHIFT Function Detachable Stand Holder External Antenna...

Page 6: ...SOURCE button To select the input source 8 POWER button To turn ON OFF the TV 1 AC Power cord 2 EARPHONE output terminal 3 SCART input terminal 4 PC AUDIO input terminal 5 VGA input terminal 6 RF inpu...

Page 7: ...Change the viewing angle if available 5 BLUE button TV A B DVD Repeat playing between A and B 6 YELLOW button TV REPEAT DVD Change repeat mode 7 FAV Display the favorite channels list 8 TEXT Display...

Page 8: ...t recording when watching available digital programs D SETUP DVD Call out the setup menu 20 Stop playing 21 Play the next file INDEX DTV Display the record list or Teletext index 22 Play the previous...

Page 9: ...isplay the available program information 33 Number buttons 0 9 Input the number information such as channel number and so on 34 Switch the digit when watching TV programs 35 Return to previous channel...

Page 10: ...ot drop step on or hit the remote control This may damage the parts of the remote and lead to malfunction If the remote control is not going to be used for a long time remove the batteries REMOTE CONT...

Page 11: ...ns before connecting the device to other equipment CONNECTION TO THE SOCKET CONNECTION TO THE EXTERNAL ANTENNA Connect the external antenna to the RF output in order to receive TV programs BASIC CONNE...

Page 12: ...luded Use HDMI cable to connect the unit with other devices to receive high definition multimedia signal Back of DVD VCR Back of PC Use VGA cable to connect the unit to a PC and use this product as a...

Page 13: ...12 SCART CONNECTION COAXIAL CONNECTION Back of DVD VCR SCART cable Not included Use coaxial cable not included to connect the unit with an amplifier or other audio decoding devices...

Page 14: ...Back of DVD VCR Back of DVD VCR For basic connection use the composite Audio L R white red and CVBS yellow cable to connect the unit with other devices AV cable Not included AUDIO L R connections of t...

Page 15: ...EQUIPMENT AND THE POWER PLUG ARE CONNECTED PROPERLY AND THE UNIT IS SET IN A CORRECT MODE BEFORE ANY KIND OF OPERATION Insert your CI card Conditional Access Module to watch encrypted digital channels...

Page 16: ...ailable range 0 100 MUTE CONTROL Press MUTE button to mute the sound press it again to turn on the sound SOURCE SETTING Press the SOURCE button to display the sources list Press the UP or DOWN navigat...

Page 17: ...Favorite Management QUICK SELECT When viewing an available channel press the OK button from the remote control to display the channel list Press UP or DOWN buttons to select the preferred channel Pre...

Page 18: ...ect the recorded files and press the OK button to start playback TIME SHIFT FOR DTV MODE ONLY Insert your USB memory device into USB slot first When watching a digital program If you don t want to mis...

Page 19: ...the preferred file Press the RED button to delete the selected file Press the GREEN button to add remove all the files from the playlist Press OK button to add remove highlighted file from playlist P...

Page 20: ...to add remove all the files from the playlist Press OK button to add remove highlighted file from the playlist Press button to start playing During music normal playing Press the OK button from the re...

Page 21: ...d remove highlighted file from the playlist Press button to start playing During movie normal playing Press OK button on remote control to display the tool bar press EXIT button to hide it Press LEFT...

Page 22: ...e book normal playing Press the RED button to add remove current page from Bookmark List Press the GREEN button to enter into the GOTO mode Input valid number and press OK button to enter desired page...

Page 23: ...nus Press OK or RIGHT buttons to access the submenu pages Press UP or DOWN buttons to select the preferred options Press LEFT or RIGHT buttons to adjust the value Press OK button to confirm selection...

Page 24: ...o confirm and move to the next step Setup 6 Press UP DOWN navigation button to select desired searching type Press OK button to confirm and start auto channel search NOTE To skip ATV or DTV tuning pre...

Page 25: ...nt This item is used to adjust the tone of color from 0 100 in NTSC mode 1 7 Colour Temperature This setting is used to adjust the optimum colour temperature Available options Standard Cool Warm 1 8 A...

Page 26: ...olume Level This feature is used to turn on off AVL function 2 6 SPDIF This feature is used to select desired SPDIF audio output type Available options Off PCM Auto 2 7 Audio Description This feature...

Page 27: ...s the YELLOW button on the remote control to add remove the skip mark d Press the BLUE button on the remote control to enter MOVE mode Then use UP DOWN navigation buttons to select the preferred posit...

Page 28: ...All DTV or ATV and press OK or RIGHT buttons to confirm Select OK to start auto searching select Cancel to cancel this operation To exit auto tuning press MENU or EXIT and select OK 3 6 Digital Manua...

Page 29: ...KS s Press OK or RIGHT navigation buttons to enter the submenu Press LEFT RIGHT navigation button to move the cursor press number buttons on remote control to input desired value 3 66 Modulation QAM...

Page 30: ...button to select preferred color system Available options Auto PAL SECAM 3 76 Sound System Press the OK or RIGHT navigation buttons to enter the submenu and press UP DOWN navigation button to select...

Page 31: ...ubmenu Input the Old Password New Password and Confirm New Password in turn After that this unit will save the new password automatically 4 14 Hotel Mode Press OK or RIGHT navigation button to enter s...

Page 32: ...he default volume Clear Lock Clear above settings DataBase Export Export database to other devices DataBase Import Import database from other devices 4 2 Language Press OK or RIGHT buttons to enter th...

Page 33: ...ff This item is used to set the Auto Power Off time Available options Off 1 Hour 2 Hours 4 Hours 4 6 Audio Description This item is used to turn on off Audio Description function for visually impaired...

Page 34: ...function 4 83 Timeshift Buffer This item is used to select the desired time shift buffer duration Available options Auto 30Mins 1hr 2hr 4 84 Timer Press the OK or RIGHT navigation buttons to enter th...

Page 35: ...ve the cursor Use number buttons to input your desired value and press OK button to confirm your setting 4 85 Record List Press OK or RIGHT navigation button to enter the submenu Press UP DOWN navigat...

Page 36: ...on Auto Standby turn on off Auto Standby function Speaker Preference select TV Speakers or Amplifier as a preference Amplifier Support ARC HDMI 3 turn on off ARC function 5 Setup 5 1 OSD Display Press...

Page 37: ...se refer to the menu operations of DTV mode PC MODE Connect a personal computer to this unit Power on your computer and this unit Press the SOURCE button on the remote control to select PC input sourc...

Page 38: ...on the display are not subject to the warranty certificate Contact a professional for assistance when wall mounting your TV We are not responsible for any damage to the product or injury to yourself i...

Page 39: ...nt the display from being damaged Step 2 Align the Stand with the TV bottom and then force the end of stand until the TV is fully seated on the stand Step 3 Tighten the included screws with a screw dr...

Page 40: ...nce of users of low voltage equipment Directive regarding the electromagnetic compatibility 89 336 CEE modified by Directive 92 31 CEE and 93 68 CEE HG982 2007 RoHS EN50581 2012 2014 30 EU HG 487 2016...

Page 41: ...YPbPr 2 x USB 1 x Scart 1 x AV IN 1x VGA 1 x CI Outputs 1xJack 3 5mm Coaxial USB Multimedia Playback Format Movie Music Photo Text according to their format Power Source AC 100 240V 50 60Hz Power Cons...

Page 42: ...stance of no more than 6m from the TV sensor Remove the obstacles between the remote control and the TV sensor No key operation from the main unit and or the remote control is effective Disconnect the...

Page 43: ...ALE 45 TELECOMANDA 47 PREGATIREA TELECOMENZII 50 CONEXIUNI DE BAZA 51 OPERATIUNI OPERATIUNI DE BAZA 56 MENIU PRINCIPAL 63 PRIMA INSTALARE 64 MOD DTV 65 MOD ATV SI ALTE MODURI 78 MOD PC 78 RECOMANDARI...

Page 44: ...pentru a evita supraincalzirea aparatului Lasati un spatiu de minim 10 cm in jurul aparatului pentru a permite ventilarea Nu amplasati surse de flacara deschisa cum ar fi lumanari in apropierea apara...

Page 45: ...de baterii baterii noi i uzate Bateriile trebuie instalate n func ie de polaritate Dac bateria este uzat trebuie scoas din produs Bateriile trebuie aruncate n siguran Utiliza i ntotdeauna cutiile de c...

Page 46: ...Pe Ecran n Mai Multe Limbi Control Complet din Telecomanda Intrari HDMI SCART YPBPR AV VGA PC AUDIO si Card CI Iesire CASTI si COAXIAL Functie Inregistrare Functie TIME SHIFT Suport Montare Detasabil...

Page 47: ...entru a accesa meniul principal 7 Buton SOURCE Pentru a selecta sursa de semnal 8 Buton POWER Pentru a porni opri televizorul 1 Cablu alimentare 2 Iesire CASTI 3 Intrare SCART 4 Intrare PC AUDIO 5 In...

Page 48: ...ul de vizionare dac este disponibil 5 Butonul ALBASTRU TV A B DVD Repeta i redarea ntre A i B 6 Butonul GALBEN TV REPEAT DVD Modifica i modul repetare 7 FAV Afi a i lista canalelor preferate 8 TEXT Af...

Page 49: ...rarea c nd viziona i programe digitale disponibile D SETUP DVD Accesa i meniul de configurare 20 Opriti redarea 21 Reda i fi ierul urm tor INDEX DTV Afi a i lista de nregistr ri sau indexul Teletext 2...

Page 50: ...e disponibile despre program 33 Butoane numerice 0 9 Introduce i informa iile despre num r cum ar fi num rul canalului i a a mai departe 34 Schimba i cifra c nd viziona i programe TV 35 Reveni i la ca...

Page 51: ...erii AAA Nota Nu scapati calcati sau loviti telecomanda Acestea pot cauza deteriorarea componentelor telecomenzii si defectarea acesteia Daca telecomanda nu va fi folosita pentru o perioada lunga de t...

Page 52: ...ructiunile inainte de a realiza conexiuni cu alte echipamente CONECTAREA LA PRIZA CONECTAREA LA ANTENA EXTERNA Conectati antena externa la mufa RF pentru receptionarea programelor TV CONEXIUNI DE BAZA...

Page 53: ...ti cablul HDMI pentru conexiunea cu alte dispozitive pentru receptionarea continutului multimedia de inalta rezolutie Vedere spate DVD VCR Vedere spate PC Folositi cablul VGA pentru conectarea PC la T...

Page 54: ...CART CONECTAREA PRIN CABLUL COAXIAL Vedere spate DVD VCR Cablu SCART Nu este inclus Folositi cablul coaxial pentru conectarea unitatii cu un amplificator extern sau alt dispozitiv de decodare audio Ca...

Page 55: ...YPBPR Cablu YPbPr Nu este inclus Vedere spate DVD VCR Pentru conectare folositi cablul compozit Audio L R alb rosu si CVBS galben pentru conectarea TV cu alte dispozitive Cablu AV Nu este inclus Veder...

Page 56: ...ALIMENTARE SUNT CONECTATE IN MOD CORESPUNZ TOR I TELEVIZORUL ESTE SETAT N MOD CORECT NAINTE DE EFECTUAREA ORICAROR OPERATIUNI Introduceti cardul CI Conditional Access Module Pentru a putea viziona can...

Page 57: ...L VOLUM Apasati VOL sau VOL pentru a regra nivelul volumului Plaja disponibila 0 100 MOD MUT Apasati butonul MUTE pentru a dezactiva sunetul apasati l din nou pentru a activa sunetul SETARI SURSA Apas...

Page 58: ...din lista de favorite vezi capitolul 3 2 Management Favorite SELECTIE RAPIDA In timpul vizualizarii unui canal apasati butonul OK de pe telecomanda pentru a afisa lista de programe Apasati butoanele...

Page 59: ...asati butonul INDEX de pe telecomanda pentru a afisa pagina de setari PVR Apoi apasati butoanele SUS JOS pentru a selecta fisierele inregistrate si apasati OK pentru a porni redarea TIME SHIFT DOAR IN...

Page 60: ...DREAPTA pentru a selecta POZE in meniu si apoi apasati OK pentru confirmare NOTA Cand selectati o fila Foto apasati EXIT pentru a muta cursorul pe TITLU si apoi apasati DREAPTA pentru a vizualiza fil...

Page 61: ...da fila anterioara Apasati butonul pentru a reda fila urmatoare 2 Muzica Apasati butoanele STANGA DREAPTA pentru a selecta MUZICA in meniu si apoi apasati OK pentru confirmare Folositi butoanele direc...

Page 62: ...a derula rapid inapoi Apasati butonul pentru a derula rapid inainte Apasati butonul pentru a reda fila anterioara Apasati butonul pentru a reda fila urmatoare 3 FILM Apasati butoanele STANGA DREAPTA...

Page 63: ...Apasati butonul pentru a opri redarea Apasati butonul pentru a derula rapid inapoi Apasati butonul pentru a derula rapid inainte Apasati butonul pentru a reda fila anterioara Apasati butonul pentru a...

Page 64: ...eparte Televizorul contine moduri de setari diferite Imediat ce setarea initiala este realizata ramane in memorie pana cand este modificata In acest fel televizorul va opera mereu in aceleasi conditii...

Page 65: ...confirma si a trece la pasul urmator Setare 2 Apasati tastele SUS JOS pentru a selecta tara Apasati OK pentru a confirma si a trece la pasul urmator Setare 3 Apasati tastele SUS JOS pentru a selecta l...

Page 66: ...apasati EXIT si va fi afisata o fereastra Apasati OK pentru a sari configurarea apasati NU pentru ascunde fereastra MOD DTV Apasati butonul SOURCE pentru a comuta TV ul in modul DTV 1 Imagine 1 1 Mod...

Page 67: ...fi diferite in functie de sursa de semnal 1 9 Noise Reduction Acesta setare este folosita pentru a elimina zgomotul de imagine si a obtine o imagine mai buna Optiuni disponibile Oprit Slab Mediu Puter...

Page 68: ...ii poate ajuta sa inteleaga anumite scene sa actiuni cu ajutorul nararii si nu vazand imaginea Nota Acest mod este disponibil doar pe programele care contin informatii narate 3 Canal 3 1 Managementul...

Page 69: ...favorite Ap sa i butoanele SUS JOS pentru a selecta programul preferat a Ap sa i butonul ROSU din telecomand pentru a ad uga canalul eviden iat n lista Favorite 1 b Ap sa i butonul VERDE de pe teleco...

Page 70: ...iunea TV este Terestra 3 61 Canal Ap sa i butonul OK sau DREAPTA pentru a intra n submeniu i ap sa i butonul de navigare SUS JOS pentru a selecta programul preferat 3 62 Frecventa KHz Ap sa i butonul...

Page 71: ...introduce valoarea dorit 3 66 Modularea QAM Ap sa i butonul OK sau DREAPTA pentru a intra n submeniu i ap sa i butonul de navigare SUS JOS pentru a selecta modula ia preferat Dup finalizarea set rilor...

Page 72: ...Ap sa i butonul OK sau DREAPTA pentru a intra n submeniu i ap sa i butonul de navigare SUS JOS pentru a selecta sistemul de sunet preferat Op iuni disponibile BG DK I L L NOT Op iunile sistemului de...

Page 73: ...fica i codul PIN Ap sa i butonul OK sau DREAPTA pentru a intra n submeniu Introduce i parola veche parola nou i confirma i parola nou Dup aceasta TV ul va salva automat noua parol 4 14 Mod Hotel Ap sa...

Page 74: ...bile Setare Surs Selecta i sursa dorit Num r canale Selecta i canalul dorit Volum maxim Seta i volumul maxim Volum Implicit Seta i volumul implicit Stergere Blocare terge i set rile de mai sus Export...

Page 75: ...Min 120 Min 180 Min 240 Min 4 5 Oprirea automat Acest element este utilizat pentru a seta timpul de oprire automat Op iuni disponibile Oprit 1 or 2 ore 4 ore 4 6 Descriere Audio Pentru a Activa Dezac...

Page 76: ...sit pentru a activa dezactiva func ia Auto Timeshift 4 83 Timeshift Buffer Acest element este folosit pentru a selecta durata dorit a buffer ului Op iuni disponibile Auto 30 Min 1 or 2 ore 4 84 Timer...

Page 77: ...vigare pentru a muta cursorul Utiliza i butoanele numerice pentru a introduce valoarea dorit i ap sa i butonul OK pentru a confirma setarea 4 85 Lista de nregistr ri Ap sa i butonul OK sau DREAPTA pen...

Page 78: ...ctiva i func ia de pornire oprire automat Iesire audio Selecta i Difuzoare TV sau Amplificator ca preferin Amplificator Suport ARC HDMI 3 activeaza dezactiveaza func ia AR C 5 Configurare 5 1 Afisare...

Page 79: ...est element este utilizat pentru a reveni la set rile implicite din fabric 5 7 Actualizarea software ului Acest element este utilizat pentru a actualiza software ul TV prin intermediul dispozitivului...

Page 80: ...tonul POWER pentru a seta TV ul n modul Standby i deconecta i techarul nainte de a curata TV ul Nu folosi i niciodat alcool benzen diluant lichid de cur are sau alte substan e chimice Nu utiliza i aer...

Page 81: ...ranului Pasul 2 Alinia i Standul cu baza televizorului i apoi for a i cap tul suportului p n c nd televizorul este a ezat complet pe suport Pasul 3 Str nge i uruburile incluse cu o urubelni NOTE Decon...

Page 82: ...ipamente de joasa tensiune Directiva cu privire la compatibilitatea electromagnetica 89 336 CEE modificate de Directiva 92 31 CEE si 93 68 CEE HG982 2007 RoHS EN50581 2012 2014 30 EU HG 487 2016 Cerin...

Page 83: ...B 1 x Scart 1 x AV IN 1x VGA 1 x CI Iesiri 1 x Jack 3 5mm Coaxial USB formate multimedia redate Film muzica poze text vor putea fi rulate in functie de formatul lor Alimentare AC 100 240 V 50 60 Hz Co...

Page 84: ...anda si senzorul TV Nu func ioneaz nicio opera ie de la unitatea principal i sau de la telecomand Deconecta i fi a de alimentare i apoi reconecta i o Este posibil ca aparatul s nu func ioneze corespun...

Reviews: