AllSee AB49HD7 Hardware User Manual Download Page 10

Digital Android Battery A-Board (Standalone) Hardware User Manual 


Page 9 

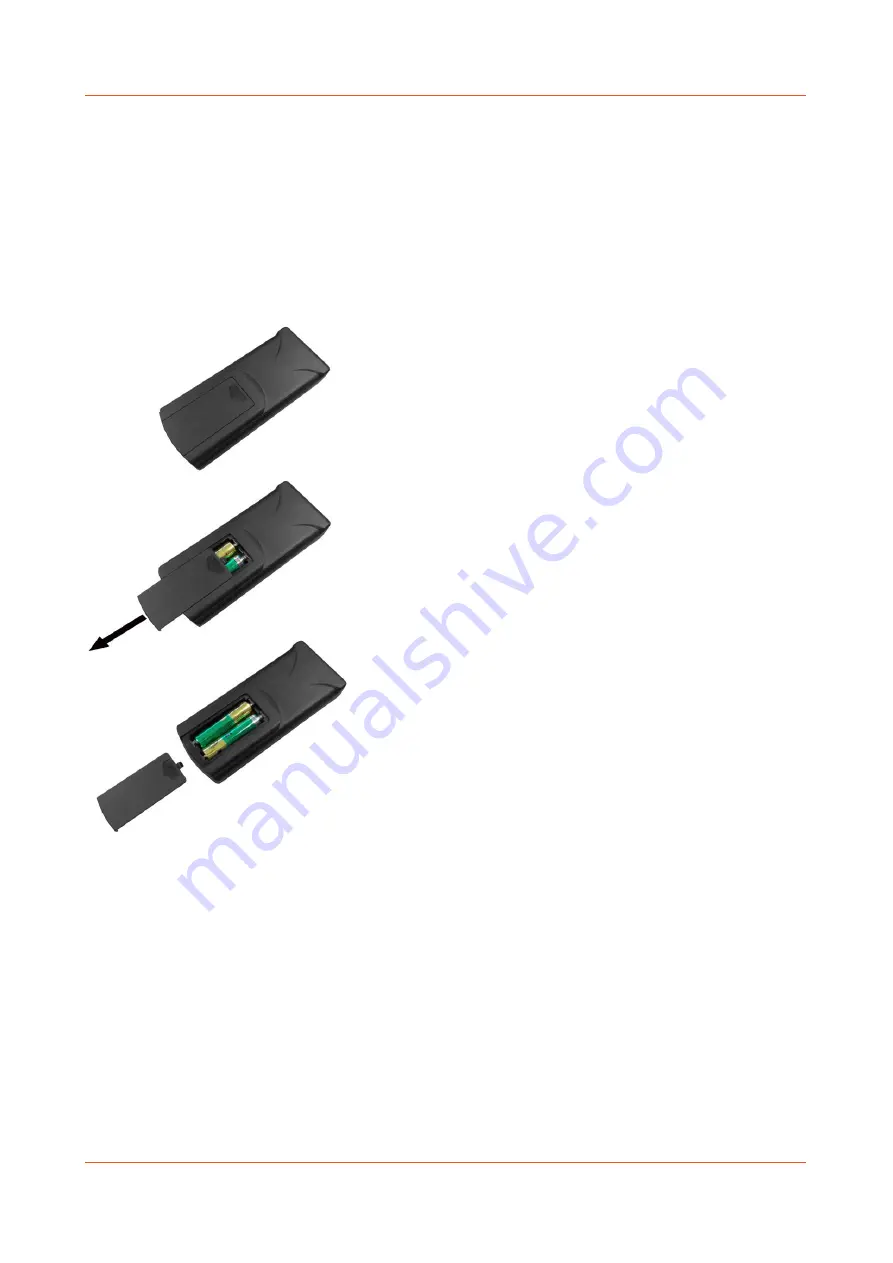
1.4 Replacing the Remote Control Battery   

1. Slide the battery cover off, as shown below. 

2. Remove the used batteries. 

4. Insert the two new AAA batteries with their terminals corresponding to the indicators. 

5. Put the cover back on. 


Summary of Contents for AB49HD7

Page 1: ...Digital Android Battery A Board Standalone Hardware User Manual Manual Version ABHD7 1...

Page 2: ...es or openings with any objects Remove protective covering from the screen before you use the display Shut off the power supply before cleaning Use a soft lint free cloth instead of a tissue to wipe t...

Page 3: ...o allow swift set up and use of the unit Please refer to the main part of the User Guide for full information on use of the unit 1 Holding the handle on the rear of the unit wheel the display into pos...

Page 4: ...e locks keeping the legs extended 4 Carefully lower the display back down until the castors touch the ground You can then apply the brakes on the castors to fix the display in position if required 5 T...

Page 5: ...copy the files you want to play onto an empty USB drive These should be in the root directory without putting them into a folder Remove USB from PC 4 Insert USB drive into the one of the USB ports loc...

Page 6: ...ry 16 1 6 1 Charging the Battery 16 1 6 2 Powering Directly from Mains 17 1 6 3 Charge Level Indicator 17 1 7 Home Screen 18 1 8 System Menu Operation 19 1 8 1 System Settings 19 1 8 2 System Control...

Page 7: ...ions 2 for presentations with animation 50 4 2 Video Format Conversion 50 4 3 Connecting screen to PC 54 4 4 My media file does not fit properly on the screen 54 4 5 My media file will not display or...

Page 8: ...ects filled with liquids such as vases should be placed on the product For user convenience a number of operations can be performed through the remote control Attention 1 Do not change any default set...

Page 9: ...Digital Android Battery A Board Standalone Hardware User Manual Page 8 1 3Remote Control...

Page 10: ...are User Manual Page 9 1 4Replacing the Remote Control Battery 1 Slide the battery cover off as shown below 2 Remove the used batteries 4 Insert the two new AAA batteries with their terminals correspo...

Page 11: ...ng When you first unpackage the unit please follow the below steps to move and position your display 1 Holding the handle on the rear of the unit wheel the display into position 2 Keeping hold of the...

Page 12: ...al Page 11 3 Extend the castor legs out until the supporting hinge locks keeping the legs extended 4 Carefully lower the display back down until the castors touch the ground You can then apply the bra...

Page 13: ...e below steps to move and position your display 1 Remove the brakes from the castors by lifting them up While holding the handle on the rear of the unit carefully lean the display forward so that all...

Page 14: ...tal Android Battery A Board Standalone Hardware User Manual Page 13 3 While holding the handle carefully lean the unit back until the castors touch the ground 4 You can now wheel the display into posi...

Page 15: ...anual Page 14 5 Once in position keeping hold of the handle carefully lean the display forward so that all of the weight is on the feet and the castors are off the ground 6 Extend the castor legs out...

Page 16: ...attery A Board Standalone Hardware User Manual Page 15 7 Carefully lower the display back down until the castors touch the ground You can then apply the brakes on the castors to fix the display in pos...

Page 17: ...battery however to charge the battery to full capacity you will need to connect the charger mains power cable to the display and the mains socket The charging point of the display is located next to t...

Page 18: ...1 6 3 Charge Level Indicator Located next to the power rocker switch on the rear of the unit is a charge level indicator underneath this will be a small button Using the button you can toggle between...

Page 19: ...ard Standalone Hardware User Manual Page 18 1 7 Home Screen Once your screen has powered up and begins to play content press the STOP button on the remote control to go back to the Home Screen picture...

Page 20: ...the right item press PLAY to confirm selection To get back to the side menu press the LEFT navigation button on the remote control If any settings are changed you must select BACK then EXIT on the on...

Page 21: ...tiple languages the default being English As with all menu operation press DOWN to access the sub menu then use the navigation buttons to select the right item then PLAY to confirm selection Switch Sc...

Page 22: ...on allows you to display a clock while content is playing There are 5 options as pictured below Close The screen doesn t display time Top Left The time will be displayed on top left of the screen Top...

Page 23: ...Log This is a network function only and is disabled on this screen USB This allows you to enable or disable the USB port If you want to be able to update the screen please ensure this is turned on bl...

Page 24: ...This allows you to enable or disable the scrolling text function If you have included scrolling text in your playlist using the scheduling software and want it to display please ensure this is turned...

Page 25: ...t Yes and press PLAY to restore factory settings this will restore all system settings back to default Auto Start This feature allows your screen to start playing the pre loaded content as soon as it...

Page 26: ...enu please press the LEFT navigation button the remote control you can now navigate though the Main Menus sub menus The sub menus within this section are Work Mode Play Mode Content Storage Image Dura...

Page 27: ...Digital Android Battery A Board Standalone Hardware User Manual Page 26 Play Mode This feature is only available if the screen is set to STANDALONE mode and should be set to Open...

Page 28: ...rectly from a USB stick should you want to We recommend that you set this feature to Internal Memory however if you want your content to displays directly from your USB stick and not copy over please...

Page 29: ...the remote control you can now navigate though the Main Menus sub menus To set accurate values first select the top date field by pressing PLAY Another window will now appear allowing you to set your...

Page 30: ...Digital Android Battery A Board Standalone Hardware User Manual Page 29 Set the time using the same method saving when complete...

Page 31: ...screen please set the Control Mode to Manual There are two Setting Modes Daily allowing you to set the same on off times for every day of the week or Weekly allowing you to set individual on off time...

Page 32: ...play at different volumes at different times of the day and switch to different AV inputs at different times of the day Volume Timer To enable this feature turn the slider on blue New fields will now...

Page 33: ...nd press PLAY on your remote control Activate the timer set a volume level and also a start and end time Finally navigate to and select SAVE Port Timer To enable this feature turn the slider on blue N...

Page 34: ...ttery A Board Standalone Hardware User Manual Page 33 Navigate to a timer field and press PLAY on your remote control Activate the timer then set a start and end time and an AV input Finally navigate...

Page 35: ...used space and free space You can also format the disk You should be extremely careful here as formatting the disk will result in a total loss of data 1 8 7 Exit Highlighting and selecting this sectio...

Page 36: ...ch as brightness contrast and saturation This can be accessed at any time by pressing the MENU button on your remote control Source Here you can select which video signal the screen displays As a defa...

Page 37: ...u To go back to the previous menu navigate to Return and press PLAY on your remote control Picture Here you can alter the overall image settings of your screen The default value for all the image sett...

Page 38: ...oid Battery A Board Standalone Hardware User Manual Page 37 Exit To exit from this Display Settings menu navigate to Exit and press PLAY If inactive for more than 10 seconds you will automatically exi...

Page 39: ...ed Media Files Media Type Supported File Type Image JPG Video MPG AVI MP4 Audio MP3 1 This unit does NOT support WMV or FLV video file types 2 This unit does NOT support Sony ATRAC3 DTS or Dobly HD au...

Page 40: ...in the root directory without putting them into a folder 2 Insert USB drive into the USB slot see Figure 4 Figure 6 Position of Screen Inputs 3 This will automatically delete any files currently stor...

Page 41: ...ery A Board Standalone Hardware User Manual Page 40 5 Remove the USB drive 6 The unit will now restart if it doesn t please turn off and back on via the mains or press the reset button and play the st...

Page 42: ...y Signal Input for video signal 3 5mm Audio Input for audio signal input USB Universal Serial Bus for updating media player SIM Card Slot Subscriber Identity Module Card Slot 3G Screens only Micro SD...

Page 43: ...pplication you will be greeted by the main menu screen giving you the options of Create New Playlist and Load Existing Playlist 2 5Creating Playlists Once you have selected Create New Playlist the pla...

Page 44: ...ecutive schedule times do not overlap Click on the Add Schedule Button Type a Schedule name Select preferred start time Select preferred end time Click OK Schedule will appear in the playlist To add m...

Page 45: ...it has a file name of 11 characters or less and contain no special characters etc only Click the Add Image button Select appropriate Schedule Click Browse and locate and select files Enter a duration...

Page 46: ...P3 file Enter volume level Click OK MP3 Appears in Schedule NOTE You must add audio files after all image files Adding Video Note Before adding video files please ensure that it has a file name of 11...

Page 47: ...by accessing the System Settings of the Main Menu see 1 5 1 System Settings Click the Add Scroll Message button Enter the message you would like to run across the bottom of the screen Or if you have a...

Page 48: ...andalone Hardware User Manual Page 47 2 5 3 Saving NOTE Before saving please ensure location drive is empty Click Save to Disk Click Browse and select the top level of the USB drive as the location of...

Page 49: ...list appears in playlist creator Select item to edit and click Edit button located on the top right hand side of the application NOTE You can also add items to the playlist and add further schedules 2...

Page 50: ...following steps 1 Create or open a PowerPoint presentation 2 Click File Save As 3 Enter a File name 4 Click on Save as type scroll down and find the file extension JPEG file interchange format as show...

Page 51: ...extension Windows Media Video wmv as shown in the image below 5 Click Save 6 you can then convert the WMV video file to an AVI by following the steps in the next section 4 2 NOTE For the best portrai...

Page 52: ...rd Standalone Hardware User Manual Page 51 2 of 7 Launch the program and click the AVI button 3 of 7 Now click Add File alternativly at this stage you can just drag and drop your video file into this...

Page 53: ...Digital Android Battery A Board Standalone Hardware User Manual Page 52 4 of 7 Next locate and select the your video file then click Open 5 of 7 Now click Output Setting...

Page 54: ...53 6 of 7 Set your Video Settings to the following values and then click OK 7 of 7 Click Start Once the video has finished converting you can access it by clicking the Output Folder button you can th...

Page 55: ...the media onto the display once again 3 5My media file will not display or is missing from the playlist In this situation the first step to take is to start with a blank USB drive Copy one supported...

Reviews: