


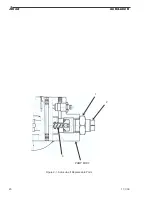


5.3 MODEL 770CS INSTALLATION
Model 770CS Hy-Ram does not have a pres-
sure-reducing circuit. When the AutoLube
II is installed, additional fittings and a
third hose must be installed to reduce pres-
sure, as follows:
1. The lubrication fittings and mounting
configurations are installed the same as
described in Section 5.1.
2. Remove plug from AutoLube II hydrau-
lic pressure port on hammer, marked
with a small
P
on the cylinder head, and
install adapter (2), M14-1.5 x 4BSPP.
3. Install side port of tee fitting (4) on
adapter (2), 04JIC.
4. Connect small hose (6), 04JIC, ¼ inch,
for hydraulic connection to AutoLube II
on the bottom port of tee fitting (4),
04JIC.
5. Connect hose (11), 04-06JIC , to top port
of tee fitting (4), 04JIC..
6. Install tee fitting (12), 04BSPP-06 male
JIC, bottom port, on Connection F,
two-speed connection, on cylinder head.
7. Cap the top port of the tee fitting (12),
0 4 B S P P - 0 6 m a l e J I C o r i n s t a l l
two-speed line.
8. Install hose (11), 04-06JIC on orifice
side of tee fitting (12), 04BSPP-06 male
JIC.
9. Proceed with installation at Step 6 in
Section 5.1.
A
llied
AutoLube II
11/1/03
11
Lube
Pressure
9
10
7
8
5
6
4
2
3
1
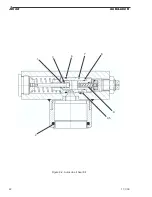
Connect to Autolube
II
pressure port on Hy-Ram
Connect to lubrication port
on Hy-Ram
12
11
To 2-Speed Port
Figure 5-2. AutoLube II Installation on Model 770CS
Summary of Contents for AutoLube II
Page 4: ...Allied AutoLube II ii 11 1 03 This page intentionally left blank ...
Page 6: ...Allied AutoLube II 2 11 1 03 This page intentionally left blank ...
Page 8: ...Allied AutoLube II 4 11 1 03 This page intentionally left blank ...
Page 10: ...Allied AutoLube II 6 11 1 03 This page intentionally left blank ...
Page 12: ...Allied AutoLube II 8 11 1 03 This page intentionally left blank ...
Page 16: ...Allied AutoLube II 12 11 1 03 This page intentionally left blank ...
Page 22: ...Allied AutoLube II 18 11 1 03 This page intentionally left blank ...
Page 24: ...Allied AutoLube II 20 11 1 03 1 2 PUMP BODY 3 Figure 9 1 AutoLube II Replaceable Parts ...
Page 26: ...Allied AutoLube II 22 11 1 03 2 4 5 9 1 3 6 7 8 Figure 9 2 AutoLube II Seal Kit ...
Page 28: ......