background image

AT-iMG746MOD Installation Guide

Chapter 3: Installing the Gateway in the Enclosure

23

Connecting the Telephone Wires

To connect the telephone wires, perform the following procedure:

1. Remove the grommet from the telephone wire/ LAN entrance.

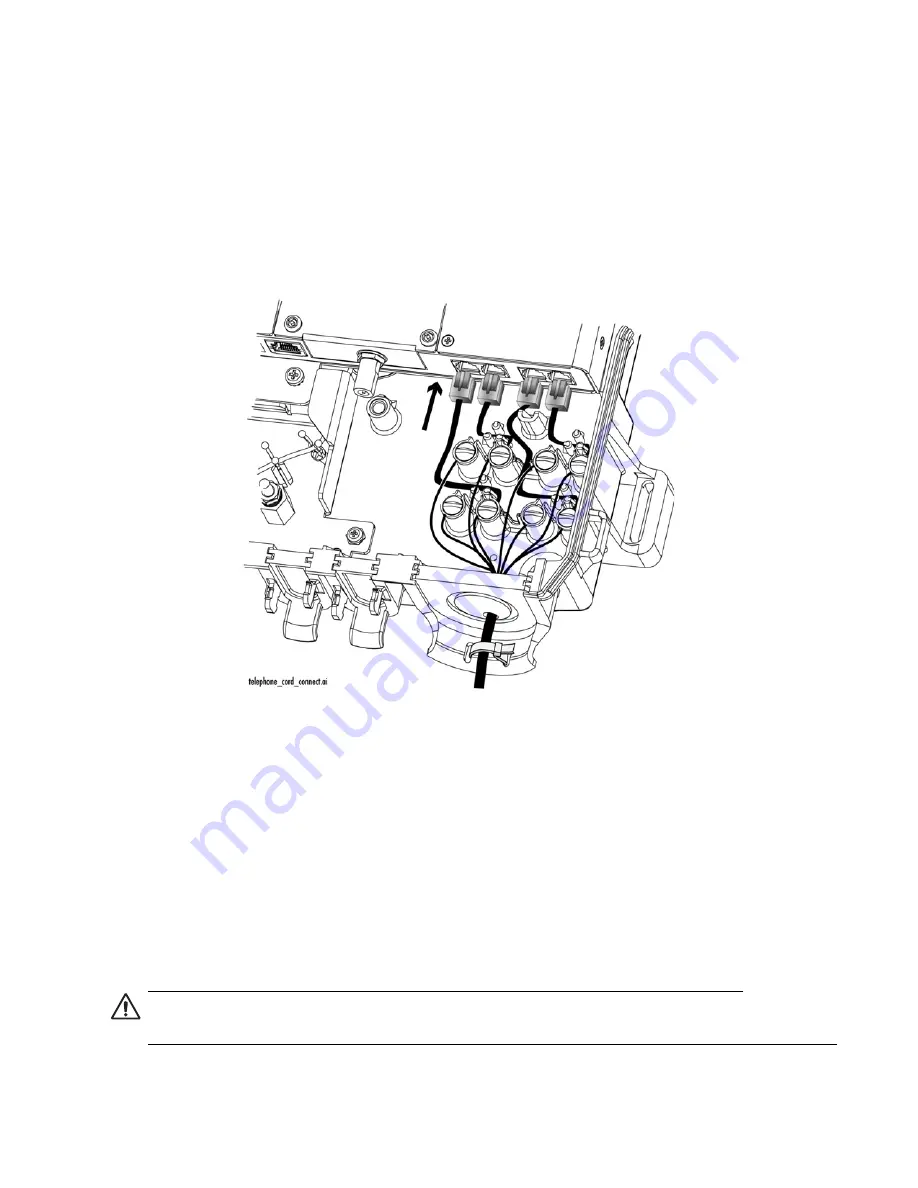
2. Connect the telephone wires to each pair of telephone terminal posts in the enclosure, as well as the 

appropriate RJ-11 connectors, as shown in Figure 14, at 5.3 in-lbs.

Figure 14. Connecting the Telephone Wires

3. Perform the next steps based on the following:

a. If you are connecting the LAN cable, go to the next subsection, “Connecting the LAN Cables” 

on page 24

b. If you are not connecting the LAN cable continue to the next step below.

4. Cut a notch into the bottom of the grommet to accommodate the telephone cable.

5. Secure the telephone wire to the entrance with a UV-rated wire tie (not provided).

6. Trim the wire tie, reinsert the grommet, and seal the grommet with tape and silicone sealant.

Caution

The grommet must be sealed so that the unit can operate correctly in an outside environment.

Summary of Contents for AT-iMG7x6MOD series

Page 1: ...Enclosure and Intelligent Multiservice Gateways AT iMG7x6MOD Electronics Unit Installation Guide...

Page 2: ...rks or registered trademarks of their respective owners Allied Telesis Inc reserves the right to make changes in specifications and other information contained in this document without prior written n...

Page 3: ...ng for the Installation 28 Mount the Grounding Stud 29 Fastening the Plywood Mounting Surface to a Wall 29 Attach Wall Mounting Bracket and Mark Mounting Holes 30 Mount the Gateway to the Mounting Sur...

Page 4: ...cifications 48 Safety and Electromagnetic Emissions Certifications 48 Power Cord Wiring 49 Serial Port Wiring 50 T1 E1 Cable Wiring 50 Cleaning Fiber Optic Connectors 51 Using a Cartridge Type Cleaner...

Page 5: ...module with a Gig LAN RJ45 port This will be highlighted in various figures Safety Symbols Used in this Document This document uses the safety symbols defined in Table 1 Reviewing Safety Precautions...

Page 6: ...quipment and shall be easily accessible 7 Warning Operating Temperature This product is designed for a an operating temperature range of 40 to 65 degrees C All Countries Install product in accordance...

Page 7: ...n approve per the Code No wiring to the product should be exposed in lengths beyond 140 feet as circuits should avoid exposure to accidental contact with lightning and power conductors in accordance w...

Page 8: ...d Telesis without an RMA number will be returned to the sender at the sender s expense To obtain an RMA number contact Allied Telesis Technical Support through our web site www alliedtelesis com Sales...

Page 9: ...Electronics Overview 9 Chapter 2 Electronics Overview Features The AT iMG746MOD is part of the iMG7x6MOD Series product Figure 1 The AT iMG746MOD Electronics Unit with Gig BiDi WAN Module Figure 2 Ca...

Page 10: ...Fixed Interfaces 6 RJ 45 LAN ports 10 100 Base T 4 Voice ports FXS For the AT iMG726MOD 2 voice ports are available Modular WAN Interface Card 100M BiDi EPON 1G BiDi Modular LAN Interface Card to exp...

Page 11: ...wing table shows which module configurations are possible Also refer to Understanding the LEDs iMGMOD Unit on page 42 Table 2 Module Combinations for MOD Products Product iMG626 iMG726 iMG646 iMG746 1...

Page 12: ...re Installation Guide for steps on how to install the Enclosure as well as figures that show the overall configuration 2 Go to Chapter 3 of this Installation Guide for installation steps 3 Go to Chapt...

Page 13: ...Example Configurations The following figures show one possible installation with the iMG746MOD Figure 4 Example AT iMG746MOD using Coax Home Network ethernet up to 6 ports RJ11 up to 4 ports Coax up...

Page 14: ...14 Chapter 2 Electronics Overview...

Page 15: ...following tools on hand before you install the enclosure or gateway Flat head and 2 Phillips screwdrivers Wire cutters 5 32 in hex pin security screwdriver Additional Supplies You may also need the fo...

Page 16: ...ay perform the following procedure 1 Open the enclosure and locate the notches at the top of the enclosure 2 Align the tabs on top of the gateway with the notches at the top of the Enclosure Then rest...

Page 17: ...17 3 Use two of the 8 32 SEMS screws to secure the gateway to the grounding plate as shown in Figure 6 Figure 6 Mounting the Gateway Connecting Cables Cable Layout Overview Figure 7 shows the cable e...

Page 18: ...and 7 pin terminal blocks are supplied with the AT iMG008 AT iMG008G UPS and the gateways For lengths up to 50 ft use three pair twisted wire with a minimum 18 AWG Figure 32 on page 49 provides a det...

Page 19: ...uration To connect the coax cable perform the following procedure 1 Remove the grommet from the power cord entrance cut a 1 4 X in it and put it back in place 2 Slip the coax through the grommet 3 Con...

Page 20: ...ble to verify the coax is properly grounded the iMG must be directly connected to building primary ground Warning Coaxial cable screen shield needs to be connected to the earth at the building entranc...

Page 21: ...d would be used Refer to Figure 11 Figure 11 DS1 E1 Network Configuration To connect the DS1 T1 cable perform the following procedure 1 Connect the DS1 T1 cable s to the DS1 T1 card as shown in Figure...

Page 22: ...an RJ 45 that is configured directly on the module Refer to the following figure Note Activating the copper Gigabit LAN interface disables the interface to the T1 E LAN module and so the T1 E LAN mod...

Page 23: ...14 Connecting the Telephone Wires 3 Perform the next steps based on the following a If you are connecting the LAN cable go to the next subsection Connecting the LAN Cables on page 24 b If you are not...

Page 24: ...through the slots at the bottom of the entrance 3 Connect the LAN cables to the RJ 45 ports on the gateway 4 Secure the wires with a wire tie as shown in Figure 15 This step will include the telephon...

Page 25: ...he following procedure 1 Install an uninterruptible power supply according to the manufacturer s instructions 2 If necessary plug the management cable into the console port For networks with remote ma...

Page 26: ...AT iMG746MOD Installation Guide 26 Chapter 3 Installing the Gateway in the Enclosure...

Page 27: ...ation Required Tools and Supplies Tools Have the following tools on hand before you install the enclosure or gateway Flat head and 2 Phillips screwdrivers Wire cutters Crimping tool Additional Items Y...

Page 28: ...in the gateway package If any item is missing or damaged contact your Allied Telesis sales representative for assistance AT iMGxx6MOD chassis LAN and WAN cards are already installed This Installation...

Page 29: ...s intelligent Multiservice Gateway must be mounted on a plywood surface that complies with the following specifications Recommended minimum size of 12 in by 12 in 31 cm by 31 cm Recommended minimum th...

Page 30: ...18 Securing the Plywood to the Wall Attach Wall Mounting Bracket and Mark Mounting Holes 1 Take the wall mounting bracket and attach it to the top of the gateway using the three remaining mounting scr...

Page 31: ...o the Mounting Surface 1 Secure the gateway to the mounting surface with at least three wood screws not included starting with the upper right corner as shown in Figure 20 Note Ensure the bracket can...

Page 32: ...14AWG stranded grounding wire for the ground connection 2 Strip 0 25 in 0 7 cm of insulation from the ground wire and crimp it into the ground wire ring lug 3 Secure the ring lug on the stud with a w...

Page 33: ...es The terminal adapters are supplied with the AT iMG008 AT iMG008G UPS and the gateways For lengths up to 50 ft use three pair twisted wire with a minimum 18 AWG Figure 32 on page 49 provides a detai...

Page 34: ...tic cable perform the following procedure 1 Remove the dust plug from the fiber optic port on the gateway and clean the port and connector See Appendix B Cleaning Fiber Optic Connectors on page 51 for...

Page 35: ...nect the coax cable perform the following procedure 1 Connect the coax cable to the HPNA card as shown in Figure 25 Warning Coaxial cable screen shield needs to be connected to the earth at the buildi...

Page 36: ...uld be used Refer to Figure 26 Figure 26 DS1 E1 Network Configuration To connect the DS1 T1 cable perform the following procedure 1 Connect the RJ 45 cable s to the DS1 T1 card as shown in Figure 27 F...

Page 37: ...J 45 that is configured directly on the module Refer to the following figure Note Activating the copper Gigabit LAN interface disables the interface to the T1 E1 LAN module and so the T1 E1 LAN module...

Page 38: ...e directly into the RJ 11 ports on the AT iMGxx6MOD Connecting the LAN Cables To connect the LAN cables perform the following procedure Note Allied Telesis recommends that you fully wire all six ports...

Page 39: ...39 Prepare for Initial Startup To complete the installation perform the following procedure 1 Install an uninterrupted power supply according to the manufacturer s instructions 2 Plug the management...

Page 40: ...AT iMG646MOD Installation Guide 40 Chapter 4 Installing the Gateway Indoors...

Page 41: ...set 1 Ensure the UPS device has the battery connected so that the battery can provide power if necessary The battery must be plugged in and charged 2 Turn on the power supply All LEDs will blink 3 The...

Page 42: ...N daughter card has been installed such as the 1G BiDi module on the iMG6x6MOD A log is also generated WAN BD ON A WAN link has been established OFF A WAN link has not been established WAN EPON Red Si...

Page 43: ...r is properly seated in the fiber optic port Verify that the fiber optic cable has an active light source Problem The WAN EPON connection LED stays at red flashing does not go to green Solution Check...

Page 44: ...up then there may be a problem with the AT iMG746MOD gateway Contact Allied Telesis Solution 3 Verify the configuration If problems persist reset the iMG746MOD to its factory defaults system config s...

Page 45: ...ft LED on Green 10M Table 4 LEDs and Meanings for each port No LED ADMIN LED LINK LED NETWORK Meanings 1 ON Off Off Port enabled no errors no faults 2 ON ON Off Port enabled but in a failed state e g...

Page 46: ...AT iMG746MOD Installation Guide 46 Chapter 5 Turn Up and Troubleshooting...

Page 47: ...mm x 43 2 mm 13 in x 9 1 in x 1 7 in AT iMG746MOD 222 mm x 222 mm x 25 mm 8 75 in x 8 75 in x 1 0 in Weight AT EN746MOD 1 2 kg 3 lbs AT iMG746MOD max 1 3 kg 2 7 lbs Physical Specifications iMG726MOD...

Page 48: ...y 5 to 90 non condensing Storage Humidity 5 to 95 non condensing Operating Altitude Range Up to 3 000 m 9 843 ft Power Specifications Input Supply Voltage 12 V DC Power Consumption 10W typical 18W max...

Page 49: ...to Figure 32 and Table 5 Figure 32 Gateway Terminal Block to Power Cord Terminal Block Wiring Diagram iMG Terminal Block Power Supply Terminal Block Table 5 Gateway Terminal Block to Power Cord Termi...

Page 50: ...tion not a DB9 connection used with other Allied Telesis products Pinout is as follows Note When looking at the RJ 45 port pin 1 is on the right Pin 3 TXD Pin 6 RXD Pin 4 or 5 GND T1 E1 Cable Wiring P...

Page 51: ...ible to the naked eye can disrupt light transmission and lead to failure of the component or of the entire system Therefore it is of utmost importance to clean all fiber optic connectors before use Fi...

Page 52: ...ir to clean a fiber optic connector To clean a fiber optic connector using a cartridge cleaner perform the following procedure 7 With one hand hold the cartridge cleaner and push the lever on the clea...

Page 53: ...icity that can damage the fiber optic cable 10 If desired repeat steps 3 and 4 11 If a fiber inspection scope is available use the scope to inspect the ferrule end face to make sure that it is clean 1...

Page 54: ...oth 2 5 mm and 1 25 mm sizes for use on SC and MU connectors respectively Note NEVER use a household cotton swab and or alcohol to clean a fiber optic connector This may leave a residue on the ferrule...

Page 55: ...ean and to check for scratches pits or other problems that may affect performance Note Always keep a dust cap on a fiber optic cable when it is not in use Note Do not touch the end face of the ferrule...

Page 56: ...56...

Reviews: