background image


*7@8(&'8-@**@&[email protected](.-7@
')@**@0(07@$2@+&@;[email protected]@2)7@
*=?7@26@.;8@@*)@878@=(8'@7.0?@=82@
')@**@;2-27@2&;*2*?@$2@*.)&7@;7@?@70([email protected]@7(+(*2@;'@*.)&7@-@@-&2.;7@-@
+;78@@*2@2&;*2*?@
-*?@;7@002.<@&7@?*(-37@
*=?7@[email protected](<@&*.<7@='-@'-*(-&@'.8@047@
*-@-@+(-8(-@8'@00*(-@%2@'@;7@
*@8'@2;@8@*78@@+@!2.+@8'@=**@
[email protected]@0*@-2@#++*@+82(*@082.*@.2@*(1;(7@
%2@&2(**(-&@78@8'@;2-27@.!@8'@&2(**@788(.-@8.@8'@'.:[email protected](8(.-@-@*8@(8@;2-@*()@8'(7@$2@@
+(-;87@'(7@;,7@."@27(;7@!2.+@&2(**(-&@-@+)7@8'@&2(**@7(2@8.@*-@%527@<@8'@.--8@
.0-@='-@.(-&@8'(7@%527@[email protected]@$2&8@8.@*.7@8'@&7@7;00*?@


[email protected]@*-@.<2@8'@&2(**@;2(-&@.028(.-@*=?7@(&-(8@=(8'@8'@*(@.0-@
0@!*++*@*(1;(7@-@+82(*7@-2@8'@00*(-@
7@8'@00*(-@=(8'@@=8'[email protected](.-@.<2@
7@0*78(@.2@&*[email protected]@8'@'.8@&2(**@
7@(-@782 -&@=(-@
(7+-8*@8'@<*<@[email protected]@?.;2@.=-@
22?@.;8@@*)@878@=(8'@[email protected]@!*+@
8.2@8'@702@ 88*@(-@8'@7@(-8@
8.2@&7@ 88*@*?(-&@.=-@*=?7@78-@;02(&'8@
7@(-@*.7@2..+7@
)@782;8;2*@'-&7@
.<@8'@2;@;2(-&@;7@
[email protected]@.782;8@8'@<-8(*8(.-@.!@8'@00*(-@
[email protected]@**.=@8'@&7@'[email protected]@*82(*@*7@8.@.+@([email protected]@=(8'@8'@00*(-@='(*@(8@(7@'.8@
[email protected]@;7@.*@[email protected]'2@7.*(@!;*7@

(7.--8@&[email protected](.-7@='(*@8'@00*(-@(7@([email protected](.-@

[email protected]@;7@2;[email protected]@-8@&7@?*(-27@
<@;-88-@;2(-&@.028(.-@
+.<@8'@&7@*-)(-&@0*;&@!2.+@8'@*%'-@7(@0-*@(-@8'@7(@+.*@

'(7@00*(-@([email protected]*?@7;(8*@!/2@;7@=(8'@*.=@0277;2@;[email protected]@.2@8'(2@&7@+(>8;27@-@(7@!(88@=(8'@
8'@002.02(8@*.=@0277;2@2&;*8.2@<(@@!*>(*@'.7@'@00*(-@(7@2?@$2@;7@=(8'@+2@;8-@
[email protected]@8'(2@+(>8;27@.!@8&.2?@ @@@@

Summary of Contents for 100303

Page 1: ...BLY INSTRUCTIONS CAREFULLY BEFORE STARTING THE ASSEMBLY WARNING ACCESSORIES MAY BE HOT PLEASE KEEP CHILDREN AWAY THESE PARTS MUST BE KEPT AWAY FROMCOMBUSTIBLE MATERIALS AFTER USE PLEASE TURN OFF THE GAS SUPPLY OPTICAL TECHNICAL CHANGES POSSILE AT ANY TIME Operating and assembly instructuions Please read carefully before commissioning ...

Page 2: ... 7 5 2 7 8 2 8 8 7 8 7 7 00 8 2 8 2 2 0 2 8 7 8 8 8 0 0 1 7 8 2 7 2 8 00 7 8 00 8 8 2 02 8 8 2 7 0 78 2 77 8 8 2 7 782 7 8 8 8 2 22 8 8 78 8 0 8 2 8 70 2 88 8 7 8 8 2 7 88 7 78 02 8 7 7 2 7 782 8 2 7 8 2 2 7 8 782 8 8 8 8 8 00 8 8 7 7 2 82 7 8 8 8 8 8 8 00 8 7 8 8 7 2 8 2 7 7 7 8 7 8 7 8 00 7 0 2 8 8 7 2 78 2 8 7 27 88 2 0 2 8 8 7 0 2 8 7 0 8 7 7 00 7 7 8 2 7 8 02 77 2 8 02 0 2 8 2 7 8 2 7 7 88 8 ...

Page 3: ...17 7 41 0 0 7 33 0 5 017 0 95 1 017 7 5 77 100 7 71 7 33 0 0 0 0 7 5 77 3 13 0 5 77 957 5714 197 1145 0 0 934 7 315 7 10 197 1 7 4 1 4 0 1 017 5714 7 5 77 4 7 3 4 794 5 62 0 3417 7 7 41 4 7 590 7 3 7 5 77 41 13 0 5 14 100 7 0 594 7 7 7 4 5 01 3 47 14 14 0 1 0 7 100 7 10 1 7 5 177 5 15 5 34 5594 4 9 714 7 15 0 5 71 4 3 594 7 7 7 100 7 10 5 5 144 7 7 4 0 1 5 15 4 9 714 14 77 7 57 957 44 197 5 1 1 7 ...

Page 4: ... R mdRu mU w R u_PR KzrkRr v _k w R Mmkwrmd ckmK IkP wzrk _w Ikw_MdmMc _uR wm 1301 JlQ x T L rlTr v n fQ NnjT nl gV x T L rlTr QnTv lnx fa x x rl nX x T Jv J x j l xTv JlQ rTqTJx x T qrnNTQ rT vxTq D R u_PR KzrkRr _u PRu_ kRP Uor pmwu pIku _w I mU ii m kmw zuR w R u_PR KzrkRr d_P Iu I Src wIKdR RYrR zu_k Umr w R U_ruw w_iR d_ w Idd w R iI_k KzrkRru IkP RIw zp Uor i_kzwRu _w w R d_P MdmuRP IkP w R ...

Page 5: ...ner nozzle 0 82 mm Infrared burner nozzle 0 82 mm Device Devices category Gas type Burner capacity Total burner capacity consumpion Gas pressure o and their mixture Gas barbecue for outdoor use 17 2 kW 1250 g h 20 7 kw 1505 g h optional INFO e g 0 93 mm indicates the diameter of the nozzle in mm ALL GRILL ALLROUNDER 100303 CE 2531 22 PIN NO 2531CU 0071 WEEE Reg Nr DE 41898675 ...

Page 6: ...H 48 G 95H7 H H 75 970H 57 H H H 75 5 H0 H H 9 H H H 0 4 H 9 00H H 95H7 H H 57 H 5 H 07 H H 7 0 H 0 H 755 H H9 0 79 755 H H9 0 79H 5 H 99 H7 H 0 H H 95H75H H H 880 H H 75 H 5 H 5H0 H H 9 G 95H H 9 00H 975 H 5 7H H 5 H 7 5 9 H H 0 4 H G 9 80 H H H 7 0 G H 5H 978H 5H H 07 H79H 95 9 0 4 G H 0 5H H 9 00 G H 47 H X H H H87 0 G H 0 H H07 9H 9 00 5 H 48 9 9 9 H 9 H 07 H 9 H 5H H 95 9H G 9 H0 H 5 H 4 0 75...

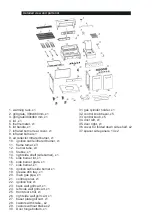
Page 7: ... lid side burner grate side burner ignition cable side burner grease drib tray main gas pipe control panel ignition box back wall grill cart left side wall grill cart front door strut right side wall grill cart baser plate grill cart castors with brake castors without brake Door hinge bottom gas cylinder holder control knob bezel control knob door left door right cover for folded down side shelf s...

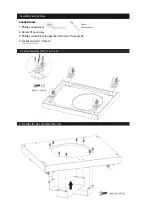
Page 8: ...Ϯϳ н Ϯϴ н ϮϵͿ 2 Holder for gas cylinder No ϯϭͿ ϭϬŵŵ Socket wrench Assembly instructions needed tools 1 Phillips screwdriver 2 Gloves if necessary 3 Phillips screwdriver longer than 400 mm if required 4 Socket wrench 10 mmm ...

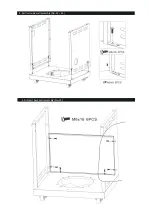
Page 9: ...3 Grill cart side wall assembly No Ϯϰ н Ϯϲ Ϳ 4 Grill cart back wall assembly No Ϯϯ ...

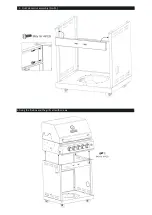
Page 10: ...5 Front door strut assembly No Ϯϱ ϲ Fixing the firebox and the grill cart with screws 10 ...

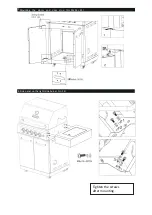
Page 11: ...ϳ Mounting the doors and door stop Eƌ ϯϬн ϯϰ н ϯϱͿ ϴ Side panel on the right side burner No ϭϰ Tighten the screws after mounting ...

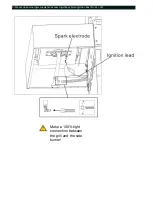
Page 12: ...ϵ Mount side burner gas supply and conect ignition cable to ignition box Eƌ ϭϰ н ϭϴͿ Make a 100 tight connection between the grill and the side burner ...

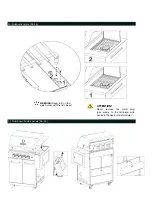
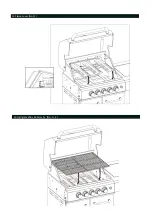
Page 13: ...r grate Eo ϭϲͿ ATTENTION Never remove the blind plug gas supply to the left hand side panel in the basic model modular WARNING Never turn on the side burner with the lid closed 1ϭ Fold down lid side panels Eo ϯϲͿ ...

Page 14: ...1Ϯ Flame cover No ϭϭ 1ϯ rill grate ϯϬϬ x ϰϲ0 mm Ϯdž No 2 н ϯ ...

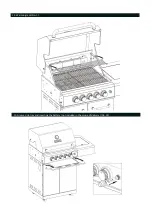
Page 15: ...1ϰ Warming rack No 1 1ϱ Grease drip tray aŶĚ inserting the battery not included in the scope of delivery No ϭϵ ...

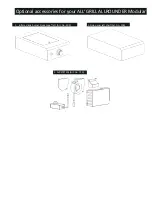
Page 16: ...Optional accessories for your ALL GRILL ALLROUNDER Modular ϭ Infrared side burner Steakzone left Art No ϯϬϬͿ Ϯ Side panel left shelf Art No 1ϬϬͿ ϯ Z z d D ƌƚ Eo ϳϱϬͿ Θ y ...

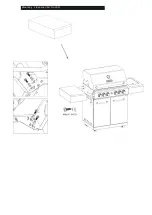
Page 17: ...Mounting Side panel ƌƚ Eo ϭϬϬͿ ...

Page 18: ...t the gas hose and the ignition cable 4 Insert the grease drip tray from behind Mounting AIR SYSTEM Art No 750 optional Modular 1 mount the AIR SYSTEM fan on the back of the grill 2 Fit the cover over the fan 3 connect the AIR SYSTEM regulator and mount it on the inside of the side wall Make a 100 tight connection between the grill and the side burner ...

Page 19: ...geable batteries Please do not dispose of batteries in household waste Every consumer is legally obliged to hand in batteries at a collection point in their municipality district or at a retailer This enables them to be disposed of in an environmentally friendly manner Batteries containing harmful substances are marked with the symbols Cd for cadmium Hg for mercury and Pb for lead Batteries are ma...

Page 20: ...ted all the ignition cables correctly and are they undamaged Are the distances between the electrodes and the ceramic burner correct and can the ignition spark be seen white blue flash Steakzone STARTING THE CERAMIC BURNER STEAK ZONE When starting the ceramic burners please always make sure to hold down the gas supply regulator at full power for 5 seconds before ignition in order to enrich the cer...

Page 21: ...el brushes as abrasion can cause extraneous rust to form All cleaning agents must be free of acids salts and chlorine Please note Products you prepare should not contain acidifying agents Attention MARINADES OF ALL KINDS VERY OFTEN CONTAIN ACIDIFIERS Occasional extraneous rust which can be caused by rusty other parts and acidic and acidic foods especially inside the grill as well as by external in...

Page 22: ... and keeps it ready for use for longer 2 You can only achieve this patina if you clean without chemicals and cleaning agents 3 Burn out your all grill interior and burn your spice and food residues after it no longer smokes you have burnt them completely pyrolysis Then simply clean the grate with the grill brush and remove the coarse dirt inside the grill and under the grate with a spatula Do not ...

Page 23: ...ve any residue with a scraper or a cloth that is not too damp Do not use any cleaning agents or detergents Allow to air dry thoroughly before using again Optional accessories Pizzastone 41 x 36 x 1 5 cm Art No 9839 Pizzastone ø 33 x 1 5 cm Art No 9813 If you use frozen pizza or rolls they must be completely defrosted before baking as the stone could be damaged by the temperature difference Over ti...

Page 24: ...ten the motor holder to the grill with 1 2 screws Skewer lengths may vary depending on item and serial number Example pictures for mounting the skewer set for all grills Technical and optical changes possible Enjoy your rotisserie grill and BBQ Detail picture not for Allgrill Chef u Extreme Detail Ring for spit guide Detail picture not for Allgrill Chef u ExtremDetail Ring for spit guide Detail pi...

Reviews: