8
SETTING UP YOUR PRINTER
1.
Carefully remove your printer from the packaging by grasping the printer frame firmly
with both hands.
2.
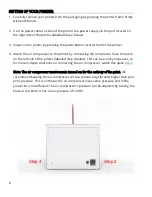
Use the power cable to connect the printer to a power supply via the port located on
the right side of the printer (labelled Step 2 below).
3.
Power on the printer by pressing the power button located front of the printer.
4.
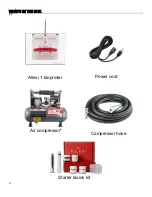
Attach the air compressor to the printer by connecting the compressor hose to nozzle
on the left side of the printer (labelled Step 4 below). This can be a tricky maneuver, so
for more in-depth directions on connecting the air compressor, watch this quick
Note: The air compressor must remain turned on for the entirety of the print. We
recommend keeping the air compressor set to a pressure significantly higher than your
print pressure. This is so that as the air compressor loses some pressure and refills,
your print is not affected. The air compressor’s pressure can be adjusted by turning the
black or red knob. It has a max pressure of 120PSI.
Step 4
Step 2
Summary of Contents for Allevi 1
Page 1: ...1 Allevi 1 User Guide 1 0 6 ...
Page 2: ...2 BU IL D W ITH L I FE ...
Page 5: ...5 Let s Get Started ...
Page 12: ...12 Let s Start Printing ...
Page 21: ...21 ...


