


SECTION 2
ASSEMBLY
068521
Page 24
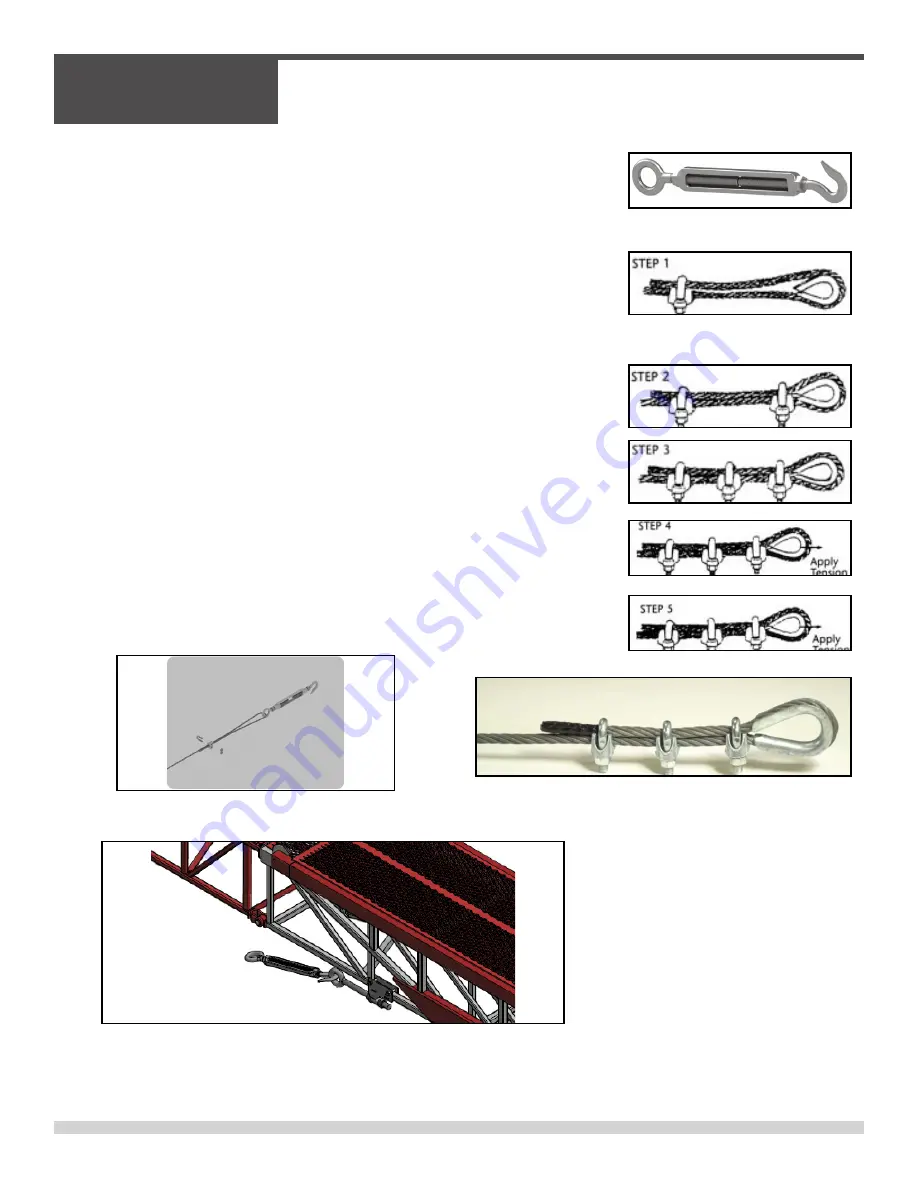
Installing Cable Tension Kit:
1. Loop dead end of cable through the Hook & Eye Turnbuckle.
2.
Apply first clip one base width from dead end of wire rope. U-Bolt
over dead end. Live end rests in clip saddle. Tighten nuts evenly to recommended torque.
3. Apply second clip as close to loop as possible. U-Bolt over dead
end. Turn nuts firmly but DO NOT TIGHTEN.
4.
Apply all other clips. Space evenly between first two and 6-7 rope diameters apart.
5. APPLY TENSION and Tighten all nuts to recommended torque.
6. Check nut torque after rope has been in opertation.
7. Mount End Bracket Assembly to frame of workbridge as shown.
8. Center the Cable Stay Assembly Mounts on to low frame as shown.
9. Attach cable to Cable Stays on the unit. Be sure that all bolts and
nuts are securely fastened before placing any weight on the Work
Bridge.
Assembly Instructions
Image of Completed Clamp Assembly
Summary of Contents for WB2434
Page 10: ...SECTION 1 SAFETY 068521 Page 10 SECTION 1 SAFETY ...
Page 20: ...SECTION 2 ASSEMBLY 068521 Page 20 SECTION 2 ASSEMBLY ...
Page 25: ...068521 Page 25 SECTION 2 ASSEMBLY Assembly Instructions ...
Page 26: ...SECTION 3 PARTS 068521 Page 26 SECTION 3 PARTS ...
Page 43: ...068521 Page 43 SECTION 3 PARTS PAGE LEFT BLANK INTENTIONALLY ...
Page 44: ...SECTION 3 PARTS 068521 Page 44 5 2 1 4 3 Decals WB2434 ...