background image

Rockwell Automation Publication 6300B-UM002A-EN-P - October 2020

27

Chapter

 5

Clean the Wall Mount Box PC

For optimal performance, it is important to clean the VersaView® 6300B wall 
mount box PCs periodically. 

Clean the Vent Holes

Perform the following steps to clean VersaView 6300B wall mount box PCs.

1.

Disconnect power from the computer at the power source.

2. Vacuum dust and debris from any vent holes or heatsink.
3. Reconnect power to the computer at the power source.

Clean the Fan Filters

Cat. Nos. 6300B-PBDx VersaView 6300B wall mount box PCs have two filters. 
Inspect these filters every three months or earlier if environmental conditions 
require it.

To access the filters, perform the following steps.

1.

Disconnect power from the computer at the power source.

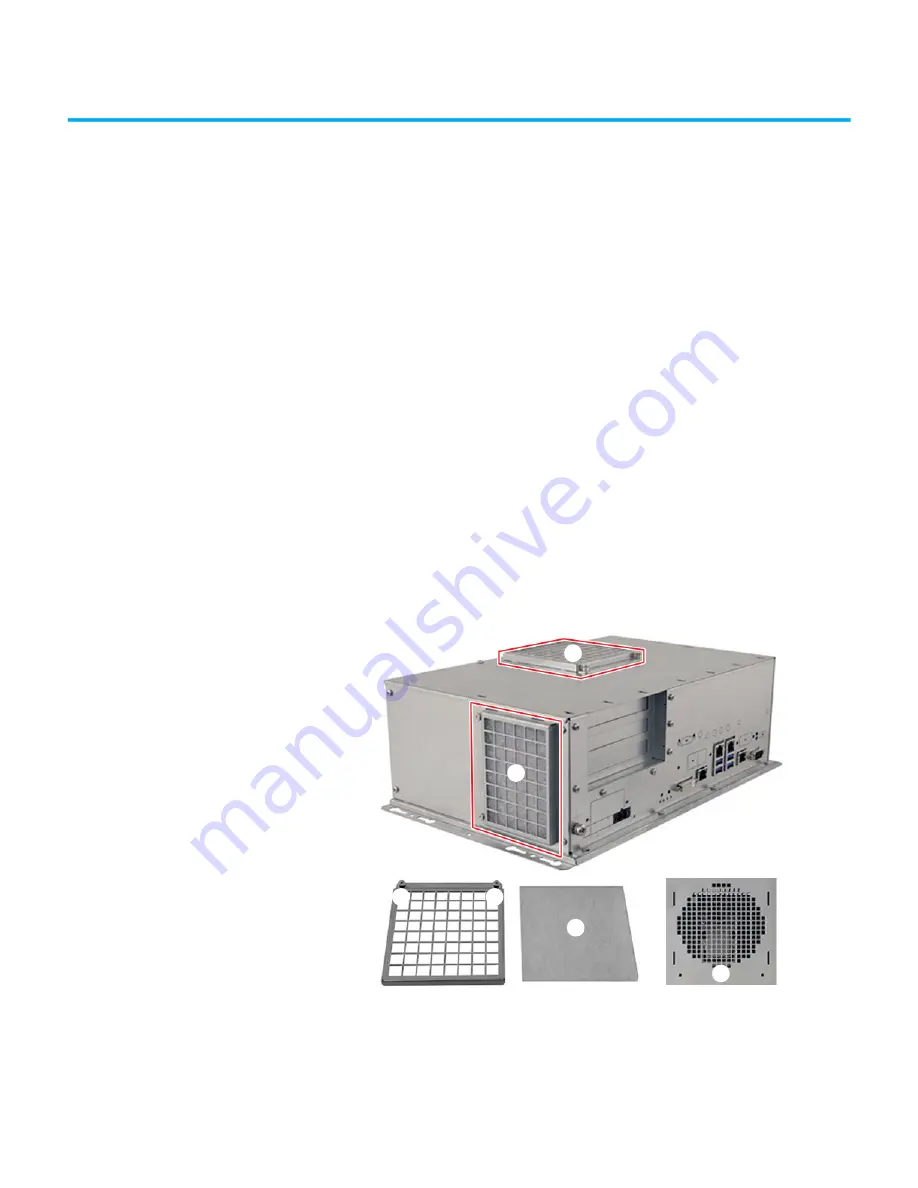
2. Locate the two filter plates (A).

3. Loosen the two screws (B) that secure each filter plate to the box PC.
4. Remove each filter plate and filter from the box PC.
5. Remove the filter (C) from each filter plate.

A

B

C

A

B

D

Summary of Contents for 6300B-PBCx

Page 1: ...VersaView 6300B Wall Mount Box PCs Bulletin Numbers 6300B PBCx and 6300B PBDx User Manual Original Instructions ...

Page 2: ...l Automation Inc with respect to use of information circuits equipment or software described in this manual Reproduction of the contents of this manual in whole or in part without written permission of Rockwell Automation Inc is prohibited Throughout this manual when necessary we use notes to make you aware of safety considerations Labels may also be on or inside the equipment to provide specific ...

Page 3: ... panel The housing or cabinet in which the computer is mounted can only be accessed with a key or tool and only by qualified personnel Before a housing or cabinet can be opened all power must first be disconnected Proper Disposal of the Computer You cannot dispose of computer equipment like other waste material Most computers and monitors contain heavy metals that can contaminate the earth Therefo...

Page 4: ...4 Rockwell Automation Publication 6300B UM002A EN P October 2020 VersaView 6300B Wall Mount Box PCs User Manual Notes ...

Page 5: ...lation 15 Install the Wall Mount Box PC 15 Install Method 1 15 Install Method 2 15 Connect Peripheral Cables 16 Grounding and Bonding 16 DC Power Supply Guidelines 16 Power Consumption 17 Install the Ground Wire 17 Connect Power 17 Connect DC Power for Cat Nos 6300B PBCx Wall Mount PCs 18 Connect AC Power for Cat Nos 6300B PBDx Wall Mount PCs 20 Chapter 3 Operate the Wall Mount Box PC Operating Gu...

Page 6: ...Chapter 6 Troubleshoot the System Thermal Alarms 29 Troubleshooting 29 Load the System Defaults 30 Ship or Transport the Computer 30 Chapter 7 Replace Components Replacement Parts 31 Voltage Precautions 31 Electrostatic Discharge Precautions 31 Pre configuration 32 Post configuration 32 Remove the Cover 33 Replace the Battery 34 Reinstall the Cover 36 ...

Page 7: ...tional information about related products from Rockwell Automation You can view or download publications at rok auto literature VersaView 6300B wall mount PCs with one expansion slot 6300B PBCx VersaView 6300B wall mount PCs with up to three expansion slots 6300B PBDx Resource Description VersaView 6300B Wall Mount PCs Installation Instructions publication 6300B IN002 Provides basic installation g...

Page 8: ...8 Rockwell Automation Publication 6300B UM002A EN P October 2020 Preface Notes ...

Page 9: ... 5 in SSD SATA III mSATA interface 1 4 x Ethernet RJ45 3 x USB 3 0 Type A 2 x USB 2 0 Type A 1 x RS 232 DB9M and 1 x DVI D full HD ports One PCIe x4 expansion slot Fanless design for 24V DC SELV input power The following features are available for the Cat No 6300B PBDx VersaView wall mount PCs Microsoft Windows 10 IoT Enterprise 2019 LTSC Storage up to 1 TB 2 5 in SSD SATA III M 2 2280 interface 4...

Page 10: ... C D E F G G I J H K I K Ø5 0 2 Ø5 0 2 Ø10 0 39 Method 1 x 4 Method 2 x 4 Bull No Dimensions in mm in A B C D E F G H I J K 6300B PBCx 338 4 13 32 324 12 75 246 9 69 75 8 2 98 69 8 2 75 6 0 24 7 2 0 28 78 3 07 110 4 33 58 2 28 68 2 68 6300B PBDx 377 14 84 362 14 25 232 9 13 128 5 04 122 4 8 6 0 24 7 5 0 3 51 2 150 5 9 31 1 22 41 1 61 4 5 6 7 3 No Description No Description 1 Ground screw 6 3 x USB...

Page 11: ... 4 8 3 6 No Description No Description 1 Ground screw 6 Serial port RS 232 DB9M 2 AC input power connection 7 CFast card slot 3 DVI D port full HD 8 2 x SSD drive slot optional 4 4 x Ethernet LAN port RJ45 9 3 x PCIe expansion slot 5 4 x USB 3 0 port Type A 4 5 9 7 4 1 2 NOTE Computer connections shown are a possible configuration your connection configuration can differ ...

Page 12: ...12 Rockwell Automation Publication 6300B UM002A EN P October 2020 Chapter 1 About the Wall Mount Box PC Notes ...

Page 13: ...t VersaView 6300B Wall Mount Box PCs Installation Instructions publication 6300B IN002 ATTENTION This equipment is intended for use in a Pollution Degree 2 industrial environment in overvoltage Category II applications as defined in IEC 60664 1 at altitudes up to 2000 m 6561 ft without derating This equipment is considered Group 1 Class A industrial equipment according to IEC EN 61326 1 Without ap...

Page 14: ...r the following The site must have sufficient power The site must be indoors The site must not expose the computer to direct sunlight The computers can operate in a surrounding air temperature range as follows 0 50 C 32 122 F for 6300B PBCx wall mount box PCs with the Intel Core i3 processor 0 45 C 32 113 F for 6300B PBCx wall mount box PCs with the Intel Core i7 processor 0 50 C 32 122 F for 6300...

Page 15: ...mer supplied Safety glasses Install the Wall Mount Box PC There are two preferred methods to install the computer Install Method 1 1 See Method 1 in Figure 1 on page 10 to locate and drill holes for the four M4x20 stainless steel screws 2 Align the holes on both computer brackets with the four drilled holes 3 Install the computer with the four customer supplied screws 4 Tighten the four screws Ins...

Page 16: ...C and a connected monitor DC Power Supply Guidelines Follow these guidelines to select the DC power supply for the computer The computer must be powered with a voltage of 24V DC 18 32V DC SELV input voltage range The nominal output power must be 25 larger than the drained power The output voltage rise time has to be less than 100 ms Consider the working temperature and the thermal derating of the ...

Page 17: ...card CFast SATA 1 3 SSD mSATA2 2 0 Ethernet 10 100 1000 Mbps 1 3 2 5 in SATA MLC 5 2 RAM 4 GB 3 9 Serial port RS 232 DB9M 1 3 8 GB 4 6 Expansion slot PCI half size or PCIe x4 6 5 1 1 5W is the maximum that the card can use 16 GB 5 9 32 GB 8 WARNING Do not exceed 120 W for the total system configuration Power consumption greater than 120 W can overpower the external and internal power supplies whic...

Page 18: ...or assembly perform the following steps 1 Remove the DC terminal block from the computer chassis For the terminal block location see Figure 2 on page 10 2 Open the power connector assembly kit that ships with the computer A 3 Insert the cable tie through the slots of the appropriate connector half B 4 Strip the end of each DC power wire to the length in Table 1 on page 19 5 Insert each stripped en...

Page 19: ...ssis Torque the DC terminal block flange screws to the values in Table 1 13 Turn on the main power switch or breaker 14 See Connect Power on page 17 for what happens during initial computer power up Item Description 6300P PBCx Models 1 DC 24V DC nominal recommended power wire size 2 5 mm2 14 AWG 2 DC 0V DC recommended power wire size 3 Stripped wire length 7 mm 0 275 4 Torque range to secure DC po...

Page 20: ...he public low voltage mains To connect AC power to the computer perform the following steps 1 Connect the appropriate end of the supplied power cord to the power input port on the computer 2 Connect the other end of the supplied power cord to an AC power source with an input voltage of 110 230V AC 50 60 Hz 3 Turn on the power switch in the power input port of the computer 4 See Connect Power on pa...

Page 21: ...e that all necessary peripheral devices are connected to the corresponding I O ports on the box PC 2 Make sure any connected components with separate power supplies such as an external display are turned on first 3 To power on the box PC perform the following AC powered models Turn on the power switch which is on the bottom of the box PC chassis DC powered models Turn on the main power switch or b...

Page 22: ...ttery goes lower and risks loss of date and time 3 Watchdog LED Red The watchdog timer has expired 4 Mass storage LED Yellow When lit access to a mass storage device SSD or CFast is happening through a SATA channel 5 On off standby UPS LED No color The computer is powered off or the CPU is not starting Green The computer is powered on The system is in a low power state and current session informat...

Page 23: ... to restart the box PC are unsuccessful then press the system reset button on the front panel of the box PC For the system reset button location see Table 2 on page 22 Shut Down the Wall Mount Box PC Use either of the following methods to shut down the box PC From the Start menu click or choose Shut Down Press Ctrl Alt Delete and then click or choose Shut Down IMPORTANT Use this method only if the...

Page 24: ...24 Rockwell Automation Publication 6300B UM002A EN P October 2020 Chapter 3 Operate the Wall Mount Box PC Notes ...

Page 25: ...nge the boot drive order Set or change the password or make other changes to the security settings Access the Set up Utility Follow these steps to access the set up utility in your computer 1 Start or restart your computer 2 During POST press F2 to access the set up utility 3 The following screens are accessible through the set up utility Main default screen when you access the utility Advanced Ch...

Page 26: ...ings through the Microsoft Windows Control Panel Date and Time View BIOS version and system memory Under BIOS Information on the Main menu With the Microsoft Windows OS you can view these settings by Windows System Information Modify the boot device order Under the Boot menu use to prioritize storage devices Modify network configuration Under the Advanced menu use when a LAN with a pre boot execut...

Page 27: ... any vent holes or heatsink 3 Reconnect power to the computer at the power source Clean the Fan Filters Cat Nos 6300B PBDx VersaView 6300B wall mount box PCs have two filters Inspect these filters every three months or earlier if environmental conditions require it To access the filters perform the following steps 1 Disconnect power from the computer at the power source 2 Locate the two filter pla...

Page 28: ...9 Reinstall both filter plates on the box PC 10 Tighten the two screws on each filter plate 11 Reconnect power to the computer at the power source IMPORTANT If dirty filters cannot be replaced immediately Rockwell Automation recommends that you do one of the following Use a vacuum cleaner Wash them with warm water and a mild detergent such as dishwashing liquid rinse and then air dry However both ...

Page 29: ...ges or component temperatures Troubleshooting Follow these steps to identify and isolate an issue with computer operation 1 Shut down the computer according to Shut Down the Wall Mount Box PC on page 23 2 Disconnect power to the computer 3 Disconnect all peripheral devices from the computer 4 If a keyboard and mouse are used verify that they are properly connected 5 If an external display is used ...

Page 30: ... the system defaults 4 Press F10 to save your changes and exit The change resets the system automatically Ship or Transport the Computer If you must ship the computer via common carrier or otherwise transport it to another location for service or any other reason you must first uninstall the computer and place it in its original packing material IMPORTANT An external display keyboard and mouse mus...

Page 31: ...utions Follow these ESD precautions Transport the computer and replacement parts in static safe containers such as conductive tubes bags or boxes Keep electrostatic sensitive parts in their containers until they arrive at the designated static free work area Cover the designated work area with approved static dissipating material Use an anti static wriststrap that is connected to the work surface ...

Page 32: ...ts If necessary label each cable to expedite reassembly 3 Disconnect all peripheral cables from the I O ports 4 Loosen the mounting screws and remove the computer from its mounting Post configuration Follow these steps after you install or replace a hardware component 1 Reinstall the computer to its mounting 2 Tighten the mounting screws 3 Reinstall any peripherals and system cables that were prev...

Page 33: ... for Pre configuration on page 32 2 Cat No 6300B PBCx models Remove the three screws that secure the back cover of the computer Cat No 6300B PBDx models Remove the two screws that secure the back cover of the computer 3 Remove the cover 4 After you install replace or upgrade internal computer components perform the steps in Reinstall the Cover on page 36 You need a 2 5 mm Phillips screwdriver to l...

Page 34: ...ends on the amount of time the computer is on or on time The thermal light emitting diode LED on a VersaView 6300B wall mount box PC flashes red when the RTC battery is lower than 2 5V For the battery fault LED location see Table 2 on page 22 Follow these steps to replace the RTC battery 1 Perform the steps in Remove the Cover on page 33 2 Locate the battery on the motherboard IMPORTANT Battery re...

Page 35: ...e you remove the battery observe the battery polarity so you insert the new battery in the same direction WARNING Replace the battery with the same model There is a risk of explosion if the battery is replaced with the wrong type AVERTISSEMENT Remplacer la batterie par le même modèle sinon il y a risque d explosion IMPORTANT If you replace the battery then all UEFI settings return to their default...

Page 36: ... following steps 1 Reinstall the cover 2 Cat No 6300B PBCx models Reinstall the three screws that secure the back cover of the computer Cat No 6300B PBDx models Reinstall the two screws that secure the back cover of the computer 3 Follow the steps for Post configuration on page 32 You need a 2 5 mm Phillips screwdriver to reinstall the cover screws ...

Page 37: ...Rockwell Automation Publication 6300B UM002A EN P October 2020 3 VersaView 6300B Box PCs and 6300T Box Thin Clients User Manual ...

Page 38: ...ess Knowledgebase articles rok auto knowledgebase Local Technical Support Phone Numbers Locate the telephone number for your country rok auto phonesupport Literature Library Find installation instructions manuals brochures and technical data publications rok auto literature Product Compatibility and Download Center PCDC Download firmware associated files such as AOP EDS and DTM and access product ...

Reviews: