background image

22

Rockwell Automation Publication 2711PC-UM002F-EN-P - February 2020

Chapter 2

Install the Terminal

Mount the 1000 Terminal in a 

Panel

Four mounting clips secure the 1000 terminal in a panel. Tools required for 

installation include panel cutout tools, a small, slotted screwdriver, and a torque 

wrench for tightening the mounting clips.

Follow these steps to mount the terminal in a panel.

1.

Cut an opening in the panel by using the panel cutout template shipped 

with the terminal or the cutout dimensions on 

page 18

.

2.

Verify the terminal sealing gasket is properly positioned on the terminal.
This gasket forms a compression type seal. Do not use sealing compounds.

Be careful not to pinch the legend strip during installation.

ATTENTION: 

Disconnect all electrical power from the panel before making the 

panel cutout.

Make sure the area around the panel cutout is clear and that the panel is clean of 
any debris, oil, or other chemicals.

Make sure metal cuttings do not enter any components already installed in the 
panel and that the edges of the cutout have no burrs or sharp edges.

Failure to follow these warnings can result in personal injury or damage to panel 
components.

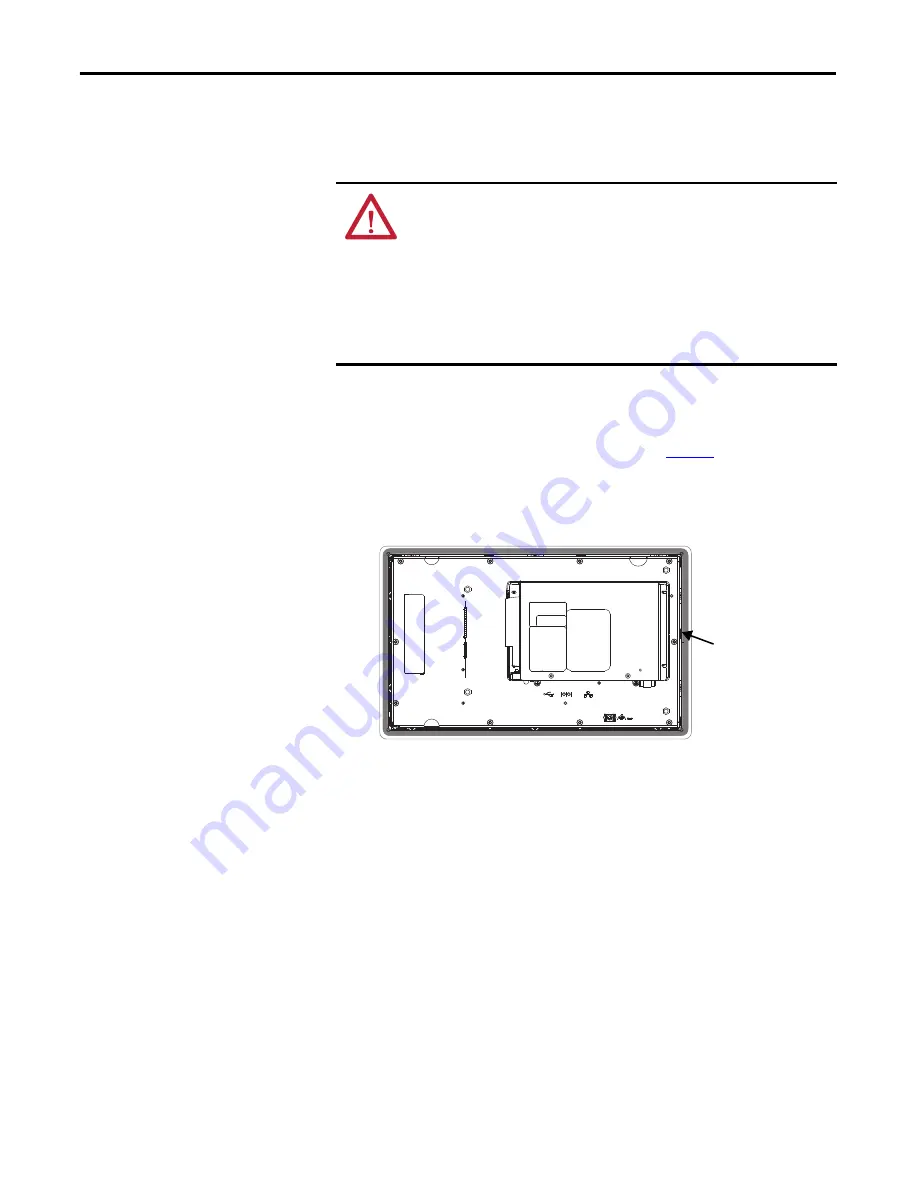
Sealing Gasket

Summary of Contents for 2711PC-B4C20D8

Page 1: ...PanelView Plus 6 Compact Terminals Catalog Numbers 2711PC K4M20D8 2711PC B4C20D8 2711PC B4C20D8 LR 2711PC T6M20D8 2711PC T6C20D8 2711PC T10C4D8 User Manual OriginalInstructions...

Page 2: ...its equipment or software described in this manual Reproduction of the contents of this manual in whole or in part without written permission of Rockwell Automation Inc is prohibited Throughout this m...

Page 3: ...es 18 Panel Guidelines 18 Panel Cutout Dimensions 18 Product Dimensions 19 Mount the 400 600 Terminal in a Panel 20 Mount the 1000 Terminal in a Panel 22 Remove and Install the Power Terminal Block 24...

Page 4: ...y Properties 82 Logo Manager 84 System Information 85 User Accounts 88 Services 89 Network Server Configuration 90 Printer Support 99 PDF Reader 102 Chapter5 InstallandReplaceComponents Required Tools...

Page 5: ...ade Terminal Firmware over the Network 138 Chapter8 Troubleshooting Status Indicators 141 Terminal Does Not Start Properly 142 Start up Messages and Codes 143 Check Terminal Components 145 Ethernet Co...

Page 6: ...6 Rockwell Automation Publication 2711PC UM002F EN P February 2020 Table of Contents Notes...

Page 7: ...oncerning related products from Rockwell Automation You can view or download publications at http www rockwellautomation com literature To order paper copies of technical documentation contact your lo...

Page 8: ...8 Rockwell Automation Publication 2711PC UM002F EN P February 2020 Preface Notes...

Page 9: ...h Limited number of displays and alarms in FactoryTalk View Machine Edition ME application and runtime software Primary HMI for CompactLogix controllers Topic Page Software Support 10 PanelView Plus 6...

Page 10: ...r applications Machine Edition Station is preloaded on each terminal and does not require FactoryTalkView activation 6 10 or later FactoryTalkView Studio for Machine Edition Configuration software for...

Page 11: ...DC power input non isolated 24V DC nom 18 30V DC 4 Mounting slots four 5 Ethernet port for controller communication 10 100Base T Auto MDI MDI X 6 RS 232 serial port for controller communication printi...

Page 12: ...ys Use arrow keys for navigation Use Alt arrow to initiate these functions Alt left arrow Home Alt right arrow End Alt up arrow Page Up Alt down arrow Page Down 5 Function keys F1 F8 Keys that can be...

Page 13: ...rm one of three actions at startup Launch a FactoryTalk View Machine Edition HMI application Launch the FactoryTalk View Machine Edition Configuration mode of the terminal where you load and run appli...

Page 14: ...6 5 ft Table 7 Power Supply and Power Terminal Blocks Cat No Terminal Model Description Quantity 1606 XLE120E 400 600 and 1000 DIN rail power supply AC to DC 100 240V AC 50 60 Hz 1 2711P 6RSA 400 and...

Page 15: ...her environments due to conducted or radiated disturbances Korean RadioWave Suitability Registration When so marked this equipment is registered for Electromagnetic Conformity Registration as business...

Page 16: ...des marquages sur sa plaque d identification quiindiquentlecodedetemp raturepourlesenvironnementsdangereux Lorsque plusieurs produits sont combin s dans un syst me le code de temp rature le plus d fav...

Page 17: ...es as applicable This associated nonincendive field wiring apparatus has not been evaluated for use in combination with another associated nonincendive field wiring apparatus Nonincendive Field wiring...

Page 18: ...the panel must be sufficient to hold the terminal and maintain an appropriate seal against water and dust The panel surface must be flat and free of imperfections to maintain an adequate seal and NEMA...

Page 19: ...t 400 Keypad or Keypad Touch Figure 3 PanelView Plus 6 Compact 600 Touch Figure 4 PanelView Plus 6 Compact 1000 Touch Table 14 PanelView Plus 6 Compact 400 600 1000 Product Dimensions Terminal Size In...

Page 20: ...imensions on page 18 2 Verify the sealing gasket is present on the terminal This gasket forms a compression type seal Do not use sealing compounds Table 15 Lever Locking Positions Mounting Slot Lever...

Page 21: ...cated until it is in the final position Follow the appropriate locking sequence for the optimal terminal fit 7 Inspect all levers to verify that they are in the correct and same locked position 6 1 6...

Page 22: ...ensions on page 18 2 Verify the terminal sealing gasket is properly positioned on the terminal This gasket forms a compression type seal Do not use sealing compounds Be careful not to pinch the legend...

Page 23: ...surface uniformly 6 Tighten the mounting clips screws to a torque of 0 90 1 1 N m 8 10 lb in by using the specified sequence making sure not to overtighten Mounting Clip Slot Mounting Clip ATTENTION...

Page 24: ...from the terminal this releases the locking mechanism Follow these steps to install the terminal block 1 Press the terminal block base in first with the block leaning outward WARNING Explosion Hazard...

Page 25: ...e steps to remove the terminal block from a 1000 terminal 1 Loosen the two screws that secure the terminal block 2 Gently pull the terminal block away from the connector Follow these steps to install...

Page 26: ...ltage nom Power Consumption max 400 600 Nonisolated 24V DC 18 30V DC 15W 0 6 A at 24V DC 1000 Isolated 24V DC 18 32V DC 70W 2 9 A at 24V DC ATTENTION Do not connect an AC power source to the terminal...

Page 27: ...connection is required for the following Noise immunity reliability and Electromagnetic Compliance EMC with the European Union EU EMC directive for CE mark conformance Safety by Underwriters Laborator...

Page 28: ...minals secure the earth ground wire to the functional earth ground terminal on the power terminal block On 1000 terminals secure the earth ground wire to the functional earth screw on the back of the...

Page 29: ...ration mode and run the configuration options for the terminal default Launch the Windows Explorer desktop You can also configure a terminal to allow desktop access Terminals are initially shipped wit...

Page 30: ...tem by using the RESET switch 1 Insert a thin nonconductive object into the RESET area 2 Press and release the RESET switch Follow these steps to restart the system from the Windows desktop 1 From the...

Reviews: