background image

 CTi-1500 Surface Getting Started Guide 

13 

AP12150 Issue 1 


3.4


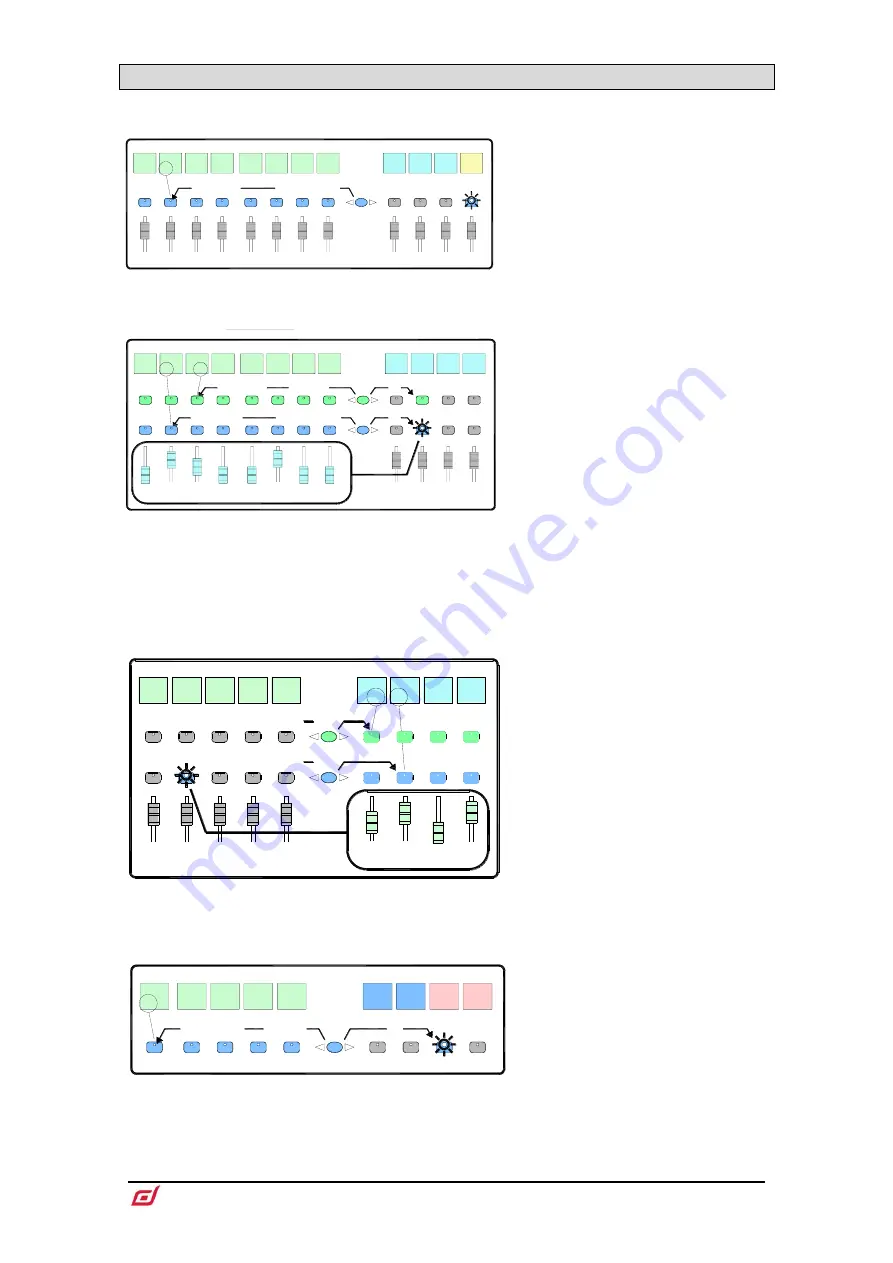
Working with the Mix 


Press a Main Mix master strip 

Mix

 key. 

This is the normal mixing mode. The Input strips 

present the channel faders. The Master strips 

present the master mix faders. 

Hold down the 

Assign

 key and press channel 

Mix

 keys to assign or unassign them from the 

main mix.  Current ON status is displayed on the 

lower part of the strip LCDs. 


Mix

Aux3

Mix

IP 1

IP 2

IP 3

IP 4

IP 5

IP 6

IP 7

IP 8

Aux1

Aux2

LR

Channel faders

Master faders

+ press Mix

ON

Normal mix mode (FOH)

Assign Routing

Main

Mix

active

hold

down

Press a Mix master strip 

Mix

 key. 

Use this to work with Aux and FX sends.  The 

Input strips present all the send levels to the 

active Mix. The Master strips present the master 

mix faders. 

Hold down the 

Assign

 key and press channel 

Mix

 keys to assign or unassign them from the 

active Mix. 

Hold down the 

Pre/Post 

key and press channel 

Sel

 keys to toggle each source pre or post fader. 

Current PRE status is displayed on the lower part 

of the channel strip LCDs. 

You can quickly set 

all 

assignments on or off, or 

all sources pre or post fader by pressing the 

Master strip 

Mix

 or 

Sel

 key. 


All sends to one master

Master faders

Aux3

Sel

Mix

IP 1

IP 2

IP 3

IP 4

IP 5

IP 6

IP 7

IP 8

Aux1

Aux2

+ press Mix

Assign Routing

ON

all

+ press Sel

Pre/Post

PRE

Master 

Mix


all

Aux4

view

Access Aux, FX, Matrix mix on faders

hold

down

Press an Input Channel strip 

Mix

 key. 

Use this to work with Aux and FX sends.  The Input 

strips remain as Channel Faders.  The Master 

strips present all sends from the Input channel. 

Hold down the 

Assign

 key and press master 

Mix


keys to assign or unassign the channel from each 

mix. 

Hold down the 

Pre/Post 

key and press master 

Sel


keys to toggle the channel pre or post fader to 

each mix. Current PRE status is displayed on the 
master strip LCDs. 

IP 6

IP 7

IP 8

Aux1

Aux2

ON

PRE

Channel faders

Aux3

Sel

Mix

Channel

Mix

Assign Routing

Pre/Post


Aux4

All sends from one input

view

IP 5

IP 4

hold

down

Press a Group Master strip 

Mix

 key. 

Use this to assign channels to the Audio and DCA 

groups.  The Input and Master faders are not 

affected. 

Hold down the 

Assign

 key and press channel 

Mix


keys to assign or unassign the channels from the 

group. 

IP 4

IP 5

IP 6

IP 7

IP 8

Grp1

Grp2

+ press Mix

all

DCA

Mix

DCA and Audio Group assign

Assign

DCA2

ON

DCA

1

hold

down

Summary of Contents for dLive CTi1500

Page 1: ...Surface Getting Started Guide CTi 1500 Before starting please check www allen heath com for the latest dLive firmware and documentation AP12150 Issue 1 ...

Page 2: ...the Allen Heath website www allen heath com legal Repair or replacement under the terms of the warranty does not provide right to extension or renewal of the warranty period Repair or direct replacement of the product under the terms of this warranty may be fulfilled with functionally equivalent service exchange units This warranty is not transferable This warranty will be the purchaser s sole and...

Page 3: ...ilable for download at www allen heath com Check for the latest version of this Getting Started Guide You can also join our Allen Heath Digital Community to share knowledge and information with other dLive users General precautions Protect the equipment from damage through liquid or dust contamination Cover the Surface when it is not being used for a long period If the equipment has been stored in...

Page 4: ...tents IMPORTANT Read before starting 3 Packed items 4 Contents 4 1 Introduction 5 1 1 dLive Surfaces 5 2 Rear Panel 6 3 Front Panel 8 3 1 Harmony UI 10 3 2 Screen modes 11 3 3 Fader strip 12 3 4 Working with the Mix 13 4 Connect and power up 14 4 1 MixRack connection 14 4 2 Recall a Template Show 14 4 3 Expander connection 14 4 4 Connect a laptop or wireless router 15 5 Dimensions 16 6 Technical s...

Page 5: ...of built in audio I O and audio networking ports DX Expanders can be added to the system for extra I O 1 1 dLive Surfaces There are different sizes of dLive Surface available The CTi 1500 C1500 C2500 and C3500 feature the same I O and differ only in the number of faders and touchscreens The S3000 S5000 and S7000 offer more I O an extra I O Port redundant power supplies and dual redundant gigaACE a...

Page 6: ... Refer to www allen heath com for a list of available option cards iLive GLD option cards M Dante M Waves M ES V2 M ACE M MADI can be used with dLive when fitted with the M DL ADAPT letter box adapter This provides a 64x64 48kHz interface with built in Sample Rate Conversion Use the I O screen to patch signals from or to the I O Ports Digital inputs Stereo AES3 input 32kHz 96kHz sampling rate Samp...

Page 7: ...n screen to configure External touchscreens are not supported Kensington Lock A slot for fitting standard Kensington anti theft security devices DX link EtherCon port for connection of a DX expander over Fast Ethernet IEEE 802 3 Layer 2 compliant A single Cat5e or higher cable carries 32x32 channels of 96kHz audio and control Use the I O screen to patch signals from or to the DX expanders Word Clo...

Page 8: ...active PAFL USB ports The upper port is dedicated to stereo WAV file recording and playback The lower port is for data transfer of Show files Libraries event logs and firmware updates Phones Analogue volume control for the headphones output SoftKeys 19 user assignable keys Assign functions using the Surface Control SoftKeys screen Talkback Press to Talk latching or momentary key and Talk Active in...

Page 9: ...cies and to exit Frequency values are shown on the strip LCD displays and the strip meters show RTA activity of each frequency band and peak band indication This is useful for ringing out monitors or identifying trouble frequencies The mix master fader is presented on the right hand strip while in this mode Copy Hold down and press A strip Sel key to copy the channel processing A strip Mix key to ...

Page 10: ...es Press Lib again to exit Setup Hold down and tap on any highlighted area of the screens to configure it For example touch a widget area to set up functions views or controls Touch on the main screen area to access options further to those displayed Listen Hold down and tap on any highlighted area of the screen to listen to that point in the signal path of the selected channel The signal temporar...

Page 11: ...te up to 16 gang groups to link selected parameters across multiple channels MixRack Setup Access to mixer bus configuration Input stereo configuration Network settings User Profiles Talkback assignments Signal Generator Audio Sync and I O Ports options Surface Setup Assignments of fader strip layout SoftKeys and custom rotary functions Control of Surface illumination and USB Audio playback record...

Page 12: ...the channel is muted by a DCA or Mute Group Sel Selects the channel for use with the Processing and Routing screens The channel strip controls become active to control processing for the channel The currently selected channel is displayed in the top left corner of the Processing screen Mix Puts the send levels and assignments of the associated channel or masters onto the fader strips or strip rota...

Page 13: ...ments on or off or all sources pre or post fader by pressing the Master strip Mix or Sel key All sends to one master Master faders Aux3 Sel Mix IP 1 IP 2 IP 3 IP 4 IP 5 IP 6 IP 7 IP 8 Aux1 Aux2 press Mix Assign Routing ON all press Sel Pre Post PRE Master Mix all Aux4 view Access Aux FX Matrix mix on faders hold down Press an Input Channel strip Mix key Use this to work with Aux and FX sends The I...

Page 14: ...ole formats to load as a quick starting point These present the familiar architecture and logical layout of well equipped analogue consoles To load a Template Show go to the Utility Show Manager screen select one of the available Template Shows touch Recall and confirm Recalling a Show overwrites all the system settings including the bus configuration control layout current parameters all Scenes a...

Page 15: ...g the MixRack and Surface must have compatible IP addresses Factory defaults are MixRack 192 168 1 70 Surface 192 168 1 71 Subnet Mask 255 255 255 0 Gateway 192 168 1 254 For direct wired laptop connections set your laptop to a static compatible IP address for example 192 168 1 10 For wireless connections set your router access point to a compatible IP address for example 192 168 1 254 and its DHC...

Page 16: ...CTi 1500 Surface Getting Started Guide 16 AP12150 Issue 1 5 Dimensions 643 77 15 00 2 50 1 4 7 5 0 168 00 145 00 1 5 2 8 5 322 06 340 00 410 98 112 77 120 97 440 00 93 05 ...

Page 17: ...ced terminated 110 Ω Meter Peak indication 3dBFS 19dBu at XLR out SRC range 32k 192kHz with bypass option Sampling Rate 96kHz 20 PPM Outputs ADC 24 bit Delta Sigma DAC 24 bit Delta Sigma Analogue XLR Outputs Balanced Latency 0 7 ms MixRack XLR in to XLR out Input to Mix Output Impedance 75Ω 5 samples Surface to Mixrack GigaACE hop Nominal Output 4dBu 0dB meter reading 8 samples DX32 to Mixrack DX ...

Reviews: