background image

C

HAPTER 


B

ASIC 

F

UNCTIONS


ALH-900

U

SER

G

UIDE


DOC.


CONTROL


#8102114-000


REV


19 


Handheld Configuration 

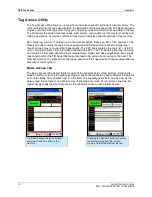
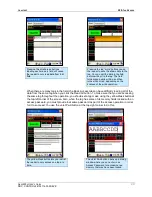
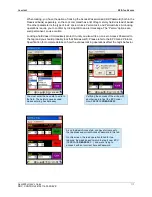
[Start] > [Settings] > [Control Panel] > [PC Connection] 


Transmitting Data 

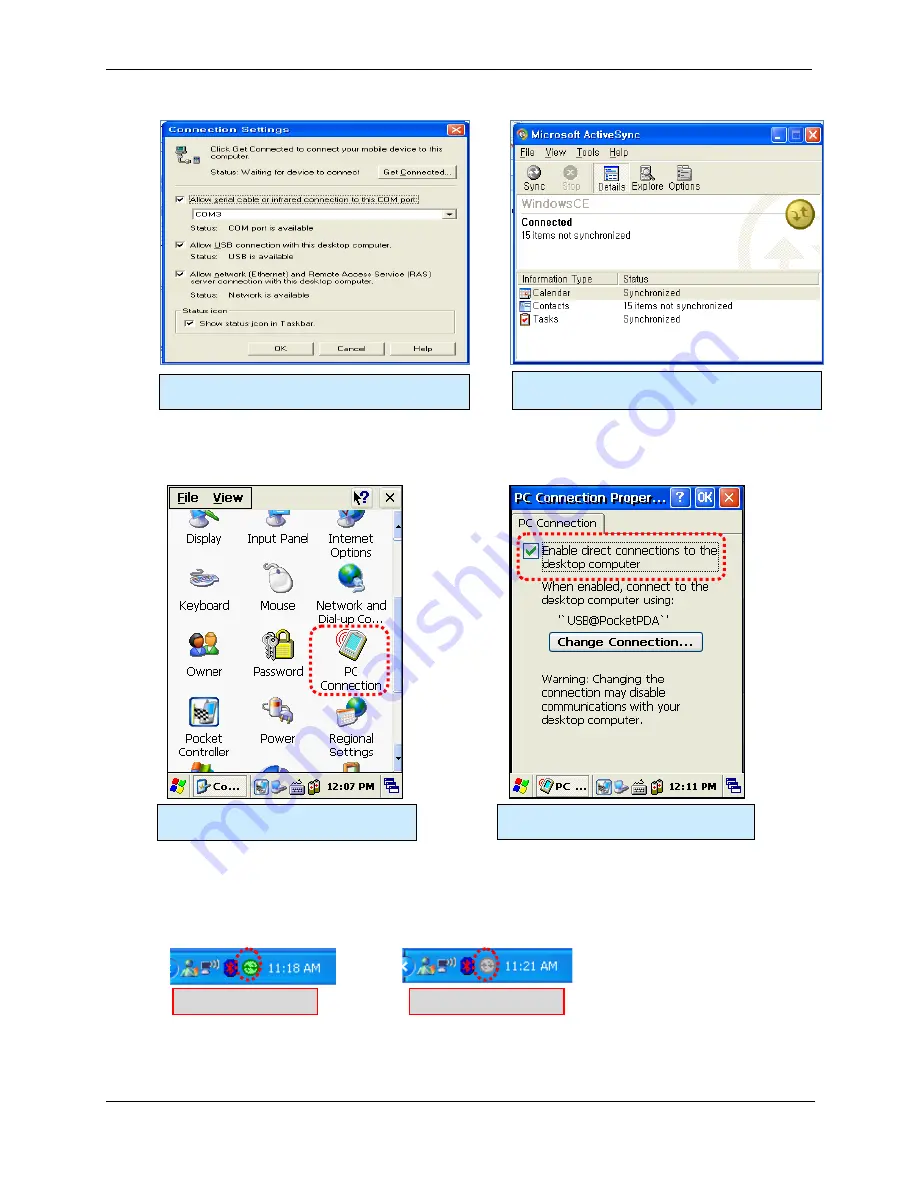
Use the USB cable to connect the PC and the handheld device. You can check the state of the 
ActiveSync connection on your PC taskbar. 


Select <Allow USB connection with 
this desktop computer>, press OK button.


Double click PC Connection icon 

Make sure direct connections are 
enabled.   

  Connected state   

Disconnected state 

ActiveSync connected to PDA.


Summary of Contents for ALH-9000

Page 1: ...ALIEN TECHNOLOGY ALH 900x Series Handheld User s Guide Windows CE June 2014 ALH 900x Series...

Page 2: ...an radiate radio frequency energy and if not installed and used in accordance with instruction manual may cause harmful interference with radio communications Operation of this equipment in a resident...

Page 3: ...and Off 7 Power On and Off With Power Button 7 Power Off With Start Menu 7 Power Off Automatically 8 Battery Discharging 8 Checking the Battery Gauge 8 Checking Battery Gauge 8 Low Power Warning 9 Ba...

Page 4: ...40 BarcodeDemo 40 Using the BarcodeEmulator 41 Setting Barcode Symbology 43 Barcode Scanning Beam Position 45 Correct Scanning Beam Position 45 Incorrect Scanning Beam Position 45 CHAPTER 5 WIRELESS L...

Page 5: ...it at room temperature Depending on the age of the battery and the operating time while using it the charge capacity can be reduced You must charge the device with only the provided adaptor Caution wh...

Page 6: ...After opening the product packaging box check the items listed as below If there are missing or defective items please contact the Alien customer support or your place of purchase Protective Film Adap...

Page 7: ...ts Barcode Scanner Camera ALH 9001 RFID Reader Handstrap Hole Speaker Main Battery Battery Latch F7 F8 F9 Volume Microphone DC Power Jack Earphone Jack Cradle Connector USB Sync Connector WLAN LED Pho...

Page 8: ...erform common actions like scan for an RFID tag Speaker Built in speaker emits various sound effects USB Sync Connector Allows you to connect and send data to a PC via a USB sync cable Earphone Jack A...

Page 9: ...x and then install the main battery and charge it completely Switch On Backup Battery The image below shows the battery compartment after the main battery has already been removed Slide the lever to t...

Page 10: ...h the battery firmly Charging You must charge the battery only with the provided adapter or cradle The Power LED illuminates red while charging and green when charging is complete Connecting Adapter 1...

Page 11: ...ppear and the system will be start up as if from a cold reboot Power Off With Start Menu You can put the handheld to sleep by pressing the Start button in the lower left corner of the screen and selec...

Page 12: ...the system is turned on the device will go into low power sleep mode automatically and even pressing the Power button will not cause the system to turn on In this case you should fully charge the mai...

Page 13: ...locked up and stops responding then a reset of the handheld may be necessary Resetting the system is also required when you want to upgrade firmware Soft Warm Reset If there is no response from the s...

Page 14: ...m simultaneously The screen will go black momentarily before the system restarts again Hard Reset Press Power and Reset buttons together System will reboot Desktop reappears in about ten seconds Time...

Page 15: ...ONTROL 8102114 000 REV E 11 You can find the MicroSD memory card icon in the file explorer after inserting the MicroSD card Set the MicroSD card into the slot and lower the cover again Slide the cover...

Page 16: ...My Device on the desktop Setting Brightness Brightness is set at 80 at the factory and screen brightness is the biggest part of your power consumption so you might need to adjust it to suit your actu...

Page 17: ...this case you need to perform the screen calibration Start Settings Control Panel Stylus Calibration Recalibrate Press and hold the stylus pen briefly on the center of the cross symbol and repeat fiv...

Page 18: ...ting the Date and Time Start Settings Control Panel Date and Time Setting Year Double click the year and click the up and down arrow button to set it Setting Month Double click the month or click the...

Page 19: ...the following sequence 1 Numeric a lowercase letters A uppercase letters 1 Entering Data Numeric Keypad Mode 1 Press the 1 ALP button or keypad icon on the taskbar to change to the numeric mode Pressi...

Page 20: ...ptions Esc Cancels the selected command or the program s current task Volume button Up Down Increases or decreases the sound volume 3 9 Performs page Up or page Down operations 2 4 5 6 8 Moves the cur...

Page 21: ...data etc Installing Microsoft ActiveSync Program Download the latest version of the ActiveSync program from the Microsoft website and install it to your PC http www microsoft com downloads Caution You...

Page 22: ...PC Start Programs Microsoft ActiveSync Windows XP Configuration Executing Microsoft ActiveSync program Click File Click Get Connected The installation was finished Now when you use the USB cable to co...

Page 23: ...mitting Data Use the USB cable to connect the PC and the handheld device You can check the state of the ActiveSync connection on your PC taskbar Select Allow USB connection with this desktop computer...

Page 24: ...S GUIDE DOC CONTROL 8102114 000 REV E 20 After ActiveSync is connected click the Explore button Browse to the folder on the handheld where you would like to copy a file Drag and drop from handheld to...

Page 25: ...d earlier in the manual Copy them to the top level of a MicroSD card and install the card into the back of the unit Alien recommends 2GB cards from SanDisk for the purposes of upgrading firmware Do no...

Page 26: ...are image requires the system to be cleaned first In fact it is a good idea to clean the system after installing new firmware on the handheld You can either clean the system leaving the Flash partitio...

Page 27: ...nds The Boot Menu window will appear Enter the Boot Menu in any of the following situations To upgrade the unit s firmware After an upgrade to clean the Windows system registry and optionally reformat...

Page 28: ...lect Enter Press the 0 key to do a Firmware Upgrade The image files must be on an installed MicroSD memory card when upgrading through the Boot menu You may be prompted to validate each firmware file...

Page 29: ...port the EPC Gen2 protocol The Frequency range is 850MHz 960MHz and can be adjusted for different regions Starting the ALH 900x RFID Demo Software The Alien RFID demo software is accessible from the S...

Page 30: ...d Close box at the top right corner to return to the main screen Clicking on a tag in the list shows its full EPC below the list and a photo and barcode value if that tag corresponds to one of your de...

Page 31: ...ead tags until you release the trigger or click the Stop button Click the red Close box at the top right corner to return to the main screen The Geiger shows the tag s EPC and signal strength Use the...

Page 32: ...me other information related to the EPC The TID bank is generally read only and contains information about the tag s manufacturer model and basic capabilities Alien Higgs tags contain bits in the TID...

Page 33: ...part of the access operation in order for it to succeed You use the violet Pwd button at the top right corner to do this Pressing the small green buttons labeling each memory field will cause the read...

Page 34: ...ke to access The reading operation also requires you to specify the length of the data to read Both the offset and length parameters are measured in words 1 word 2 bytes 16 bits Three main areas in Ad...

Page 35: ...until you also write a non zero Access Password to the tag and you should probably lock that field as well Please refer to the EPC Gen2 Protocol Specification for complete details on how the various...

Page 36: ...gs up the Tag Mask whenever it is clicked At its heart a tag mask defines a piece of data that must match exactly a specific portion of the tag s memory This includes the memory bank not just the EPC...

Page 37: ...tton to clear the mask The Scan tab acts just like the Inventory screen start stop the reader with the trigger or Start Scan button and all tags in range are displayed Masks defined with the Scan meth...

Page 38: ...sed on an EPC prefix i e all tags starting with or create an arbitrary mask If you select EPC Prefix the only thing you have to provide is the hex data representing the initial part of the EPC code fo...

Page 39: ...selects all Alien Higgs3 tags Using the Verify Mask feature you can make sure you ve entered the mask correctly Be sure to test tags that match as well as tags that don t match Masks defined with the...

Page 40: ...ts and place a file called presets txt there Each line of the presets txt file should contain the preset name followed by a tab followed by the mask string bank_name bit offset hex_data For instance a...

Page 41: ...ances you to the next step You can skip steps or redo steps by manually tapping on one of the step buttons 1 Barcode scan a barcode 2 RFID read an RFID tag 3 Photo take a picture using the color camer...

Page 42: ...keypad or tap on the RFID button again to read the EPC For ALH 9001 units with a camera the next step is to take a photo Just aim the device at the subject and pull press or tap to take a photo You al...

Page 43: ...e X button in the top right corner returns you to the main screen without applying any of the changes that you made The RFID tab has controls for RF Power and some Gen2 parameters such as Session Q an...

Page 44: ...a 2D barcode scanner Both models are designed to recognize all known 1D and 2D barcodes BarcodeDemo The BarcodeDemo application is accessible from the Start menu It provides an example of what you can...

Page 45: ...s directly into whatever application is in the foreground The icon in the System Tray lets you set the barcode value input type scan button scan sound and so on Start Programs Scanner BarcodeEmulator...

Page 46: ...inputted one by one Copy Paste Barcode data is stored on the clipboard and can be pasted later Terminator None Do not terminate the barcode value CRLF Barcode ends with a standard terminator Space Ba...

Page 47: ...arcode scanner is set to decode the types of barcodes that you expect to encounter Selecting too many symbologies can increase the time it takes to decode a scanned barcode once it has been scanned St...

Page 48: ...nitialize all the symbologies to the factory default values disable or enable all of the symbologies 1D Symbology Selection Initialize all the symbologies to the factory default values enable or disab...

Page 49: ...he barcode is read or after ten seconds if no barcode is detected Correct Scanning Beam Position 1 The smaller the size of the barcode the closer the handheld needs to be The effective scanning range...

Page 50: ...and can communicate with a host computer directly Powering Up the WLAN Radio Start Programs Alien Demos WirelessLAN Configuring the WLAN Connection Running the WirelessLAN program Turn the WiFi module...

Page 51: ...Alien Demos Summit scu Full documentation for the Summit Client Utility can be found on their website http www summitdatacom com Documents summit_users_guide_3_03 html Double click WLAN icon on the t...

Page 52: ...tooth radio is turned off be default To use Bluetooth turn it on first with the Bluetooth application Start Programs Alien Demos Bluetooth Connecting Bluetooth Printers SPP The Bluetooth Device Proper...

Page 53: ...find the Bluetooth Device Properties utility in the Control Panel Click the Scan Device button to look for available Bluetooth devices Here we ve discovered a Bixolon SPP R200 mobile printer Double ta...

Page 54: ...X USER S GUIDE DOC CONTROL 8102114 000 REV E 50 Double tap the printer again and select Active The printer will then be assigned a COM port The handheld will automatically reconnect with the printer w...

Page 55: ...f the GPS data The GPS receiver appears as a serial Com port COM6 with a baud rate of 9600 Executing GPS Demo Program Find an open place outdoors to check your GPS signals Depending on your actual env...

Page 56: ...which allows for adjustments of brightness video resolution picture quality etc Using the Camera The CameraDemo software is accessible from the Start menu It provides an example of what you can accomp...

Page 57: ...UIDE DOC CONTROL 8102114 000 REV E 53 The CameraDemo Screen Stored Images Count Preview Window Rotation Button Image Files Path Picture Resolution Preview Button Preview Stop Button Capture Button Ima...

Page 58: ...hat the ALH 9001 can use the 3G network for wireless data communications Installing SIM Card A SIM card can be easily inserted and pulled out along the arrow direction Note the location of the dog ear...

Page 59: ...gure the Remote Access Server RAS In the Operator Setting screen first pick the country where you are operating Next select your wireless operator from the list Each wireless operator may offer more t...

Page 60: ...l application When the settings are as you like them click the Save button to write them to a configuration file A confirmation dialog pops up Dismiss it and click the close button for the Operator Se...

Page 61: ...ication Port RS 232 serial port USB 1 1 Expansion Slot 1 MicroSD Slot SDHC 1 SIM Slot Keypad 29 key Notifications Vibrator Speaker LEDs Power Supply Main Battery Lithium ion 3 7V 3 000mAh Optional 4 4...

Reviews: