ALIBI ALI-IPU5030RMH Quick Installation Manual Download Page 3

3

www.observint.com

© 2014, 2015 Observint Technologies. All rights reserved.

4. 

Secure the camera to the Junction box (or mounting surface) using the screws provided. 

5. 

Apply power to the camera through the 12 Vdc power cable or PoE injector, as configured.  

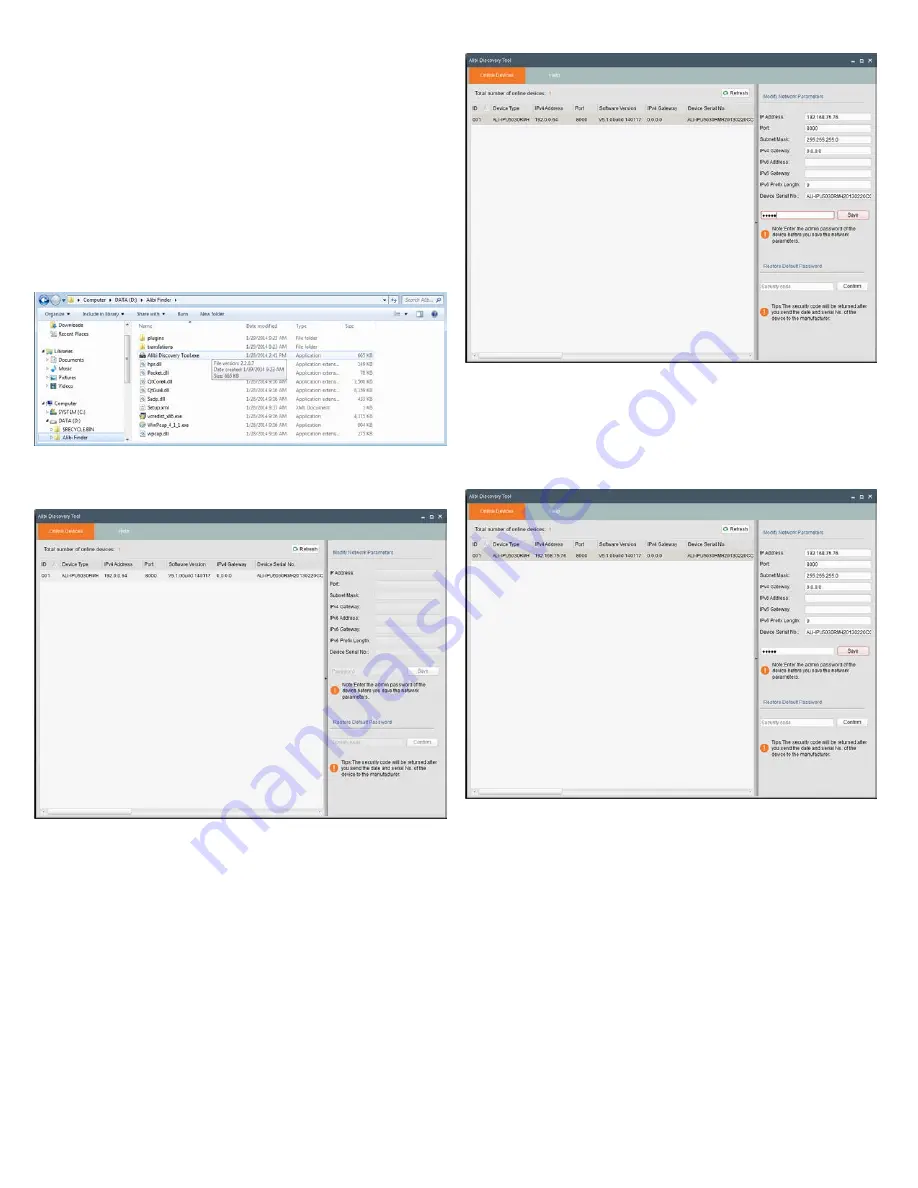
Step 4.  Install the Alibi Discover Tool

The Alibi Discover Tool is a software utility used to “discover” Alibi cameras and NVRs/DVRs installed on the 
LAN and change their network settings. The tool is provided on the CD with your camera. To use the tool: 
1. 

Insert the software CD provided with your camera into an optical drive on the Microsoft Windows 
computer you will use to access your camera on the LAN. 

2. 

On the CD, find the folder that contains the Alibi Discover Tool.

3. 

Copy the files in the folder to a new directory on your computer. The files should appear as shown in 
the directory shown below. 

4. 

To open the Alibi Discover Tool, double click the file 

Alibi Discover Tool.exe

. The tool will 

automatically discover Alibi cameras and recorders installed on the network. 

In the screen shown above, an ALI-IPU5030RMH camera was discovered. This camera, although 
installed on a subnet other than the one implied by its IP address is shown, is still found by the tool. 

5. 

To change the network settings of the camera to be compatible with the subnet where it is installed, 
do the following: 

a. 

Click the device to highlight it. Notice that the network parameters are populated in the frame 
on the right. 

b. 

Modify the network settings to values compatible with the subnet where it is installed. 

c. 

Enter the 

admin

 password for the device in the password field. By default, the 

admin

 user 

password for Alibi cameras is 

1111

d. 

Click the 

Save

 button. The new IP address, port, and other settings will appear in the list with 

the device you modified. 

6. 

Close the Alibi Discover Tool by clicking the 

Close

 icon ( 

T

 ) in the upper-right corner of the screen. 

Step 5.  Remote login

To access the camera from a computer on the LAN: 
1. 

Open your Microsoft Internet Explorer browser on your compute and enter the IP address of the 
camera in the URL field. In the example below, the IP address of the camera is 192.168.75.76.

Summary of Contents for ALI-IPU5030RMH

Page 1: ...the camera 1 Loosen the sun shield set screw then lift off the sun shield 2 Remove the lens cover from the camera body by unscrewing it counterclockwise observing it from the lens end MicroSD card slot with card partially installed Video test monitor cable connector 3 Insert a microSD card into the slot shown in the photo above 4 Push the microSD card into the slot until it clicks into place See t...

Page 2: ... locations of the holes for the mounting screws Also mark the location of a hole for the camera drop cables 5 Route extension cables from the power source and LAN switch or LAN with PoE and peripheral devices for the left or microphone and right audio channels and alarm input and output devices to the mounting location To mount the camera onto an electrical box 1 Install a double gang electrical b...

Page 3: ... Alibi cameras and recorders installed on the network In the screen shown above an ALI IPU5030RMH camera was discovered This camera although installed on a subnet other than the one implied by its IP address is shown is still found by the tool 5 To change the network settings of the camera to be compatible with the subnet where it is installed do the following a Click the device to highlight it No...

Page 4: ...will appear in the Websites list Click Close 4 If this login is the first login to an Alibi camera from your computer and browser continue with the following sub steps to install WebComponents a After a successful login to the NVR a message will appear in the middle of the Live View window requiring you to load a plug in Click on the message to continue then click Run in the pop up block at the bo...

Page 5: ...ed Switch set the Start Time and End Time of the switch then open the Day Night Switch submenu to select the Smart IR feature ON or OFF Also click the Common Day and Night tabs to set the Saturation Hue Brightness Contrast and Sharpness for Day and for Night modes Image Adjustment submenu Open the Image adjustment submenu to set the Saturation Hue Brightness Contrast and Sharpness of the video ima...

Page 6: ...sion Format 64 Kbps G 711 16 Kbps G 726 64 Kbps MP2L2 Features Motion Detection Support Event Notification Alarm Output Email FTP Privacy Mask Support Electronic Image Stabilization Support Smart Defog Support ROI Support Up to 4 configurable zones Video Analytics Tamper Detection Intrusion Detection Face Detection Dynamic Analysis De focus Detection Interface Ethernet RJ 45 10 100 BASE T Audio In...

Reviews: