


1
www.observint.com
ALI-IPU5030RMH_CQ
4/3/15
What’s in the box
Your camera includes these items:
•
Security L-wrench
•
Video test cable (BNC adapter)
•
Mounting hardware including screws, wall inserts
•
LAN drop cable seal kit
•
Drill template for surface mounting
•
Adapter plate for gang-box mounting
•
CD with documentation and the Alibi Discover software utility
•
This document
Before installing the camera
•
Make sure the device in the package is in good condition and all the assembly parts are included.
•
Make sure all the related equipment is power-off during the installation.
•
Check the specification of the products for the installation environment.
•
Make sure the power supply is matched with your required voltage to avoid damage.
•
Make sure that the wall is strong enough to withstand three times (12 lb) the weight of the camera.
•
Dust or grease on the lens cover will cause IR reflection. Please do not remove the dome cover film
until the installation is finished. If there is dust or grease on the lens cover, clean the it with a clean
soft cloth and isopropyl alcohol.
Step 1. Install a microSD card in the camera
A microSD card installed in the camera provides local storage for log information, capture files, and
recorded video. This information can be downloaded to a network PC by accessing the camera web
interface with Microsoft Internet Explorer (see “Step 5. Remote login” on page 3). microSD cards can be
as large as 64GB. To install a microSD card in the camera:
1.
Loosen the sun shield set screw, then lift off the sun shield.
2.
Remove the lens cover from the camera body by unscrewing it counterclockwise (observing it from
the lens end).
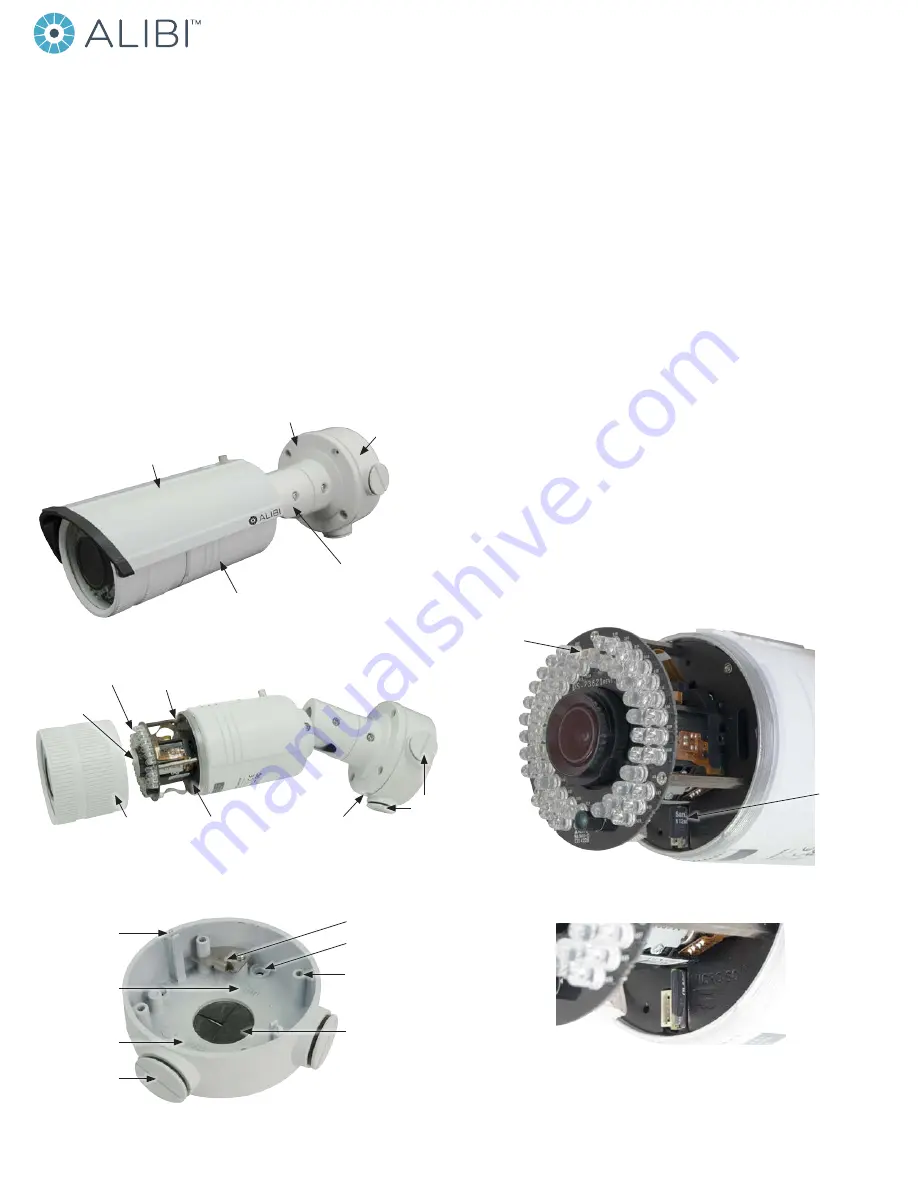
MicroSD
card slot
with card
partially
installed
Video test
monitor
cable
connecto
r
3.
Insert a microSD card into the slot shown in the photo above.
4.
Push the microSD card into the slot until it clicks into place. See the photo below.
5.
Reattach the lens cover and the sun shield.
ALI-IPU5030RMH IP 3MP IR Bullet
Camera Quick Installation Guide
This document guides you through the basic steps to install and initially configure the ALI-IPU5030RMH
camera. The ALI-IPU5030RMH camera features:
•
1/3” progressive scan CMOS
•
Up to 2048 × 1536 resolution
•
120 dB WDR, 3D DNR
•
Smart Codec, Smart IR, Smart VOD
•
Smart Focus: Motorized VF lens with zoom control
•
Smart Face Detection
•
Smart Audio Detection
•
Intrusion Detection
•
Defog, EIS, BLC
•
Built-in heater
For more information about the software features of this camera, please refer to the
ALI-IP Camera
Software User Manual
.
Camera body
Articulated
mounting
bracket
Junction box assembly
(see detail below)
Sun Shield
Camera mounting base
Conduit
access
Reset button*
Lens
Analog video output
microSD card slot
Cable channel
Lens cover
Camera with sun shield removed
* Press the RESET button for 10 seconds when the camera is powering on or rebooting to restore the
default settings, including the user name, password, IP address, the port number, etc.
Top (up)
Bottom (down)
Conduit port (2)
Mounting screw
hole (4)
Hole for camera
mounting screw (3)
Safety cable hook
Cable access
through mounting
surface
Camera base
locator pins
Junction box detail


