background image


19.


Single Chord: 

Press this button to enable the Single automatic chord feature. This 

feature will generate chords for the accompaniment rhythms based on the keys you play 
that are the second lowest F# key or lower on the keyboard. The available chords for this 
function are described in


Operation > Accompaniment Rhythm

.


Press this button again 

or press the 

Chord Clear

 button to disable the chord function. 


20.


Fingered Chord:

 Press this button to enable the Fingered automatic chord feature. This 

feature will generate chords for the accompaniment rhythms based on the keys you play 
(the second lowest F# key or lower on the keyboard). The available chords for this 
function are described in


Operation > Accompaniment Rhythm

.


Press this button again 

or press the 

Chord Clear

 button to disable the chord function. 


21.


Chord Clear: 

Press this button to turn the Single Chord/Fingered Chord feature off.


22.


Sustain: 

Press this button to activate a sustain effect which simulates a sustain pedal 

when playing the keyboard. Press this button again to disable the sustain effect. 


23.


Vibrato: 

Press this button to activate a pulsating change to the pitch when playing the 

keyboard. Press this button again to disable to vibrato effect.


24.


Dual: 

Press this button to layer two sounds together. The sound that you were using 

before pressing the Dual button will be used for one part of the layer. To select the other 
sound for the layer, enter a number for the sound or use the 

+

 and 

 buttons.


Press the 

Dual

 button again to disable the dual-tone function. 


25.


Split: 

Press this button to split the keyboard into two zones. The sound that you were 

using before pressing the 

Split

 button will be applied to the left-hand side of the 

keyboard. To select a sound for the right-hand side, enter a number for the sound or use 
the 

+

 and 

 buttons.


Press the 

Split

 button again to disable the keyboard split. 


26.


Percussion: 

Press this button to play the built-in drum kit and percussion sounds using 

the keys. Press this button again to disable this function.


27.


Intro/Ending: 

Press this button to play an intro and then start playback of an 

accompaniment rhythm. Press this button while the accompaniment rhythm is playing to 
play an outro and then stop playback of an accompaniment rhythm.


28.


Beat: 

Press this button to start the metronome. Press this button again to change the 

time signature of this button or turn off the metronome.


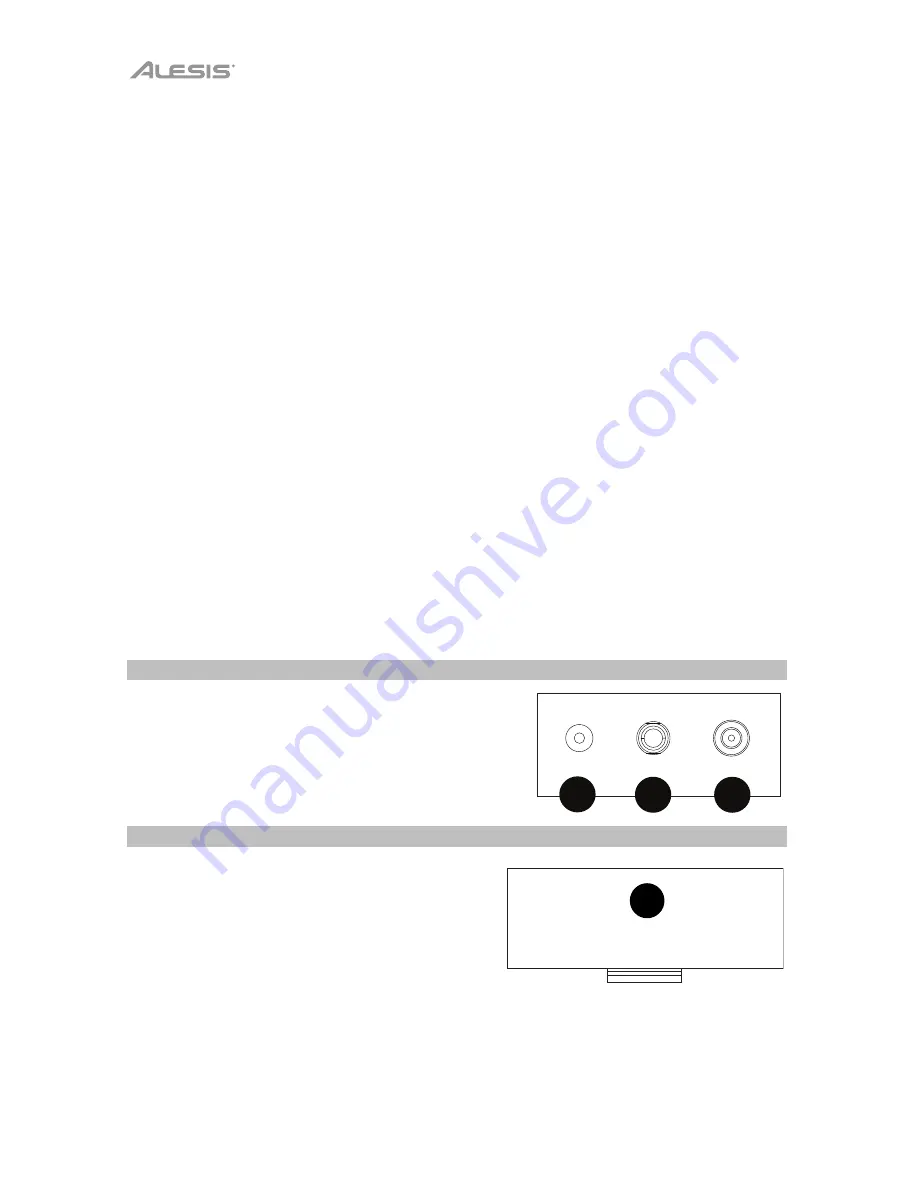
Rear Panel 


1.


Mic:

 Connect the included microphone here to 

sing while playing the keyboard. 

2.


Phones:

 Connect the included headphones here to 

hear the keyboard and mute the internal speakers. 

3.


Power Input:

 Connect the included power adapter 

here. 


Bottom Panel 


1.


Battery Compartment: 

Install 6 “AA” 

batteries here to power the keyboard if you 
are not using the power adapter.


1

MIC

PHONES

DC 12V

1

2

3

DC 9V 

Summary of Contents for Melody61 MKII

Page 1: ...User Guide English 3 8 Gu a del usuario Espa ol 9 14 Guide d utilisation Fran ais 15 20 Guida per l uso Italiano 21 26 Benutzerhandbuch Deutsch 27 32 Appendix English 33 MKII...

Page 2: ...2...

Page 3: ...Power Adapter User Guide Safety Warranty Manual Support For the latest information about this product system requirements compatibility information etc and product registration visit alesis com For a...

Page 4: ...4 MIC PHONES DC 12V Connection Diagram Items not listed in Introduction Box Contents are sold separately Microphone Power Headphones DC 9V...

Page 5: ...buttons to select another demonstration song Press this button again to stop the playback 8 One Key Press this button to start the one key function This function lets you play along with the demo song...

Page 6: ...e using before pressing the Dual button will be used for one part of the layer To select the other sound for the layer enter a number for the sound or use the and buttons Press the Dual button again t...

Page 7: ...rd split Accompaniment Rhythm To select an accompaniment rhythm press Rhythm then use the number buttons or the and buttons To start or stop an accompaniment rhythm press the Start Stop button To have...

Page 8: ...tomatically stop Rhythm Programming To create custom accompaniment rhythms using the keyboard keys 1 Press the Program button and start programming the rhythm by playing each note in the pattern one a...

Page 9: ...ente Gu a del usuario Manual sobre la seguridad y garant a Soporte Para obtener la informaci n m s reciente acerca de este producto requisitos de sistema informaci n de compatibilidad etc y registrarl...

Page 10: ...10 MIC PHONES DC 12V Diagrama de conexi n Los elementos que no se enumeran en Introducci n Contenido de la caja se venden por separado Micr fono Suministro el ctrico Auriculares DC 9V...

Page 11: ...y Tempo simult neamente para restaurar el valor por defecto 7 Demo Pulse este bot n para iniciar y detener la reproducci n de los temas demo Utilice los botones num ricos o los botones o para selecci...

Page 12: ...se toca el teclado Pulse este bot n nuevamente para desactivar el efecto de sostenido 23 Vibrato Pulse este bot n para activar un cambio pulsante al tono al tocar el teclado Pulse este bot n nuevamen...

Page 13: ...de pulsar el bot n Split se aplicar al lado izquierdo del teclado Para seleccionar el sonido del lado derecho introduzca un n mero para el sonido o utilice los botones y Pulse el bot n Split nuevamen...

Page 14: ...l tema grabado 3 Pulse Play nuevamente para detener la reproducci n Nota El tema grabado se borrar cuando se inicie una nueva grabaci n o cuando se apague el teclado Cuando la memoria se encuentre lle...

Page 15: ...nes de s curit et informations concernant la garantie Assistance technique Pour les toutes derni res informations concernant la configuration syst me requise la compatibilit etc et l enregistrement du...

Page 16: ...16 MIC PHONES DC 12V Sch ma de connexion Les l ments qui ne figurent pas dans la section Pr sentation Contenu de la bo te sont vendus s par ment Microphone Alimentation Casque d coute DC 9V DC 9V...

Page 17: ...uches Tempo et Tempo simultan ment afin de r initialiser la valeur par d faut 7 Demo Cette touche permet de lancer la lecture des chansons de d monstration Utiliser les touches num riques ou les touch...

Page 18: ...ermet d activer la fonction d accompagnement avec accords automatiques un ou plusieurs doigts 22 Sustain Appuyez sur cette touche pour activer un effet de sustain qui simule une p dale de sustain Appu...

Page 19: ...our lancer ou arr ter un rythme d accompagnement appuyez sur la touche Start Stop Pour que le rythme d accompagnement joue un rythme de fond appuyez sur la touche Fill In Pour activer la fonction d ac...

Page 20: ...ment recommencera ou lorsque le clavier sera mis hors tension Lorsque la m moire est pleine l cran affichera FUL et l enregistrement s arr tera automatiquement Programmation d un rythme Pour cr er des...

Page 21: ...Istruzioni di sicurezza e garanzia Assistenza Per le ultime informazioni in merito a questo prodotto requisiti di sistema informazioni sulla compatibilit ecc e per la registrazione del prodotto recars...

Page 22: ...22 MIC PHONES DC 12V Schema dei collegamenti Elementi non elencati sotto Introduzione Contenuti della confezione sono venduti separatamente Microfono Alimentazione Cuffie DC 9V...

Page 23: ...etronomo Premere i tasti Tempo e Tempo contemporaneamente per ripristinare il valore predefinito 7 Demo premere questo tasto per avviare la riproduzione di una delle canzoni dimostrative Servirsi dei...

Page 24: ...asto per attivare un cambiamento pulsante del pitch quando si suona con la tastiera Premere nuovamente questo tasto per disattivare l effetto vibrato 24 Dual premere questo tasto per stratificare due...

Page 25: ...lato destro inserire un numero per il suono o servirsi dei tasti e Premere nuovamente il tasto Split per disattivare la divisione della tastiera Ritmo di accompagnamento Per scegliere un ritmo di acco...

Page 26: ...la tastiera viene spenta Quando la memoria piena a display compare la scritta FUL e la registrazione viene fermata automaticamente Programmazione del ritmo Per creare ritmi di accompagnamento persona...

Page 27: ...buch Sicherheitshinweise und Garantieinformationen Kundendienst F r die neuesten Informationen zu diesem Produkt Systemanforderungen Informationen zur Kompatibilit t etc und f r die Produktregistrieru...

Page 28: ...28 MIC PHONES DC 12V Anschlussdiagramm Teile die nicht unter Einf hrung Lieferumfang angegeben sind sind separat erh ltlich Mikrofon Stromversorgung Kopfh rer DC 9V...

Page 29: ...s und oder des Metronoms zu erh hen oder zu verringern Dr cken Sie gleichzeitig die Tasten Tempo und Tempo um das Tempo auf den Standardwert zur ckzusetzen 7 Demo Dr cken Sie diese Taste um die Wieder...

Page 30: ...m die Funktion Einzelakkord Gegriffener Akkord auszuschalten 22 Sustain Dr cken Sie diese Taste um einen Sustain Effekt zu aktivieren der beim Spielen des Keyboards ein Sustain Pedal simuliert Dr cken...

Page 31: ...Dual Tone Funktion zu deaktivieren Dr cken Sie die Taste Split um das Keyboard in zwei Zonen aufzuteilen Der Sound den Sie verwendet haben bevor Sie die Split Taste gedr ckt haben wird der linken Sei...

Page 32: ...n Hinweis Der aufgezeichnete Song wird gel scht wenn die Aufnahme erneut gestartet wird oder wenn das Keyboard ausgeschaltet wird Wenn der Speicher voll ist wird der Bildschirm FUL anzeigen und die Au...

Page 33: ...71 Clarinet 134 143 Synth Organ Rhythms 000 052 Pop Dance 128 163 Soul R B 243 299 Ballad 053 062 Jazz 164 179 Rock 063 118 Latin World 180 228 Swing Bossa 119 127 Waltz 229 242 Country Western Techni...

Page 34: ...34...

Page 35: ...35...

Page 36: ...alesis com Manual Version 1 4...

Reviews: