HR-16/HR16B Service Manual 1.00
8
6.1 General Testing
General testing should, at a minimum, consist of self test, and a short audio test (including
testing key response and recording and playing back a pattern). More extensive testing would
include:
♦
Checking battery backup
♦
Actually sending and receiving MIDI information
♦
Saving and loading data from tape
♦
Copying full patterns to themselves, then to other patterns so that memory
becomes completely full (this ensures that the 8031 address buss functions
correctly, as the self test does not take addressing into consideration).
6.2 Internal Diagnostics and Hidden Keys
Below is a list of the key presses necessary to activate hidden functions.
Power up while holding "ERASE", "DELETE", and "RECORD"------------Clear memory/Reinitialize system.
Power up while holding "QUANT" and "MIDI UTIL"---------------------------Self test.
Hold "PATT" and press "VOICE"--------------------------------------------------DAC Adjust mode (press "STOP" to exit).
Be aware that the self test will erase all internal memory (equivalent to reinitializing).
To perform the internal diagnostics, connect a MIDI cable between MIDI in and out. Connect
a 1/8 inch cable between Tape in and out. Activate the self test (keys above). the order of items
tested is:
1 ROM Test
Tests EPROM for errors
2 RAM Test
Tests SRAM for errors
3 MIDI I/O Test
Tests MIDI input/output functions
4 TAPE I/O Test
Tests Tape input/output functions
5 LED Test
Lights each front panel LED for a couple seconds
6 DAC Adjust
Enters DAC adjust mode (press stop to exit).
6.3 DAC Adjustments
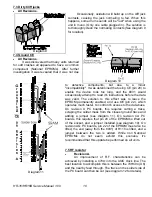
The only adjustment necessary in the HR-16 is the DAC adjustment. This is normally done at
the end of the HR-16's internal diagnostics, however holding the "PATT" button and pressing the
"VOICE" button simultaneously also starts the DAC adjust routine. While this routine is running,
adjust R90 (the trimpot near the PCM-54 DAC) so that a minimum of noise is heard during each
drum hit. A DAC that is out of adjustment will "buzz", particularly at the end of the sample. Note that
you may have to turn your amplifier up in order to hear this signal. Once the adjustment is complete,
hitting the "STOP" button ends the DAC adjust routine.


