Alcatel onetouch Pop A520L Nova LTE Quick Start Manual Download Page 5

6

7

The Home screen is provided in an extended format to allow more space for adding applications, 
shortcuts etc. Slide the Home screen horizontally left and right to get a complete view. 

1.3.1 

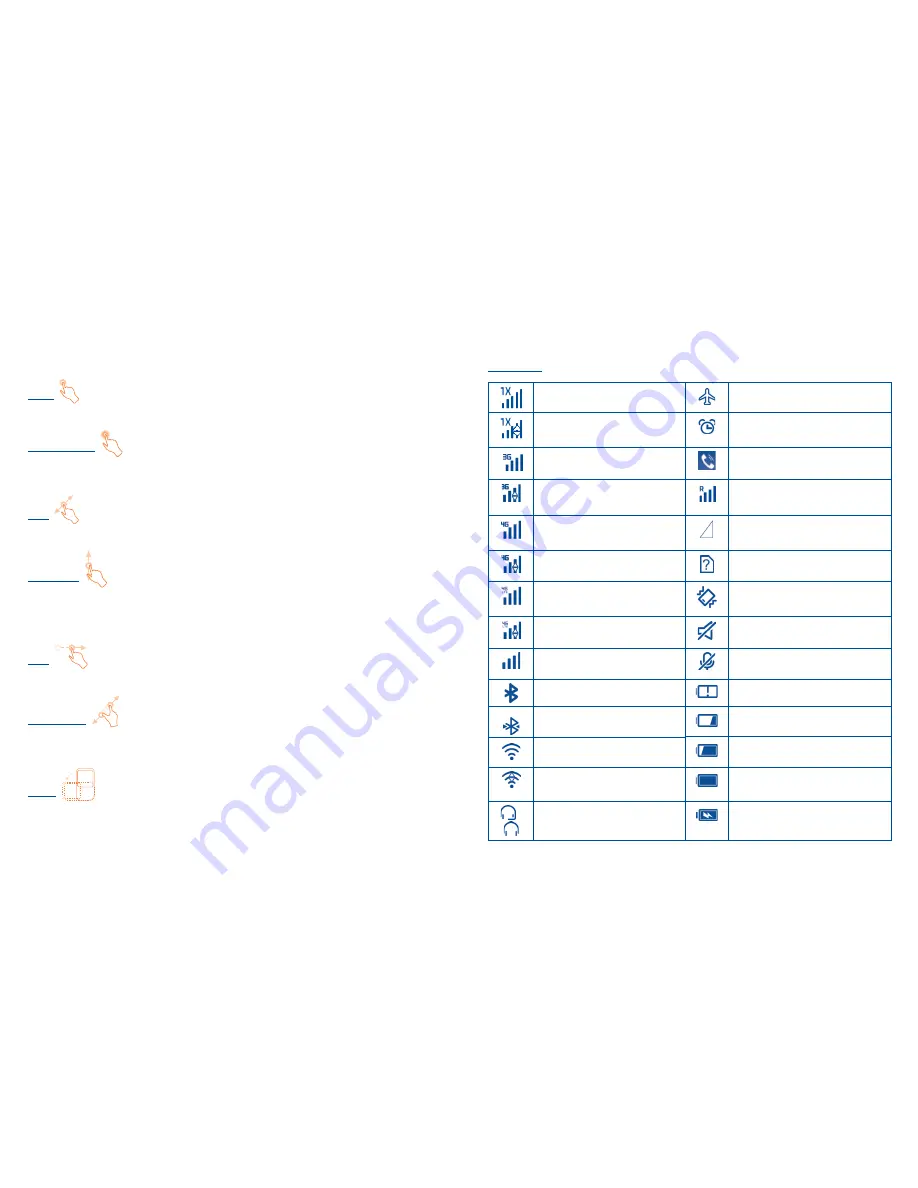
Using the touchscreen

Touch  

To access an application, touch it with your finger.

Touch and Hold  

To enter the available options for an item, touch and hold the item. For example, select a contact in 
Contacts, touch and hold this contact, an options list will then appear on screen.

Drag  

Place your finger on the screen to drag an object to another location.

Slide/Swipe  

Slide the screen to scroll up and down the applications, images, web pages etc.
The device also supports one finger zoom in (Message, Browser, Email and Gallery) by double tapping 
the screen then slide with one finger to zoom in/out).

Flick  

Similar to swiping, but flicking makes it move quicker.

Pinch/Spread  

Place your fingers of one hand on the screen surface and draw them apart or together to scale an 
element on the screen.

Rotate  

Automatically change the screen orientation from portrait to landscape by turning the phone 
sideways to have a better view.
Auto Rotate is off by default.

1.3.2 

Status bar

From the status bar, you can view both phone status and notification information. 

Status icons

1x connected

Airplane mode

1x in use

Alarm is set

3G connected

Speakerphone is on

3G in use

Roaming

4G connected

No signal

4G in use

No SIM card installed

4G LTE connected

Vibrate mode

4G LTE in use

Ringer is silenced

Signal strength

Phone microphone is mute

Bluetooth is on

Battery is very low

Connected to a Bluetooth device

Battery is low

Wi-Fi is on

Battery is partially drained

Connected to a Wi-Fi network

Battery is full

 /  Headset connected

Battery is charging

Summary of Contents for onetouch Pop A520L Nova LTE

Page 1: ...and holding the power key for more than 7 seconds until the startup screen appears In case this does not start your phone please press and hold the power key and volume up key together until the start...

Page 2: ...AR limits of 1 6 W kg The specific maximum SAR values can be found on page 32 of this user guide When carrying the product or using it while worn on your body either use an approved accessory such as...

Page 3: ...il swipe again to unlock it Power key Press Lock the screen Light up the screen Press and hold Show the pop up menu to select from Power off Restart Airplane mode Press the Power key for more than 9 s...

Page 4: ...until the phone powers on unlock your phone Slide PIN Password Pattern or Face unlock if necessary and confirm The Home screen is displayed If you do not know your PIN code or if you have forgotten it...

Page 5: ...ne finger to zoom in out Flick Similar to swiping but flicking makes it move quicker Pinch Spread Place your fingers of one hand on the screen surface and draw them apart or together to scale an eleme...

Page 6: ...Receiving location data from GPS Touch and drag down the Status bar to open the Quick setting panel or Notification panel Touch and drag up to close it When there are notifications you can touch them...

Page 7: ...en and the Favorite tray you can add them to a folder by stacking one item on top of another To rename a folder open it and touch the folder s title bar to input the new name Wallpaper customization T...

Page 8: ...within the text you would like to edit Drag the tabs to change the highlighted selection The following options will show Select all Cut Copy and Paste Touch the icon to go back without any action 3 C...

Page 9: ...ge From the Contacts screen touch the Menu key to open the options menu touch Import export then select Import from SIM card Export to SIM card Import from phone SD storage Export to phone SD storage...

Page 10: ...ough the steps to set up an email account Enter the email address and password of the account you want to set up Touch Next If the account you entered is not provided by your service provider in the p...

Page 11: ...storage and the computer To connect disconnect your phone to the computer To connect Use the USB cable that came with your phone to connect the phone to a USB port on your computer You will receive a...

Page 12: ...ion you stop backing up your settings and any existing backups are deleted from Google Servers 10 Factory data reset To activate factory data reset Touch the Menu key from the Home screen Touch Settin...

Page 13: ...HER INFORMATION DATA OR DOCUMENTATION ACCESSED INFORMATION ARE PROVIDED AS IS AND WITHOUT ANY WARRANTY OR ANY TECHNICAL SUPPORT TO THE MAXIMUM EXTENT PERMITTED BY APPLICABLE LAW TCT MOBILE AND ITS AFF...

Page 14: ...uct NOTE This product should be operated only with the following designated Battery Pack s Battery Lithium 2000 mAh TLi020F2 CAB2000013C2 Take extra precautions Keep the battery or device dry and away...

Page 15: ...avoided Interference with medical equipment functions This product may cause medical equipment to malfunction The use of this device is forbidden in most hospitals and medical clinics If you use any o...

Page 16: ...ceable signs of overheating The product does not operate normally when you follow the operating instructions Avoid hot areas The product should be placed away from heat sources such as radiators heat...

Page 17: ...ld void the user s authority to operate this equipment This device complies with Part 15 of the FCC Rules Operation is subject to the following two conditions 1 This device may not cause harmful inter...

Page 18: ...P Report 86 1986 International Commission on Non Ionizing Radiation Protection ICNIRP 1996 Ministry of Health Canada Safety Code 6 The standards include a substantial safety margin designed to assure...

Page 19: ...hone is turned ON Should not carry the phone in a breast pocket Should use the ear opposite the pacemaker to minimize the potential for interference If you have any reason to suspect that interference...

Reviews: