


HOBO Temp Data Logger (UX100-001) Manual
9.
Click the Start button to launch the logger.
Disconnect the
logger from the computer and deploy it using the mounting
materials (see
Mounting the Logger
). After logging begins,
you can read out the logger at any time (see
Reading Out
the Logger
for details).
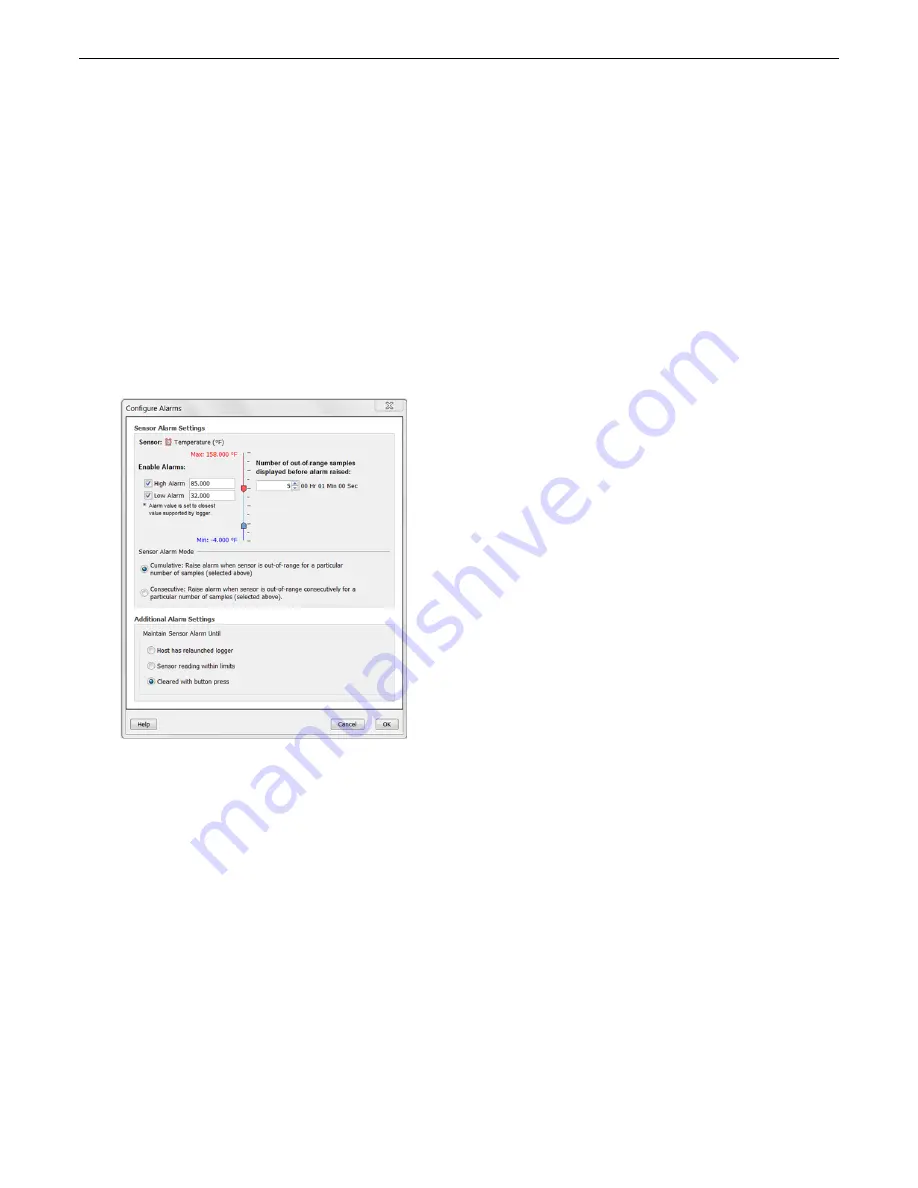
Setting up Alarms
You can set an alarm to trip on the logger when a sensor
reading rises above or falls below a specified value. To set an
alarm:
1.
Click the Alarms button from the Launch Logger window. If
the Alarms button is disabled, make sure the Logging Mode
is not set to Burst. (Alarms can only be configured if the
logger is in Normal or Statistics mode.)
2.
Select the High Alarm checkbox if you want an alarm to trip
when the temperature rises above the high alarm value.
Type the reading next to the High Alarm checkbox or drag
the red upper slider in the Configure Alarms window.
3.
Select the Low Alarm checkbox if you want an alarm to trip
when the temperature falls below the low alarm value.
Type the reading next to the Low Alarm checkbox or drag
the blue lower slider.
4.
Set the “Number of out-of-range samples displayed before
alarm is raised,” which is the number of sensor readings
needed to trigger each alarm. The time next to the
“Number of out-of-range…” field indicates the amount of
time it will take for the alarm to trip based on the number
you entered in that field and the 15-second LCD refresh
rate.
5.
Select either Cumulative or Consecutive for the Sensor
Alarm Mode. If you select cumulative, the alarm will trip
after a specific number of samples (as set in the previous
step) are outside the limits (the high or low samples do not
need to be consecutive). If you select Consecutive, the
alarm will trip after a specific number of samples (as set in
the previous step) outside the limits are displayed in a row.
6.
Choose how long the logger should maintain the sensor
alarm once it has tripped. Select “Host has relaunched
logger” if you want the alarm to remain visible on the LCD
until the next time you relaunch the logger. Select “Sensor
reading within limits” if you want the alarm to clear once
the sensor reading returns to the normal range between
the high and low alarm limits. Select “Cleared with button
press” if you want the alarm to remain on until you press
the Alarm/Stats button on the logger.
7.
Click OK to save alarm settings.
Notes:
•
Once the logger is launched, alarms will trip as
determined by these settings. Logger alarms will display
on the LCD screen. Note that the alarm limits are only
checked when the logger’s LCD screen refreshes every 15
seconds.
•
The actual values for the high and low alarm limits are set
to the closest value supported by the logger. For
example, the closest value to 85°F that the UX100 series
logger can record is 84.990°F and the closest value to
32°F is 32.043°F. In addition, alarms can trip or clear
when the sensor reading is within the logger
specifications of 0.02°C resolution. This means the value
that triggers the alarm may differ slightly than the value
entered. For example, if the High Alarm is set to
75.999°F, the alarm can trip when the sensor reading is
75.994°F (which is within the 0.02°C resolution).
•
When you read out the logger, high and low alarm levels
will be displayed on the plot along with “Chan 1 Alarm
Tripped” and “Chan 1 Alarm Cleared” events showing
when the temperature alarm tripped and cleared. The
“Chan 1 Alarm Cleared” event contains the value that
was furthest out of range for the sensor before the alarm
cleared (see the Points table for the actual value).
Burst Logging
Burst logging is a logging mode that allows you to set up more
frequent logging when a specified condition is met. For
example, let’s say the logger is recording data at a 5-minute
logging interval and burst logging is configured to log every 10
seconds when the temperature goes above 85°F (the high level)
or falls below 32°F (the low level). This means the logger will
record data every 5 minutes as long as the temperature
remains between 85°F and 32°F. Once the temperature reaches
90°F, for example, the logger will switch to the faster logging
rate and record data every 10 seconds until the temperature
falls back below the high level (or 85°F in this case). At that
time, logging then resumes every 5 minutes at the normal
logging interval. Similarly, if the temperature falls to 30°F, for
example, then the logger would switch to burst logging mode
again and record data every 10 seconds. Once the temperature
rises back to 32°F, the logger will then return to normal mode,
logging every 5 minutes.
To set up burst logging:
1.
Select Burst for Logging Mode in the Launch Logger
window. If Burst has already been configured for this
logger, click the Edit button in the Launch Logger window.
Note that you cannot set up alarms with burst logging. You
also cannot select the Stop Logging option “Never
(wrapping)” if burst logging is configured.
2.
In the Burst Logging window, select the High Level checkbox
if you want to set up a condition in which burst logging will
occur when the sensor reading rises above the high level
value. Type in the value or drag the red upper slider.


