background image

Alarm.com Smart Thermostat


Product Manual


|   9

RH

RH

RH

RC

RC

RC

Z

Z

Z

W2

W2

W2

W

W

W

C

C

C

Y

Y

Y

Y2

Y2

Y2

G

G

G

Install Your New Thermostat

Install the Back Plate

Use the bubble level provided 
on the back plate as a guide. 
Mark where the screws will go 
with a pencil through the screw 
holes on the back plate. 

TIP: If necessary, use the trim 

plate to cover up any marks 
or holes left from the old 
thermostat. Attach the trim 
plate before securing the 
back plate to the wall. 

TIP: Drill holes with 3/16” 

drill bit to tap in the drywall 
anchors for added support.

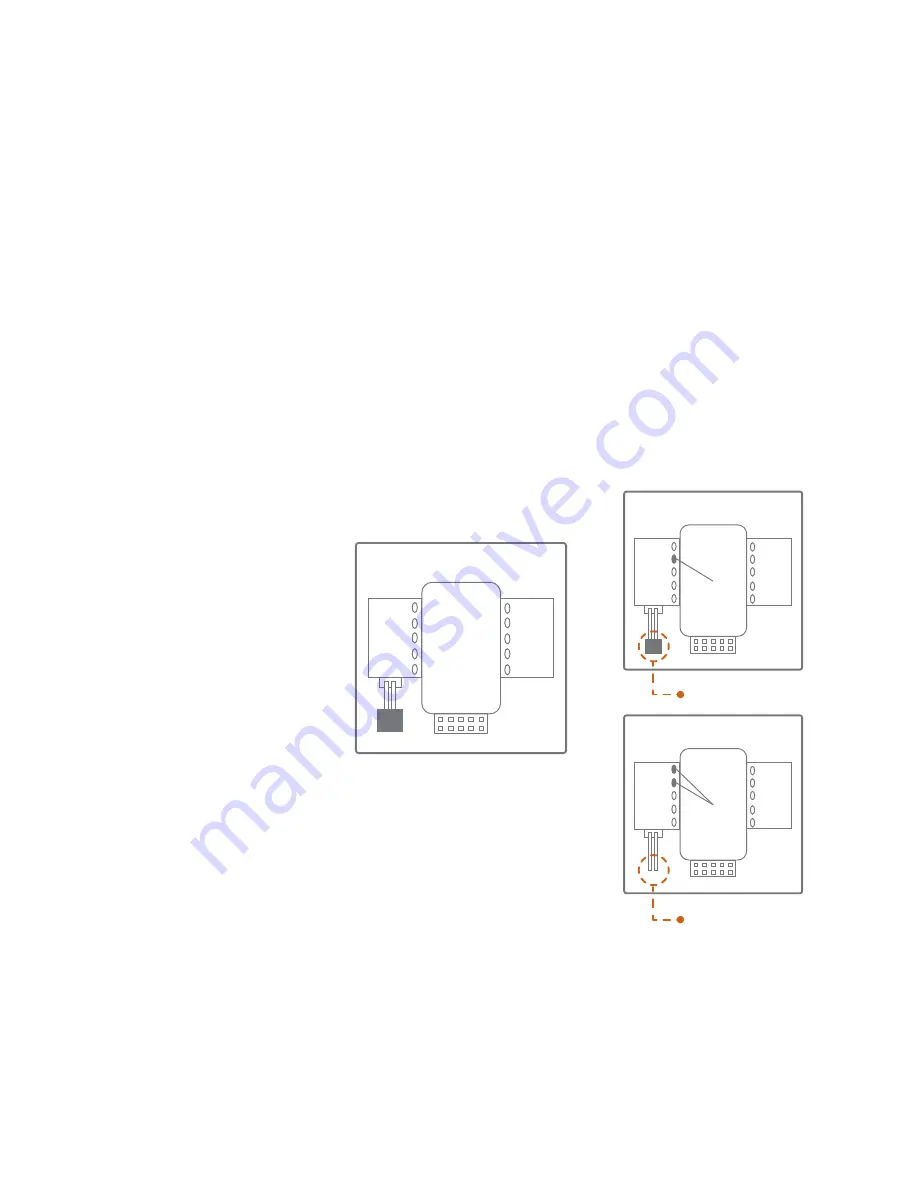
Wire Your New Thermostat

Reconnect the wires to the  
new thermostat and indicate 
the connected wires with a 
pencil in the image below.   

This information will be  

needed when configuring  
the thermostat.

 
TIP: If you have extra wires do 

not install them in the new 
thermostat.  Please contact 
your local HVAC professional 
for additional assistance. 

• If you have R, connect it to RH.

• If you have RH & RC, remove 

the black jumper in the lower 
left corner of the back plate 
terminal board with needlenose 
pliers. 


       Jumper On


       Jumper Off

• Z can be used for W3, H, or DH.

O/B

O/B

O/B

Summary of Contents for ADC-T2000

Page 1: ...Smart Thermostat ADC T2000 Product Manual ...

Page 2: ......

Page 3: ...m this way You must follow all local codes and ordinances for wiring the system This thermostat should only be powered by 4 AA alkaline batteries or a listed class 2 power supply at 24 VAC C Wire or wall transformer An amperage higher than 1 amp to each thermostat relay load may cause damage to the thermostat Verify that the system is 24 VAC If the old system is labeled as 120 or 240 volts or has ...

Page 4: ...hermostat Product Manual Thermostat Backplate Trim Plate Optional Drywall Screws 3 AA Batteries 4 Drywall Anchors 3 Wire Labels Needlenose Pliers Phillips Head Screwdriver Power Drill Pencil Box Contents RecommendedTools ...

Page 5: ...o include and exclude from the network Modes AUTO HEAT Icon and COOL Icon Illuminated at the same time The thermostat will automatically select the appropriate mode OFF No icons will be illuminated The system will not heat or cool when in OFF mode Icons HEAT Icon Illuminated in HEAT or AUTO mode COOL Icon Illuminated in COOL or AUTO mode RADIO Icon Illuminated during the wireless configuration DIS...

Page 6: ...s lamps or dryers Avoid areas that are exposed to large temperature variances such as direct sunlight near an AC unit above or below auxiliary heat and air vents and drafts from windows Be aware of what is on the other side of the wall where the thermostat is being installed Do not install on walls adjacent to unheated rooms stoves or housing hot water pipes Damp areas will not only affect the hum...

Page 7: ...NOT REMOVE the existing thermostat until power has been turned off at the circuit breaker Once power to the heating AND cooling systems is off follow these steps 3 Remove Thermostat Cover Remove the cover from the existing thermostat Do not disconnect the wires yet TIP Take a picture of the wires before you detach them from the existing thermostat for future reference 4 Label All Existing Wires La...

Page 8: ...move the existing thermostat TIP Remember to secure the wires so they don t fall into the wall Prepare the Wires Follow these guidelines for safe and secure wire connections Ensure the wires are a proper gauge between 18 24 AWG Make sure wires have exposed straight ends about 1 8 long CAUTION Verify that the system is 24 VAC If the old system is labeled as 120 or 240 volts or has wire nuts the sys...

Page 9: ...ate to the wall TIP Drill holes with 3 16 drill bit to tap in the drywall anchors for added support WireYour NewThermostat Reconnect the wires to the new thermostat and indicate the connected wires with a pencil in the image below This information will be needed when configuring the thermostat TIP If you have extra wires do not install them in the new thermostat Please contact your local HVAC prof...

Page 10: ...place the batteries as soon as you have low battery levels indicated by LOW then BAT flashing on the display If the batteries drain the thermostat could leave the HVAC system on overheating or freezing the home Always replace the batteries at least once a year This will protect the thermostat from damage and corrosion by leaking batteries If the home is unoccupied for a month or more such as vacat...

Page 11: ...ush against the back plate Press the thermostat body firmly into the back plate mounted to the wall Ensure that the pins on the body are correctly aligned with the header attached to the terminal board on the back plate Failure to do so could cause damage to the thermostat Turn the Power On Restore power to all the heating and cooling systems This can be done at the circuit breaker ...

Page 12: ...ve controller into inclusion mode Refer to the controller documentation for more information 3 Press and hold the DOWN button on the thermostat to begin inclusion mode Release the button when the RADIO icon lights up 4 When the RADIO icon becomes solid the thermostat has been included 5 Login to your online account to complete thermostat configuration ...

Page 13: ...ts Thermostat Lock and Modes Enabled WARNING Use caution when changing advanced configuration settings These configuration settings should only be changed by those familiar with heating and cooling systems parameters Contact a local HVAC professional for help WARNING Do not test the AC during cold weather or heat during hot weather Wait for mild weather to fully test the system To Check Heating 1 ...

Page 14: ...he UP or DOWN button again to adjust to the desired set point 5 Press the MODE button at any time to change the mode The modes are HEAT COOL AUTO and OFF In AUTO the brighter icon will indicate which set point is currently displayed and active HEAT or COOL After 5 seconds the display will return to the current room temperature The mode icon will become solid to indicate this After 5 more seconds t...

Page 15: ...s Above or Below the Room Temperature To prevent damaging the compressor the thermostat inserts a delay when cycling the compressor If you think the system should be on and it s not then change the set point to be 2 degrees beyond the current set point and wait 5 minutes to see if the system turns on If not contact a local HVAC professional Heat Pump is Cooling When it Should be Heating or Heating...

Page 16: ...ecomes solid the thermostat has now been successfully excluded from the network Batteries Drain Quickly If a thermostat is included using a C Wire that information is saved in the network and cannot be changed unless excluded and included again without a C Wire connected The same applies to thermostats included on battery power If you find your thermostat batteries are draining unusually fast make...

Page 17: ...quipment generates uses and can radiate radio frequency energy and if not installed and used in accordance with the instructions may cause harmful interference to radio communications However there is no guarantee that interference will not occur in a particular installation If this equipment does cause harmful interference to radio or television reception which can be determined by turning the eq...

Page 18: ...o other users the antenna type and its gain should be so chosen that the equivalent isotropically radiated power e i r p is not more than that necessary for successful communication Conformément à la réglementation d Industrie Canada le présent émetteur radio peut fonctionner avec une antenne d un type et d un gain maximal ou inférieur approuvé pour l émetteur par Industrie Canada Dans le but de r...

Page 19: ......

Page 20: ...Copyright 2015 Alarm com All rights reserved Alarm com and the Alarm com Logo are registered trademarks of Alarm com ...

Reviews: