Page 14
MOBILE HOME INSTALLATION
You must use a Quadra-Fire 1900 outside air kit (see page 15 for part numbers) for installation in a mobile
home. Use of alternative material will void warranty.
1. An outside air inlet must be provided for combustion and be unrestricted while unit is in use.
2. Unit must be secured to the mobile home structure by bolting pedestal through hearth pad and into floor.
For leg models, use attachment brackets to attach stove through pad and into floor.
3. Do not install unit in a sleeping room.
4. The structural integrity of the mobile home floor, walls, and ceiling/roof must be maintained (i.e., do not
cut through floor joist, wall stud, ceiling truss, etc.).
5. Unit must be grounded with #8 copper grounding wire or equivalent and terminated at each end with
N.E.C. approved grounding device.
6. Refer to clearance to combustibles section (page 6) for listing to combustibles.
7. Seal all wall/floor inlets to prevent air or moisture penetration. Check periodically to insure the inlet is free
of obstructions (e.g., snow or ice).
8. Burn wood only. Other types of fuels may generate poisonous gases (e.g., carbon monoxide).
9. If unit burns poorly while exhaust blower is on in home, increase combustion air.
NOTE
: Offsets from the vertical, not exceeding 45
°
, are allowed per Section 905(a) of the Uniform
Mechanical Code (UMC). Offsets greater than 45
°
are considered horizontal and are also allowed,
providing the horizontal run does not exceed 75% of the vertical height of the vent. Construction,
clearance and termination must be in compliance with the UMC Table 9C. This installation also
complies with NFPA 211.
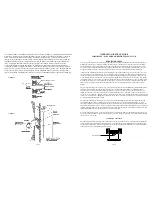
FIGURE 13
E
XTERIOR
CHIMNEY
RUNNING
UP
THE
OUTSIDE
OF
THE
RESIDENCE
*Note
: Unit has not been tested with
a horizontal connector. Refer
to local building codes.
Page 15
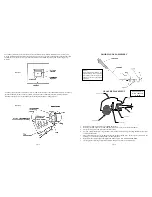
1900 PEDESTAL MODELS
1. Front cover plate attaches to firebox bottom below ashlip with two ¼-20 screws supplied.
2. Mount rear cover plate with four mounting screws supplied. This cover will seal the pedestal (floor installation) or
have a 4" (101mm) hole (rear installation).
3. Both kits have two 1 (25mm) rope gaskets to be tucked under pedestal to seal off both sides.
4.
Floor installation
: Cut a 4" (101mm) minimum hole in the floor to accommodate outside air piping. Use 4"
(101mm) minimum metal flex or rigid pipe to directly connect outside air to the unit or into vented crawl space. Use
the rodent screen supplied to cover the hole in the floor. Seal between the floor and the pipe with silicone to prevent
moisture penetration.
3.
Rear/wall installation
: Cut a 4" (101mm) hole in outside wall to accommodate outside air piping. Use a 4"
(101mm) metal flex or rigid piping to directly connect outside air to stove intake. Use a termination cap equipped
with a rodent screen (obtain from venting manufacturer). Seal between the wall and the pipe with silicone to prevent
moisture penetration.
1900 LEG MODELS
1. Remove ¼"-20 screws from stove bottom.
2. Mount front cover over the front air intake with two ¼"-20 screws.
3. Mount intake fitting on underside of bottom pan, and connect to ducting.
4.
Floor installation
: Cut a 4" (101mm) minimum hole in the floor to accommodate outside air piping. Use 4"
(101mm) metal flex or rigid piping to directly connect outside air to the unit or into vented crawl space. Use the
rodent screen supplied to cover the hole in the floor. Seal between the floor and the pipe with silicone to prevent
moisture penetration.
5.
Rear/wall installation
: Cut a 4" (101mm) hole in outside wall to accommodate outside air piping. Use 4" (101mm)
metal flex or rigid piping to directly connect outside air to stove intake. Use a termination cap equipped with a
rodent screen (obtain from venting manufacturer). Seal between the wall and the pipe with silicone to prevent
moisture penetration.
Part #831-1300
Part #831-1750
OUTSIDE AIR KIT INSTALLATION
Rope gasket
Rodent screen
Rear cover (floor)
Rear inlet (wall)
Front cover
Floor mounting bracket
Intake fitting
Front cover


