Page 12
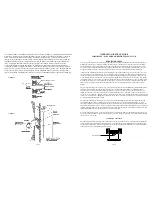
First, build the frame for the thimble, making sure that it is no smaller than 14½ (368mm) diameter, which will
maintain a 2 (50mm) air space around the chimney section. Attach the wall spacer to the chimney side of the
frame. Then insert the frame into the opening, toe-nailing it to the wall studs. Install the wall band in the
framing to secure the chimney section in place. Insert a single section of chimney connector into the chimney
through the wall band, being sure it does not protrude into the chimney beyond the edge of the chimney flue
lining. Apply high temperature furnace cement to the end of the chimney section and install it over the
connector, through the wall band, and through the wall spacer. Tighten the wall band to hold the chimney
section firmly in place and against the chimney. Install the trim collar on the outside of the opening. Check to
insure there is a 1 (25mm) air space between the connector and the chimney section. Also, during installation,
always check to insure that a 2 (50mm) air space is being maintained to the wood framing. Do not fill this
space with insulation. Insulation in this air space will cause a heat buildup which may ignite the wood framing.
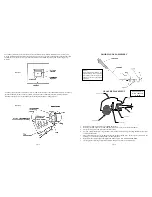
FIGURE 10
FIGURE 11
Page 17
OPERATING INSTRUCTIONS
IMPORTANT - PLEASE READ BEFORE USING STOVE
BURNING PROCESS
In recent years there has been an increasing concern about air quality. Much of the blame for poor air quality has been
placed on the burning of wood for home heating. In order to improve the situation, we at Quadra-Fire have developed
cleaner-burning wood stoves that surpass the requirements for emissions established by our governing agencies. These
wood stoves, like any other appliances, must be properly operated in order to insure that they perform the way they are
designed to perform. Improper operation can turn most any wood stove into a smoldering environmental hazard.
It helps to know a little about the actual process of burning in order to understand what goes on inside a stove. The first
stage of burning we will call the
kindling stage
. In this stage, the wood is heated to a temperature high enough to evapo-
rate the moisture which is present in all wood. The wood will reach the boiling point of water (212
°
F) and will not get
any hotter until the water is evaporated. This process takes heat from the coals and tends to cool the stove. Fire requires
three things to burn: fuel, air and heat. So, if heat is robbed from the stove during the drying stage, the new load of wood
has reduced the chances for a good clean burn. For this reason, it is always best to burn dry, seasoned firewood. When
the wood isnt dry, you must open the air control and burn the stove at a high burn setting for a longer time to start it
burning.
The next stage of burning, the
secondary stage
, is the period when the wood gives off flammable gases which burn above
the fuel with bright flames. During this stage of burning it is very important that the flames be maintained and not
allowed to go out. This will insure the cleanest possible fire. If you are adjusting your stove for a low burn rate, you
should close down the air to the point where you can still maintain some flame. If the flames tend to go out, the stove is
set too low for your burning conditions. The air control in the center of the stove, beneath the ashcatcher, is used to adjust
the stove for lower burn rates. Pulling this control towards you closes it, pushing it in opens it. The air control rod should
be closed (pulled outward) for lower burns.
The final stage of burning is the
charcoal stage
. This occurs when the flammable gases have been mostly burned and
only charcoal remains. This is a naturally clean portion of the burn. The coals burn with hot blue flames. It is very
important to reload your stove while enough lively hot coals remain in order to provide the amount of heat needed to dry
and rekindle the next load of wood. It is best to open the air control for a short while before reloading. This livens up the
coalbed. Open door slowly so that ash or smoke does not exit stove through opening. You should also break up any large
chunks and distribute the coals so that the new wood is laid on hot coals.
Air quality is important to all of us, and if we choose to use wood to heat our homes we should do so responsibly. To do
this we need to learn to burn our stoves in the cleanest way possible. Doing this will allow us to continue using our wood
stoves for many years to come.
COMBUSTION AIR SYSTEM
The combustion air enters at the upper front of the firebox, near the top of the glass door. This preheated air supplies the
necessary fresh oxygen to keep the wood burning and mix with the unburned gases, helping to create secondary, tertiary
and quaternary combustions. This air is regulated by the air control rod beneath the ashcatcher. For more combustion air
push control in, for less combustion air pull control out.
Air control rod


