background image


25

Current 

Ø


Audio:

  if audio language is supported change the audio language by  pressing “

3

/

4

” keys  

Ø


Subtitle: 

if subtitle is backed up alter the subtitle language with“

3

/

4

” keys. The chosen language 

will be seen in subtitles. 
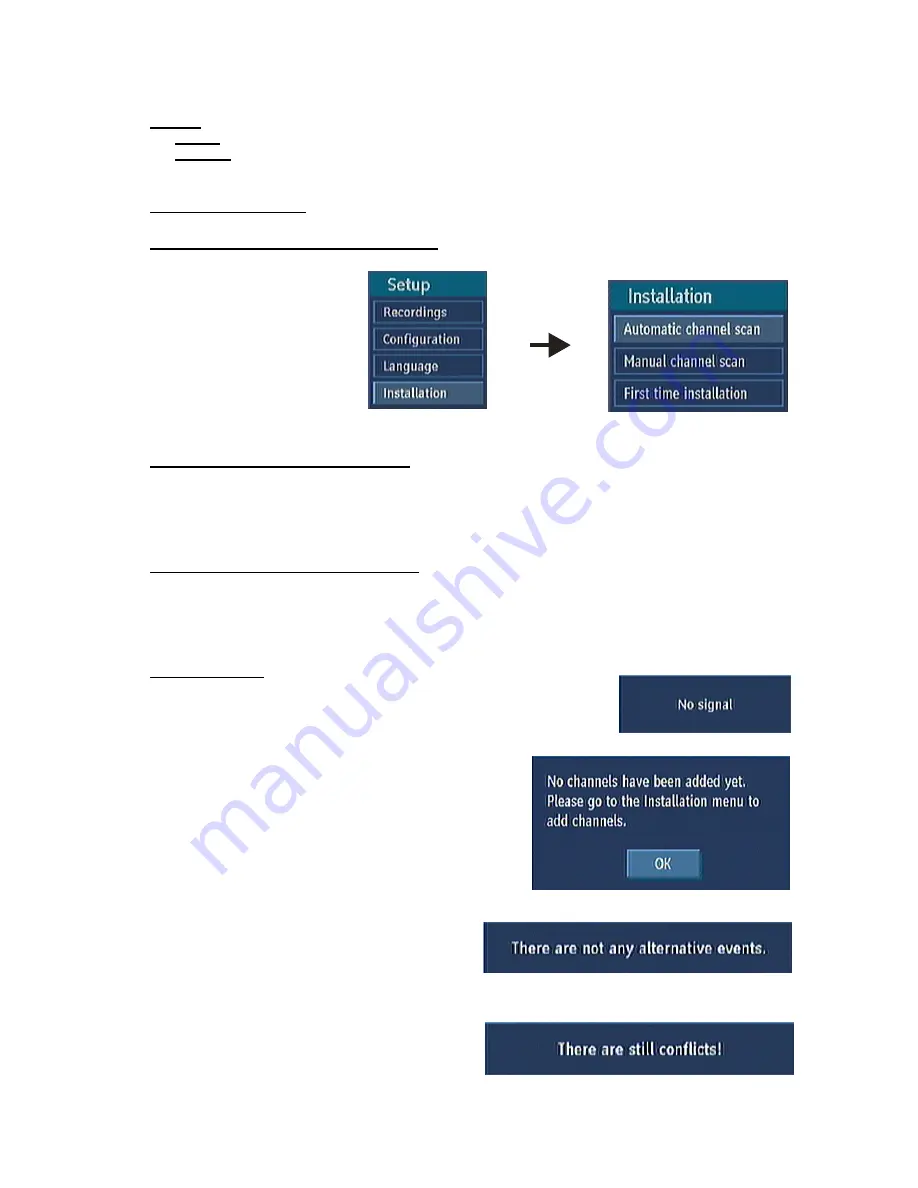
5.4. INSTALLATION  

5.4.1. AUTOMATIC CHANNEL SCAN 

 
Automatic 

channel 

scan


is 

activated  by  selecting  OK  when 
the  line  is  highlighted.  A  pop-up 
menu  appears  on  the  screen, 
select  “YES”  the  automatic  scan 
begins.  All  the  multiplexes  are 
searched  and  a  channel  table  is 
created 

automatically. 

All 

channels  found  are  stored  in  a 
sorted form with respect to their channel numbers. Selecting "NO" will cancel the operation. 

5.4.2. MANUAL CHANNEL SCAN 

In manual search the number of the multiplex is entered manually and only that multiplex is searched 
for the channels. In manual and auto search, any existing channel in the database is not re-stored to 
avoid redundant duplicates of that channel. To start the scan enter the channel number manually and 
press OK. 

5.4.3. FIRST TIME INSTALLATION 

Use this option to load default settings,  which had been set at the factory. To install factory settings, 
highlight ‘First Time Installation’ menu and press OK key, then you will be asked to confirm deleting all 
channels and settings. Selecting  YES and  pressing OK  will delete the channel table. Selecting "NO" 
and pressing OK will cancel the operation. 

6. MESSAGES  

When  the  box  receives  no  signal  (e.g.  the  antenna  cable  is 
disconnected), “NO SIGNAL” message is seen on the screen. 


When there are no channels stored in the box; the Channel 
List  menu  is  not  accessible.  Channel  navigation  is  not 
allowed. Therefore, trying to enter these menus or navigate 
the channels will display an error message on the screen. 


A conflict is caused, if more than two programmes 
are  set  for  recording  in  the  same  time  interval.  To 
solve this conflict, you have to select an alternative 
for  one  of  those  programmes.  If  there  are  no 
alternatives, the warning message on the right will appear. 
 
If there is still a conflict and you leave this menu by 
pressing  the  OK  button,  you  will  see  this  warning  
message: “There are still conflicts!”. 

Summary of Contents for AVPVR1010

Page 1: ...AVPVR1010 INSTRUCTION MANUAL...

Page 2: ...ORDING TITLE 18 4 2 CHAPTER OPTIONS 19 4 2 1 CREATE NEW CHAPTER MARK 19 4 2 2 FORWARDS TO NEXT CHAPTER 19 4 2 3 BACK TO START OF CHAPTER 19 4 2 4 BACK TO PREVIOUS CHAPTER 19 5 SETUP 19 5 1 RECORDINGS...

Page 3: ...and out of reach from children Under no circumstance should the cut off plug be inserted into a mains socket outlet due to high risk of electric shock Then fit an appropriate plug carefully following...

Page 4: ...nd get expert advice Pull the mains plug out of the wall socket during thunderstorms and disconnect the aerial lead This product is only designed for household or similar general use Any other use may...

Page 5: ...picture 7 Time shift pause live TV 8 One button record Instant recording of channels 9 Dual recordings at the same time 10 Split and series recordings support 11 Ability to record one channel while wa...

Page 6: ...REC OK PAUSE ON OFF MENU RECORD PAUSE MENU CHANNEL UP MENU CHANNEL DOWN MENU LEFT VOLUME DOWN MENU RIGHT VOLUME UP BACK PANEL RS 232 OPTICAL OUT ACIN CVBS LEFT RIGHT TV SCART HDMI OUT AUX SCART 35022...

Page 7: ...6 CONNECTION DIAGRAMS NOTE This set top box supports Free To View only There is no provision for a CAM or Pay To View card...

Page 8: ...AP PIP TIMERS AUX 1 2 3 4 5 6 7 8 9 10 11 12 13 14 15 16 17 18 19 20 21 22 23 24 25 26 27 28 29 30 31 32 USING THE CONTROLS ON THE FRONT PANEL You can enter the main menu by pressing the menu button o...

Page 9: ...tip mode 15 Subt Show Hide Subtitles 16 Swap Swap the channels shown on the PIP window and normal screen Changes HDMI resolutions while watching mode 17 Pip PIP Window Channel Up 18 Mute Mute 19 4 Pla...

Page 10: ...RIGHT keys on the remote control you can select between 720p and 1080i Please check the HDMI resolutions supported by your TV set and select the most appropriate one from this menu The next menu will...

Page 11: ...nfirm your decision if you still want to delete select YES with the buttons or the operation will be cancelled if you select NO 1 3 EDIT CHANNELS To rename a specific channel highlight Edit Name butto...

Page 12: ...the channel programs weekly by means of 7 DAY EPG All programs of channels are displayed The current program is highlighted and there is brief information about the programs of the channel such as na...

Page 13: ...DELETE SERIES TIMER In EPG menu after you have selected a programme press the OK button and select the Record Series option in the menu which appears and press the OK button again So a series recordi...

Page 14: ...rs and press the OK button again You can set a reminder for future programs To cancel an already set reminder highlight that programme and press the OK button and select the option Delete Reminder The...

Page 15: ...ected programme If you pres it again the recording will be cancelled OK Pressing this button will save the latest changings and you will leave this window and go back to the EPG window Alternatives If...

Page 16: ...it from main menu The features of this menu are like below Delete You can delete the highlited single timer or series timer Edit You can edit the saved timers Add By pressing this button you will go t...

Page 17: ...on Edit the list via GREEN key and delete with the RED button 4 RECORDINGS LIBRARY All the recordings are kept in list To show the list of recordings press either LIB button on the remote or access it...

Page 18: ...external device like a DVD player Press the LIB Button and come to the Recordings Library In this library the saved recordings are listed To select a recording which should be archieved highlight one...

Page 19: ...ECORDING TITLE If you want to display a recording title select Include To do this use the 3 4 buttons If not select Skip By selecting Skip the options below will be disabled While archiving you could...

Page 20: ...the 5 6 buttons select this option and press the OK button to go to the beginning of the current chapter This is the last played chapter 4 2 4 BACK TO PREVIOUS CHAPTER Using the 5 6 buttons select th...

Page 21: ...ortest recordings will be deleted to make space for the requested timer Unplayed If this option is set to EXCLUDED any unplayed recordings will NOT be deleted If this option is set to INCLUDED unplaye...

Page 22: ...formation present this may cause HDD damage or malfunction We recommend keeping variation in room temperature within 10 C per hour Do not place the Recorder in a location with high humidity Place the...

Page 23: ...n manual Hard Disk Operation Recording Playback Time Shift Recording If the Recorder is used in a cold location a location at low temperature the drive will only allow live viewing after power is turn...

Page 24: ...PR PR buttons If you choose Show All all channels can be navigated with the PR PR buttons To save the recent changes and exit press the MENU button 5 2 7 SCAN ENCRYPTED CHANNELS Use buttons to go to...

Page 25: ...ENU Installation menu is locked So the user can t add channels Changes will be updated after exiting Configuration Menu 5 2 9 ii SET PIN The PIN code of the unit changed Use 5 6 buttons to go to Set P...

Page 26: ...nually and press OK 5 4 3 FIRST TIME INSTALLATION Use this option to load default settings which had been set at the factory To install factory settings highlight First Time Installation menu and pres...

Page 27: ...art of the screen The small bar indicates the program duration On the channel info window there are Current event name next event name and their start and end times Program duration bar Program mode T...

Page 28: ...but the sound will remain muted until the MUTE key is pressed for the second time and the mute symbol will display for 3 seconds PIP PICTURE IN PICTURE Enables disables PIP window PIP next channel in...

Page 29: ...gital teletext pages and they are temporarily replaced by a blank picture while the banner or menu is displayed Digital teletext cannot be accessed when the Subtitles are enabled WIDE TV sets are avai...

Page 30: ...s Accessories Communications Hyper Terminal menu 4 For a new connection run Hypertrm exe file 5 Give a name and choose an icon for the connection You do not need to make a new connection every time Yo...

Page 31: ...tly dampened cloth only Do not use liquid or aerosol cleaners HEAT AND FLAMES The receiver should not be placed near to naked flames or sources of intense heat such as an electric fire Ensure that no...

Page 32: ...y Before unplugging your digital set top box make sure it is in standby The remote control is not working The digital set top box is in Stand by Remote control is incorrectly aimed Battery exhausted P...

Page 33: ...GITAL CAPABILITIES Transmission Standards DVB MPEG2 DEMODULATION COFDM with 2K 8K FFT mode FEC for all DVB Modes Automatically found VIDEO ALL MPEG 2 MP ML Video Decoder Aspect Ratio 4 3 16 9 with pan...

Page 34: ...PR V V AUDIO R L Connector 2 x RCA R L Output 2 Vrms 0 dBfs Z 10 kohm DIGITAL AUDIO Output Optical SPDIF A V DATA IN OUT Scart TV scart AUX scart RGB Video Output TV scart RGB Video Intput AUX scart C...

Page 35: ...f you do not reset your channels you risk losing some or all of your TV services during and following switchover Please refer to this instruction manual for help with resetting channels The instructio...

Reviews: