background image

- 4 -

LCD TV

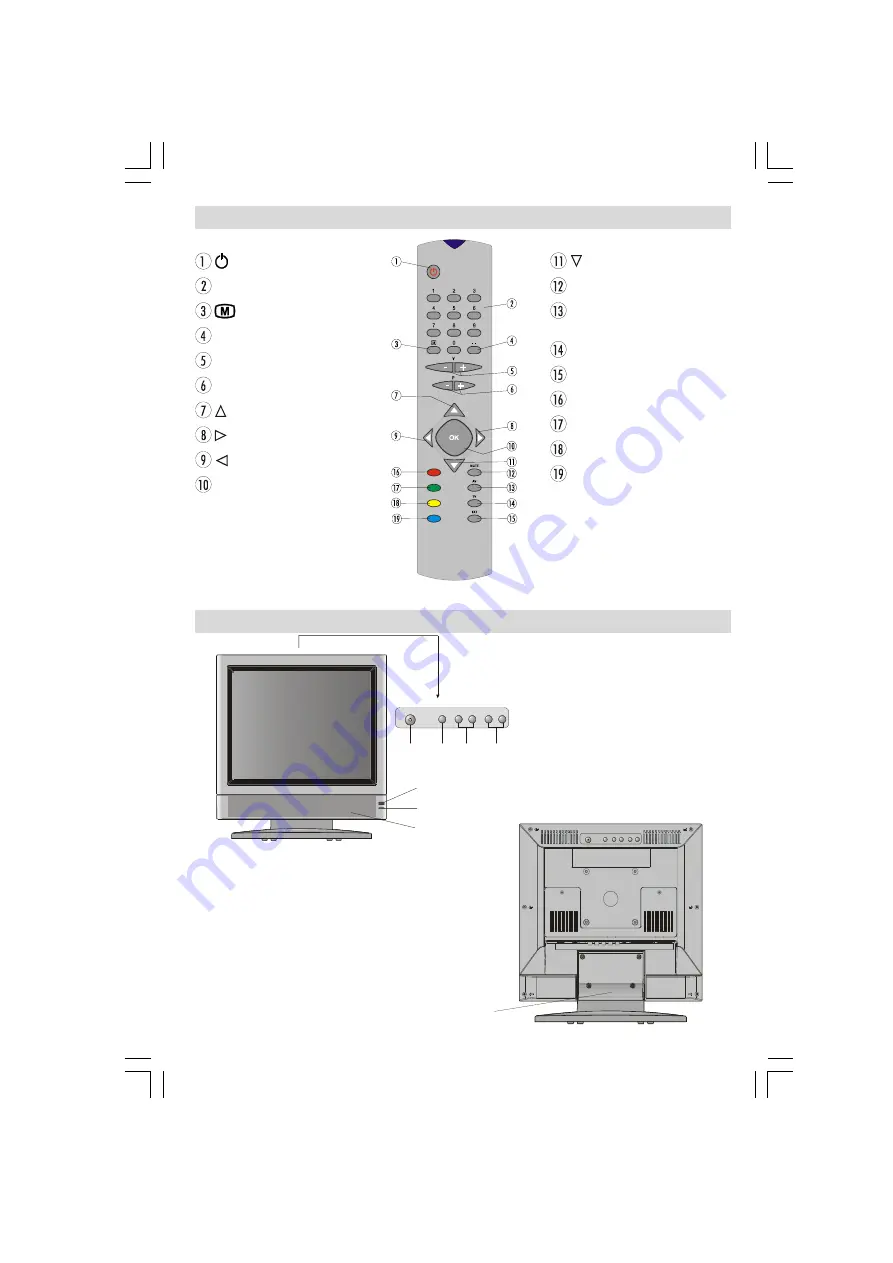
Remote Control Buttons

92/80(

0(18

3&K

32:(5

63($.(5

/('

,1)5$5('5(&(,9(5

0(18

92/80(

3&K

92/80(

0(18

3&K

)227723&29(5

   = Stand By


0 - 9 

=


Direct Programme


 = Menu


- - 

= Double Digit


V + / - 

= / -


P + / - 

= Pro/ -


 = Cursor Up

   = Cursor Right

   = Cursor Left

 OK = Okay (Store)

   = Cursor Down


MUTE

: Mute


AV

 = External Source

 (TV, EXT1, EXT2, SVHS)


TV

 = TV / Quit Menu


TXT = 

Teletext

 Red button = Sound

 Green button = Picture

 Yellow button = Feature

 Blue button = Install

ENG-1506-1243UK-17MB20-(WO PC)-50095307.p65

16.11.2006, 19:17

4

All manuals and user guides at all-guides.com

Summary of Contents for AV1506LCD

Page 1: ...15 LCD TV COLOUR TELEVISION If you experience any difficulty in setting up or operating this product please contact the Help line on 01422203676 standard rates apply All manuals and user guides at all guides com a l l g u i d e s c o m ...

Page 2: ... 5 Navigating the Menu System 5 Menu Map 6 Menu System 7 Other Features 10 Teletext 11 Connect Peripheral Equipment 12 Specifications 13 Connect Peripheral Equipment 14 Peripheral Equipment Connections 14 Important Instruction 15 ENG 1506 1243UK 17MB20 WO PC 50095307 p65 16 11 2006 19 17 1 All manuals and user guides at all guides com ...

Page 3: ... solid object or liquid falls into the cabinet unplug the set and have it checked by qualified personnel before operating it any further 4 Cleaning Before cleaning unplug the adaptor from the wall outlet Do not use liquid or aerosol cleaners Use soft and dry cloth 5 Ventilation The slots and openings on the back cover are in tended for ventilation and to ensure reliable opera tion To prevent overh...

Page 4: ... as disconnect device and therefore shall re main readily operable Warning To prevent injury this device must be se curely attached to the floor wall in accordance with the installation instructions The LCD panel is very high technology product with about a million thin film transistors giving you fine picture details Occasionally a few non active pixels may appear on the screen as a fixed point o...

Page 5: ...le Digit V Volume P Programme Cursor Up Cursor Right Cursor Left OK Okay Store Cursor Down MUTE Mute AV External Source TV EXT1 EXT2 SVHS TV TV Quit Menu TXT Teletext Red button Sound Green button Picture Yellow button Feature Blue button Install ENG 1506 1243UK 17MB20 WO PC 50095307 p65 16 11 2006 19 17 4 All manuals and user guides at all guides com ...

Page 6: ...ton on the remote control so that last mode switched off is selected By either method the TV will switch on When the TV is operated for the first time the following screen appears For more information on this process see Install Menu section To switch the TV off Press the stand by button on the remote con trol or On Off switch on the TV so the TV will switch to stand by mode To power down the TV c...

Page 7: ...8 167 0 18 9ROXPH DODQFH 6RXQG 0RGH 9 IIHFW TXDOL HU 0RGH 6WRUH 3LFWXUH 0RGH ULJKWQHVV RQWUDVW RORXU 6KDUSQHVV RORXU 7HPS 5RRP LJKWQLQJ 3LFWXUH RRP 6WRUH 6OHHS 7LPHU DQJXDJH KLOGORFN 0HQX RORXU DYRULWH 0RGH 3URJUDPPLQJ 3URJUDPPH DQG KDQQHO 6WDQGDUG RORXU 6 VWHP 6HDUFK 9 5 0RGH HFRGHU 6WRUH 36 XWR 3URJUDPPLQJ 6 VWHP 7 W 5HJLRQ 3URJUDP 7DEOH A menu map is provided above For details of the items refe...

Page 8: ...s in Personal Store Program By pressing a b button select Store Press or OK button to store the adjustments Stored will be displayed on the screen Picture Menu Picture Mode By pressing a b button select Picture Mode Press _ button to choose from one of these options Bright Standart Soft and Manual Brightness Contrast Colour Sharpness Tint By pressing a b button select the desired Op tion Press _ b...

Page 9: ...uttons is pressed Child Lock On will be displayed on the screen MenuColour By pressing a b select Menu Colour Use _ button to change menu background to Transparent or Gray Favourite Mode By pressing a b select Favourite Mode Use _ button to set Favourite mode on or off See Channel List menu Favourites Install Menu Programming By pressing a b select Programming After pressing button programming men...

Page 10: ... mode to connect any decoder to your TV By pressing a b select Decoder Press the _ buttons to turn it ON or OFF When you switch the Decoder setting to OFF EXT1 output will be muted In this case EXT1 output will not be available to display video If it is switched ON the EXT 1 output will be the selected video source Any decoder can be connected to EXT1 to unscramble required video signal Hint Decod...

Page 11: ...e that letter and _ button to select the other letters By pressing the YELLOW button you can store the name Move Select the programme that you want to insert by navigation buttons Press the GREEN button By navi gation buttons move the selected programme to the decided programme space and press the GREEN but ton again Delete To delete a programme press the RED button Press ing the RED button again ...

Page 12: ...er searches until the selected page number is located so that the desired page is displayed on the screen Press P button to move the Teletext screen for ward one page at a time Press P button to move the Teletext screen back ward one page at a time Fastext Your TV supports the 7 page Teletext system When the page number of any of the 7 pages in memory is en tered the system will not search for the...

Page 13: ...art cable to SCART sockets Playback NTSC Connect NTSC VCR player to a Scart socket of the TV Then press the AV button to select EXT1 Camera And Camcorder To Connect ToAV Input Connect your camera or camcorder to EXT2 input of the TV Connect your equipment to the TV via VIDEO yel low AUDIO R red and AUDIO L white inputs You must connect the jacks into the input with the same colour Connection to S ...

Page 14: ...ULDO VLJQDO KHFN DOO DHULDO FRQQHFWLRQV I XVLQJ DQ LQGRRU DHULDO RX PD QHHG DQ RXWGRRU DHULDO 7HOHWH W IUHH LQJ RU EUHDNLQJ XS V DERYH V DERYH 1R RU LQWHUPLWWHQW5HPRWH FRQWURO IXQFWLRQV DWWHU H KDXVWHG 5HSODFH EDWWHU LQ KDQGVHW If you are still having difficulty please call the Technical help line Ring 01422 203676 Normal rates apply Opening hours Mon Fri 8 am 8pm Sat 9 am 4pm Sun 11am 4pm Bank ho...

Page 15: ...s 17 1 8 2 1 5 9 2 1 1 287 1 287 3 21 8 2 9 2 6 7 7 5 9 5 17 11 0 25 5 DC 12 V 9 9 9 9 VIDEOINPUT AUDIO INPUT L R S VIDEO HEADPHONE SCART ANTENNA LINE OUT L R ENG 1506 1243UK 17MB20 WO PC 50095307 p65 16 11 2006 19 17 14 All manuals and user guides at all guides com ...

Page 16: ... symbol or coloured green or green and yellow The wire which is coloured blue or black must be connected to the terminal which is marked with the letter N or coloured Black The wire which is coloured brown or red must be connected to the terminal which is marked with the letter L or coloured Red For continued protection against risk of fire replace only with same type and rating of fuse ASTA appro...

Reviews: