background image

LED SMART TV

50U

D

8430

50U

C

8450

Summary of Contents for 50UD8430

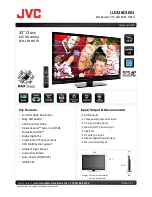
Page 1: ...LED SMART TV 50UD8430 50UC8450...

Page 2: ......

Page 3: ...1...

Page 4: ...2...

Page 5: ...3...

Page 6: ...4...

Page 7: ...UM 4 R03P AAA 5...

Page 8: ...6...

Page 9: ...TV RADIO SOURCE SOURCE TXT TXT FAV LIST FAV LIST SUBTITLE SUBTITLE AUDIO AUDIO RECORD RECORD MIX MIX SIZE SIZE CANCEL CANCEL INDEX INDEX HOLD HOLD REVEAL REVEAL SUBPAGE SUBPAGE TIMESHIFT TIMESHIFT EP...

Page 10: ...8...

Page 11: ...9 AAA...

Page 12: ...SOURCE ENTER EXIT ENTER ENTER EXIT EXIT Menu Picture Setup Sound Setup Channel Setup Function Setup Select Con rm ENTER Back Exit 10...

Page 13: ...Picture Setup Picture Mode Color Temperature DNR Aspect Ratio Select Con rm ENTER Back Exit 11...

Page 14: ...Sound Setup Sound Mode Balance AVL Digital Audio Output Audio Description Select Con rm ENTER Back Exit 12 Select Con rm ENTER Back Exit...

Page 15: ...Channel Setup Country BELGIUM Auto Scan DTV Manual Scan Channel Edit DTV Setting Select Con rm ENTER Back Exit 13...

Page 16: ...Teletext Language System Lock Auto Power Down Record Menu CEC off Start Timeshift Con g Record Disk ENTER HDMI Control Device auto power o TV auto power on ARC enable Speaker Select Con rm ENTER Back...

Page 17: ...Setup OSD Timer Sleep timer Environment Select Con rm ENTER Back Exit 15...

Page 18: ...16...

Page 19: ...17...

Page 20: ...18...

Page 21: ...19...

Page 22: ...20...

Page 23: ...21...

Page 24: ...22...

Page 25: ...16 9 AC 100 240V 50 60Hz 20 80 Non condensing 0C 40C PAL B G D K I SECAM B G D K DVB T C T2 YPbPr 23 50UC8450 50UD8430...

Page 26: ...734 31 468 15 625 31 25 37 50 45 00 28 13 33 75 67 50 56 25 640 x 480 800 x 600 1024 x 768 60 00 56 25 60 00 60 00 60 00 60 00 31 50 35 16 37 90 48 40 47 85 67 50 1920x 1080 1366x 768 480p 576p 720p 1...

Page 27: ...25...

Page 28: ......

Page 29: ...Note...

Page 30: ...the batteries are not drained Use new batteries Check that the remote control is within the operating range Check that the remote control is pointed to the remote control window on the display Check...

Page 31: ...7 Supported Signal Modes 24...

Page 32: ...6 Technical Speci cation 23 50UD8430 50UC8450...

Page 33: ...select Video in the main menu then press ENTER button to enter 5 6 4 Applications The picture is for a reference only the actual item is the standard Press button to select in the main menu then press...

Page 34: ...e only the actual item is the standard Press button to select Music in the main menu and then press ENTER button to enter You can see the information of the current playing song at the left of the men...

Page 35: ...on to select Photo in the main menu and then press ENTER button to enter Press EXIT button to return back to the previous menu You can see the information of the current playing photo after press butt...

Page 36: ...formation 5 5 4 About TV Th As the gure shows 5 6 Media Player Note Before operation MEDIA menu Plug in USB device or memory card Press button to select Media Player in the Home Page and then press EN...

Page 37: ...Press ENTER key to do system setting 5 5 1 Network Setting 5 5 2 Time Setting Press key to select the items and then press ENTER key to modify it 5 Home Page 5 5 Settings 18...

Page 38: ...5 Home Page 17 5 3 APPS...

Page 39: ...mend and video will be updated in a few days Press button to select the video and then press It is the recommended APPS in the APP Store press Enter key to download the APPs from the Store and you can...

Page 40: ...p Timer button to enter and press then press imer Press ENTER button to enter and select tton to select OSD Timer 4 5 1 OSD Timer OSD display time Press bu Press button to select Sleep T Press ENTER P...

Page 41: ...guage Language menu you will see a graphic button to select Press ENTER key to enter the sub menu you can Press ENTER Key to select the Teletext Press ENTER key to enter the sub Enter the default PIN...

Page 42: ...Auto Scan 4 3 5 4 3 4 4 3 3 4 3 1 Country Press button to select Country and then press ENTER button to Press button to select and then press ENTER button to do auto search DTV Manual Scan Press Press...

Page 43: ...ance Press button to select Balance then press button to adjust Then press EXIT button to return back the previous menu directly Press button to select AVL then press ENTER button to adjust Then press...

Page 44: ...ture Mode Press button to select Picture Mode then press ENTER button to enter Available You User mode Press button to select then press ENTER button to enter and Press button to select DNR and then p...

Page 45: ...s ENTER to con rm Press MENU Press button to select the MENU you want Press ENTER button to return back to the previous menu Press button to select the option and then press ENTER button to adjust the...

Page 46: ...round Here is only the sketch please in kind prevail 2 Basic Operation 2 1 Power ON OFF Optional Connect the power cord to the AC input Insert the power cord into the appropriate socket Press the Powe...

Page 47: ...1 Connecttion and Preparation of TV 1 4 Remote Control 8...

Page 48: ...the website 7 10 TXT Enter or exit teletext 23 TIMESHIFT DTV mode time shift MEDIA mode Press one time to pause press again to playback 13 SUBTITLE DTV mode select subtitle mode 14 AUDIO Select TV aud...

Page 49: ...as the standard or or or 1 Remote sensorwindow 2 Power indicator 3 Speaker 4 Menu key 5 Program key 6 Program key 7 Volume key 8 Volume key 9 Source key 10 Standby key 11 Power plug input 1 Connecttio...

Page 50: ...tand 1 Place theTV withthe front panelfacing downwards onthe soft clothor soft pads on adesk 2 Insert thestand into thebottom socket ofthe TV 3 Insert the screws intothe sockets and tighten them For t...

Page 51: ...trol 1 5 Installation of Batteries 2 Basic Operation 2 1 Power ON OFF Optional 5 5 5 6 7 9 9 9 9 2 2 Setting of Standby Mode 3 Signal Source 5 4 3 Setup Menu Channel Menu Sound Menu 4 1 Picture Menu 6...

Page 52: ...e TVis positioned close to the wall to avoid it falling when pushed 10cm 30cm 10cm 10cm When you turning theTV set donot hold the top side of the TVset you should hold the bottom side When you lifting...

Page 53: ...to the display Be sure not to display motionless picture on the LEDTV formore than 2 hours because it would cause picture remnants to appear which is called screen burns To avoid suchpicture remnants...

Page 54: ...ing simpleprecautions such as If your existingtelevision set isbeing retained andrelocated the same considerations as aboveshould be applied IMPORTANT INFORMATION Using cabinets orstands recommended b...

Page 55: ...PRECAUTION Note If the manualis inconsistent withthe product please referto the actualproduct...

Page 56: ...LED SMART TV Please read these instructions before operating your set and retain them for future reference Operating Instruction 50UD8430 50UC8450...

Reviews: