background image

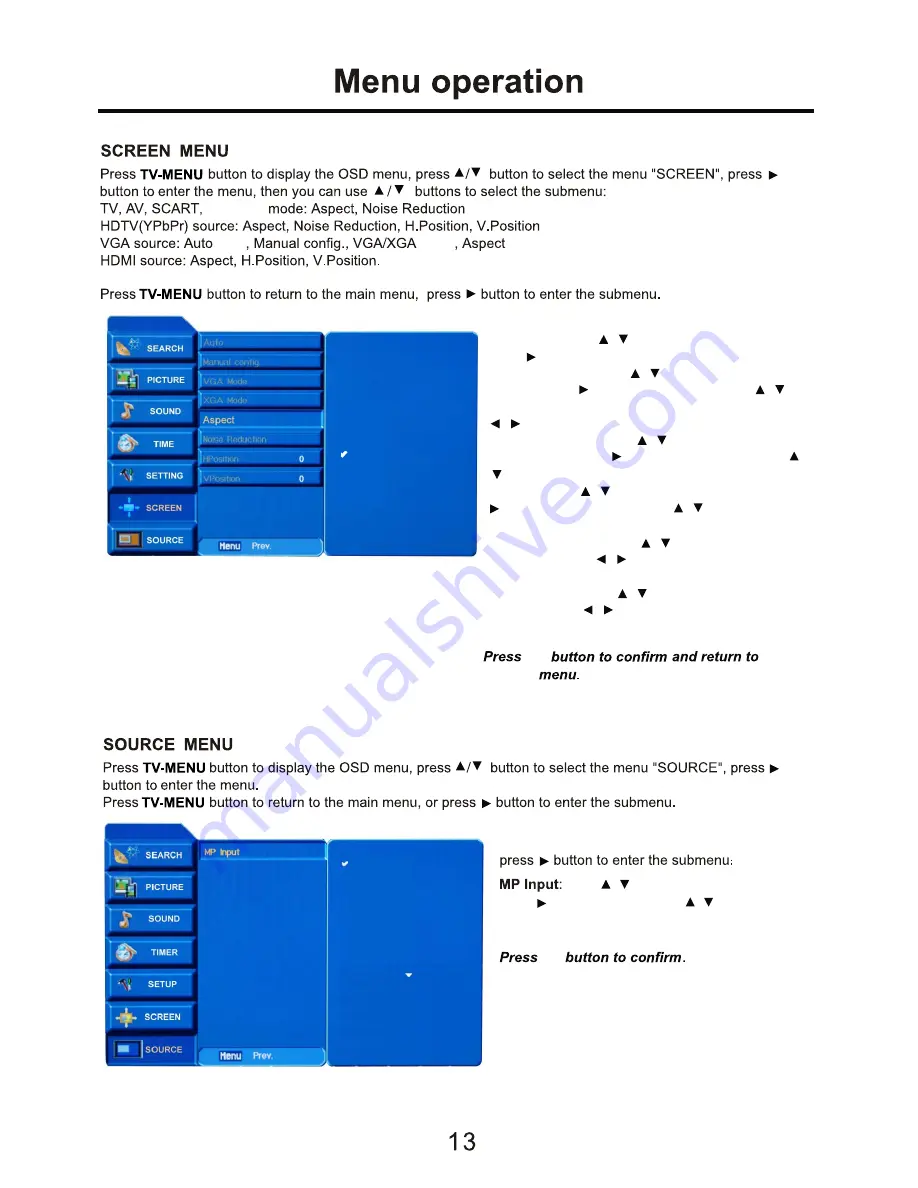
Auto sync:

 Press    /    button to select “Auto sync”

press      button to auto config.(in VGA source)

Manual config.

: Press    /    button to select “Manual

config.”, press     button to enter, and press    /
button to select 

Phase

,

Clock

,

H.Position

, press

     /     button to adjust.(in VGA source)

VGA/XGA mode

: Press    /    button to select “

VGA

/XGA mode

”, press     button to enter, and press    /

      button to select the definition.(in VGA source)

Aspect

: Press     /     button to select “Aspect”, press

      button to enter, and press     /     button to select
the ratio of the screen.

Noise Reduction

: Press    /    button to select “Noise

Reduction”, press    /     button to turn on/off the noise
reduction function.

H/V Position

: Press     /     button to select “H/V

Position”, press    /    button to adjust the picture’s
position.

press    button to enter, press    /    button to
select the input source.

OK

OK

sync

sync

mode

Auto

4:3

16:9

14:9

Zoom

Press   /    button to select “MP Input”,

TV

AV

DVD

SCART1

SCART2

S-Video

YPbPr

S-VIDEO

previous

Summary of Contents for ATLDVD3230W-HDID

Page 1: ...32 LCD TV COMBI WITH DVD DVB FREEVIEW Model No ATLDVD3230W HDID ...

Page 2: ......

Page 3: ...vironmental issues When leaving the Tv for long periods or overnight turn off the supply with the Mains switch do not leave in standby Do not leave in standby when leaving the house or the set un attended ...

Page 4: ...here they can be stepped on cut or damaged If the leads do become damaged please return to point of purchase for advice Do not drop or damage the TV If the casing becomes damaged it may cause a safety issue Do not open the case or Power adaptor you risk a severe electric shock injury or death Do not drop objects into the TV ventilation slots or DVD disc slot Should an object enter the TV return to...

Page 5: ...3 DVD operation DVB operation 14 20 System operation 18 24 25 26 ...

Page 6: ...100 240V 50 60Hz TV EXIT TV AV ...

Page 7: ...eject DVD disc 1 IR Infrared Receiver receives IR signals from the remote control Power on standby LED Indicator press POWER to turn on and off The effective range of the Remote control is more than 4 metres and 30º to the left or right and 20º above or below the receiver window Insert the disc with the mirror side facing towards you Power 2 1 Blue 1 2 ...

Page 8: ... S Video socket of DVD player or similar equipment video only 7 YpbPr Y Connect all to video output connectors of DVD or similar equipment Video only 8 VIDEO AV Connect to AV connector of DVD or similar equipment Video only 9 L R in Connect to audio output connectors of DVD or similar equipment when using S Video AV or YpbPr connectors 10 SCART 1 2 Connect to Scart connector of DVD or similar equi...

Page 9: ...eration DVB MENU To display the main menu on the screen or return to the screen from a menu screen PROG DVB program up down LANGUAGE To select audio language TV FORMAT To change the picture mode SUBTITLE To switch the dialog at the bottom of the screen TEXT To view the teletext broadcasting program INFO Means information to display brief information concerning the current channel you are viewing F...

Page 10: ...YPbPr MP Input TV AV MENU P P V V TV EXIT TV AV you can also use P V buttons on the TV set to operation the OSD MENU P V DVD DVB button ...

Page 11: ...stem 3UHVV WKH Ÿ źEXWWRQV WR VHOHFW 6RXQG 6 VWHP DQG SUHVV Ż Ź WR VHOHFW WKH FRUUHFW VRXQG V VWHP IRU RXU FRXQWU 6HOHFW IRU 8 Colour System 3UHVV WKH Ÿ źEXWWRQV WR VHOHFW RORXU System DQG SUHVV Ż Ź WR VHOHFW WKH FRUUHFW RORXU 6 VWHP 6HOHFW PAL for UK Freq LVSOD V WKH FXUUHQW FKDQQHO IUHTXHQF 0DQXDO 6HDUFK 3UHVV WKH Ÿ źEXWWRQV WR VHOHFW 0DQXDO 6HDUFK DQG SUHVVŻ Ź WR VHDUFK EDFNZDUGV DQG IRUZDUGV AF...

Page 12: ...OK OK OK OK Press button to select Program Edit press button the screen will display the Programme edit menu ...

Page 13: ... to select the menu OK OK OK OK Press button to select the menu press button to enter it sound Press button to select the menu Press button to select the menu press button to enter it previous previous previous previous ...

Page 14: ... Lock press button to enter To lock the keypad by pressing button to select off and it will be turned on by selecting On Blue Screen Press button to select the Blue Screen press button to enter turn on off the blue screen function by select On Off OSD Transparent Press button to select the OSD Transparent press button to adjust the OSD menu picture s transparent TTX Language Group Press button to ...

Page 15: ...ct the definition in VGA source Aspect Press button to select Aspect press button to enter and press button to select the ratio of the screen Noise Reduction Press button to select Noise Reduction press button to turn on off the noise reduction function H V Position Press button to select H V Position press button to adjust the picture s position press button to enter press button to select the in...

Page 16: ... also you can press numeric buttons to choose 4 The DVD player begins with the chapter 1 of the chosen title Sequence Play 1 Compatible with DVD SVCD VCD CD HD CD WMA Digital Audio disc JPEG discs 2 When a SVCD or VCD disc is loaded and PBC is on press the MENU button once switches the PBC off The player can now playback in sequence mode To turn the PBC back on press the MENU button again 3 Except...

Page 17: ... Slow button 7 times the player returns to normal play Freeze Frame 1 Compatible with DVD SVCD VCD CD HD CD WMA Digital Audio disc JPEG discs 2 During CD HD CD WMA or MP3 JPEG playback press Pause once to freeze playback Press the button again to resume normal playback Using the Repeat Feature 1 Compatible with DVD SVCD VCD CD HD CD WMA Digital Audio disc JPEG discs 2 While a disc is playing press...

Page 18: ...ying WMA Digital Audio disc JPEG discs Search Feature does not work Changing the Soundtrack or Language 1 Compatible with DVD SVCD VCD CD HD CD WMA Digital Audio disc JPEG discs 2 Press the LANGUAGE button to display current soundtrack a Press the button to switch soundtracks b Press the button again on the remote to turn to next soundtrack 3 When playing a SVCD or VCD disc there are five soundtra...

Page 19: ...display the contents on screen 3 The player will then start to play the first track of the selected directory 4 To change directories use the direction buttons Disc Care About Disc Terms Title Generally pictures or music compressed on a DVD are divided into several sections title Chapter The smaller section unit of picture or music in a DVD under the title usually one title is comprised of one or ...

Page 20: ...STEM SETUP The system setup options are illustrated below TV SYSTEM According to the Colour system of your TV normally this is set to either AUTO or PAL PASSWORD The password option is initialized as locked You cannot set the ratings limit or change the password To enable these features you must unlock the Password The default password is 0000 Using the button move the highlight to PASSWORD press ...

Page 21: ...lect this 3 AUDIO SETUP The audio setup options are illustrated below Highlight the AUDIO OUT option and press the Arrow buttons to choose the audio output mode you prefer Press OK to confirm There are 3 optional audio output modes SPDIF OFF SPDIF RAW and SPDIF PCM SPDIF RAW is for amplifiers with a built in digital decoder SPDIF PCM is selected for amplifiers with no built in digital decoder TONE...

Page 22: ... select the channel on the channel list then press the yellow button on the remote control to delete it Press button to select the channel on the channel list press the blue button on the remote control to lock it it will display a pin code menu on the screen as below the channel will be locked when you enter the correct pin code and press OK button The default pin code is 888888 you can change it...

Page 23: ...Search options Press button to select the search type manual scan or auto scan Manual Scan see picture left when you select Manual Scan press button to move to Channel No press button or numeric button to select the channel No press OK button to start Manual scan and press DVB MENU button to exit it Auto Scan see picture right when you select Auto Scan press OK button to start Auto scan and press ...

Page 24: ... Code EXIT DVB MENU 22 Use numeric buttons on the remote control to enter the pin code Enter the new code then enter again twice Press the OK button to confirm If the codes are incorrect the menu above will be shown again If the code is correct the display will revert to the System menu top of page Note If you change the Pin number please keep a note of this some where safe ...

Page 25: ...U Prog Prog 23 There are two upgrade modes Auto and Manual Use CH to select one NOT Recommended unless directed by the supplier Auto Mode 3UHVV HLWKHU Ż Ź WR VHOHFW 21 2 DQG WKHQ SUHVV 2 WR FRQILUP QWHU WKH VWDUW WLPH XVLQJ WKH QXPHULF EXWWRQV DQG 2 WR FRQILUP 7KH XSJUDGH WLPHV are posted on the website www dtg org uk Always keep the TV in standby when you think an upgrade is due the upgrade will ...

Page 26: ...ixels may fail This is normal as the screen ages or suffers a violent impact This is not a fault covered by warranty PC PC not connected correctly or turned on Check connections Display shows No Signal PC not set correctly for TV settings Enter the PC display setup section And set the PC correctly Picture Noisy or Jittering TV not adjusted to PC correctly Enter TV PC menu and select Auto see page ...

Page 27: ...25 32 1366 RGB x768 18 500 1200 1 Support to 1024x768 60Hz Support to 720p 1080i 100 240V 50 60Hz ...

Page 28: ...uring the base stand to the TV and slide the base stand out carefully Using the removed screws mount the VESA bracket and tighten the screws securely Fit the wall bracket securely following the manufacturers instruction The TV manufacturer accepts no responsibility for damage caused by faulty bracket installation 26 ...

Reviews: