background image

7. Menu Operation.

Programme Edit. (Analog) (Fig 15).
Delete “Red” 

Should it be necessary to Delete a station, use the cursors to


select 

the station to be deleted. Press the RED button, this will put a


RED marker next to 

the station to be deleted, press RED again and the station will be deleted, to exit 
delete press the Menu button. Note :-


Any deleted station is removed from the 

memory and must be retuned if required.

Rename. “Green”. 

To rename any channel, select the channel to be renamed 

using the cursor buttons. Press the GREEN button. Using the 

/

buttons, select 

the letter or digit to be changed, using the 

/

buttons change the latter to the 

required one.  When the renaming is complete, press Menu to exit.

Move “Yellow”. 

If one of the stations has been incorrectly placed in the station 

listing, you may move it to the correct position, i.e, BBC1, BBC2, ITV, Channel 4, 
Channel 5. Using the cursor select the channel to be moved, press Yellow, move 
the station to the new location and press OK, this will move the


station to the new 

location. To exit press LCD menu.

Skip “Blue”. 

You may wish to “Skip”


certain channels when using the CH+/CH-


buttons.  Use the cursor buttons to select the channel you wish to Skip. Press Blue 
and a Blue dot will be shown next to the channel selected. To remove the skip 
function, press the Blue button again.
When a channel has been selected to Skip, you still may select that channel with 
the numeric buttons. 

Fav

. To add channels to your Favourite library, use the cursor buttons to select the 

channel you wish to add. Press the FAV button. A “FAV”


logo will be shown at the 

side of the selected channel. To remove the channel from the Favourite library, 
simply press the FAV button again.

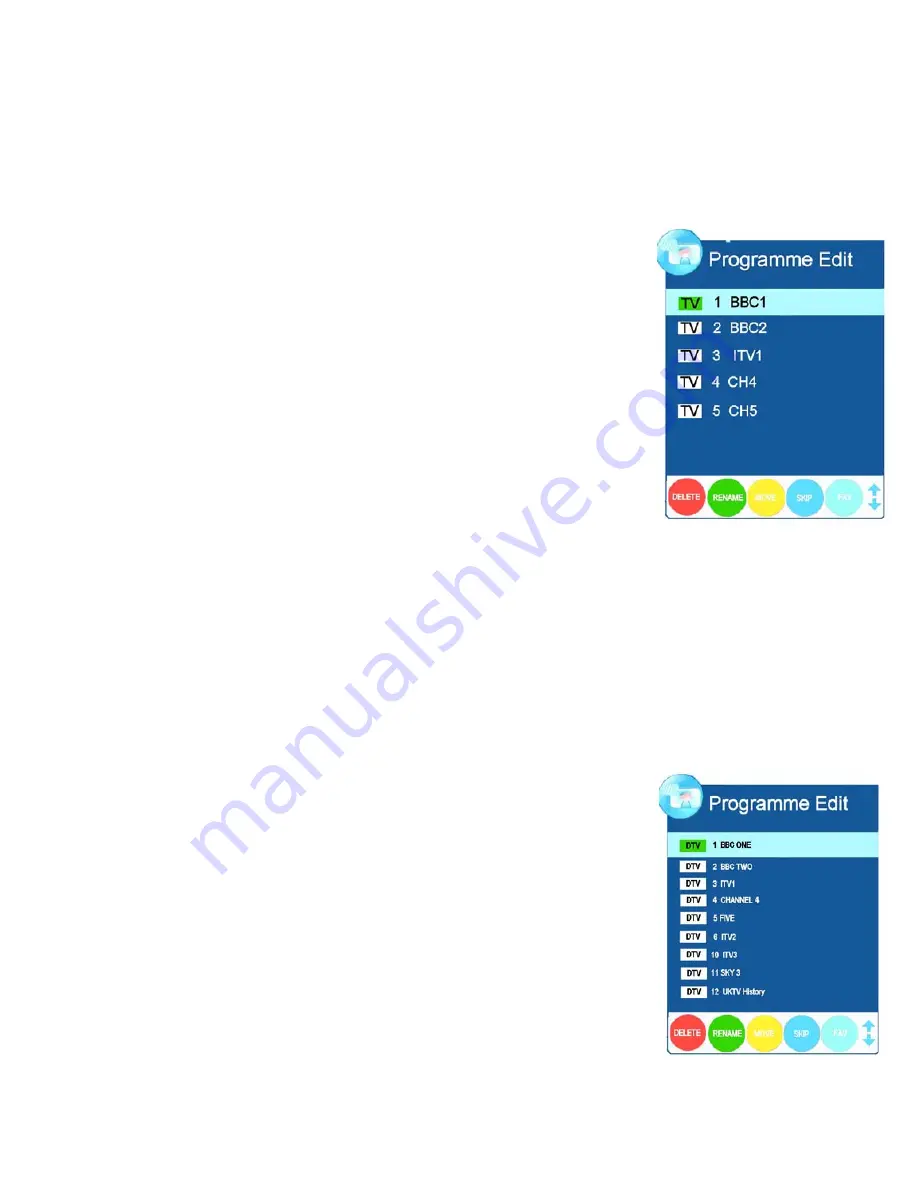
Programme Edit. (Digital) (Fig 16).
Delete “Red” 

Should it be necessary to Delete a station, use the cursors to


select 

the station to be deleted. Press the RED button, this will put a


RED marker next to 

the station to be deleted, press RED again and the station will be deleted, to exit 
delete press the Menu button. Note :-


Any deleted station is removed from the 

memory and must be retuned if required.

Move “Yellow”. 

If one of the stations has been incorrectly placed in the station 

listing, you may move it to the correct position, i.e, BBC1, BBC2, ITV, Channel 4, 
Channel 5. Using the cursor select the channel to be moved, press Yellow, move 
the station to the new location and press OK, this will move the


station to the new 

location. To exit press LCD Menu

Skip “Blue”. 

You may wish to “Skip”


certain channels when using the CH+/CH-


buttons.  Use the cursor buttons to select the channel you wish to Skip. Press Blue 
and a Blue dot will be shown next to the channel selected. To remove the skip 
function, press the Blue button again.
When a channel has been selected to Skip, you still may select that channel with 
the numeric buttons. 

Fig 15

Fig 16

13

Summary of Contents for APL2323W-HDID

Page 1: ...Model APL2323W HDID 23 58 cm Digital LCD TV with DVBt Freeview HDMI...

Page 2: ...h precision technology and 99 9 or more of the pixels are effective dots may appear These can be black or bright dots red green or blue and may appear constantly on the LCD screen This is a structural...

Page 3: ...tion 2 2 Safety Instructions 3 3 Accessories 4 4 User Controls 4 5 Remote Control 5 6 Connections 7 7 Menu Operation 9 8 Teletext 15 9 EPG Electronic Programme Guide 16 10 Wall mounting 16 11 Trouble...

Page 4: ...bin is intended to show that this appliance must not be placed with ordinary household waste at the end of its useful life To prevent possible harm to the environment or human health from uncontrolle...

Page 5: ...ces Do not allow water or other fluids to enter the TV Do not touch the Mains plug or adaptor with wet hands Should moisture enter the TV disconnect from the supply and call the customer help line Cle...

Page 6: ...nel selection by 1 with each press In menu mode will shift the selection downwards 4 CH Increases channel selection by 1 with each press In menu mode will shift the selection upwards 5 Menu Selects th...

Page 7: ...st text mode 2 INFO Displays TV settings and channel being viewed 4 MUTE Press to mute sound press again to restore sound 6 SLEEP Sets sleep timer sets from 3 hrs to 10 minutes 8 ZOOM Selects picture...

Page 8: ...use re chargeable batteries Remove batteries if not using the remote control for long periods to prevent leakage If the batteries do leak clean the compartment with soapy water and scrape any residue...

Page 9: ...nput from TV aerial or cable source 1 m V 75 typical CI SLOT Place a CAM Conditional Access Module into this point to allow a Pay per View card to be used HDMI Input CVBS Input IMPORTANT When making c...

Page 10: ...ortable listening Note Do NOT use headphones at high volume levels for prolonged periods SCART Disconnect TV from mains supply Connect scart lead to TV and appliance Connect adaptor to TV and power to...

Page 11: ...ower right corner above the switch Press either the Standby button on the remote control or the Power button on the TV Top of TV The led will now turn Green and the screen will light up after approx 5...

Page 12: ...icture brightness Colour Adjusts the colour saturation colour depth Sharpness Adjusts the clarity of the picture If the signal is noisy analog then this setting should be reduced to mask the noise Tin...

Page 13: ...MT 1 in summer Setup Fig 9 Language English only available Country UK This is set in the Tuning Menu Auto Tuning Hearing Impaired Digital TV only Sets Subtitles when transmitted Restore Factory Defaul...

Page 14: ...ing see next DTV Manual Tuning Fig 13 It may be necessary to add more digital channels as they are provided by the programme providers or manually tune stations for reasons above Select DTV Manual Tun...

Page 15: ...ain When a channel has been selected to Skip you still may select that channel with the numeric buttons Fav To add channels to your Favourite library use the cursor buttons to select the channel you w...

Page 16: ...ule away from the TV Reconnect the TV and switch on Select DTV Insert your Pay per view card Do NOT touch the gold contacts Press the LCD Menu button and select TV Setting menu Select CI Information a...

Page 17: ...size REVEAL Press to reveal hidden answers in quizzes or puzzles SUBPAGE Some text pages may contain several sub pages To access these press this button and then enter the page number using the numeri...

Page 18: ...ess the Yellow button and use the buttons to increment the date Some boxes may be blank the data may not available To exit the EPG press the EPG button again Fig 22 16 10 Wall Mounting To mount the TV...

Page 19: ...erial not connected Ensure aerial is connected TV not tuned in Follow instructions on page 11 12 TV Picture noisy and ghosting Analog Poor aerial signal Have aerial signal checked If indoor aerial it...

Page 20: ...gle V 160 H 160 Colour Systems PAL SECAM Sound Systems BG I DK L Audio Output 2 W per channel Tuning Analog Band 1 Band 3 UHF Digital UHF Inputs Scart HDMI VGA CVBS S Video L R audio PC Audio Outputs...

Page 21: ...ired in accordance with the diagram as in Fig 24 The Brown wire Live should be connected to the terminal L The Blue wire Neutral should be connected to the terminal N The Green Yellow wire Earth shoul...

Reviews: