background image

8. Menu Operation.

Fig 8

Fig 10

Fig 9

12

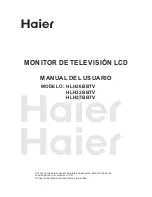
Program Edit. DTV. Fig 8

In this menu you may perform four functions. Skip, Lock, Favourite and 
Delete.

Skip.

Use the 

/

buttons to select which stations you wish to skip. 

Press the “Blue” button. An indicator will be placed in the Skip column. 
To remove, select again and press the Blue button. The Skip function 
only stops selection of the selected station when using the CH+/CH-
buttons. Direct number entry works normally.

Lock.

Displays which stations have been locked. To change status you 

must see page 17.

FAV. 

To add stations to a “Favourite” list, use the 

/

buttons to 

select which stations you wish to add. Press the “FAV” button on the 
R/C. To un select press the FAV button again.

Delete.

To remove any station from the listing, use the 

/

buttons to 

select which stations you wish to delete and press the RED button. If a 
mistake has been made, you must select AutoScan to re install all the 
stations.

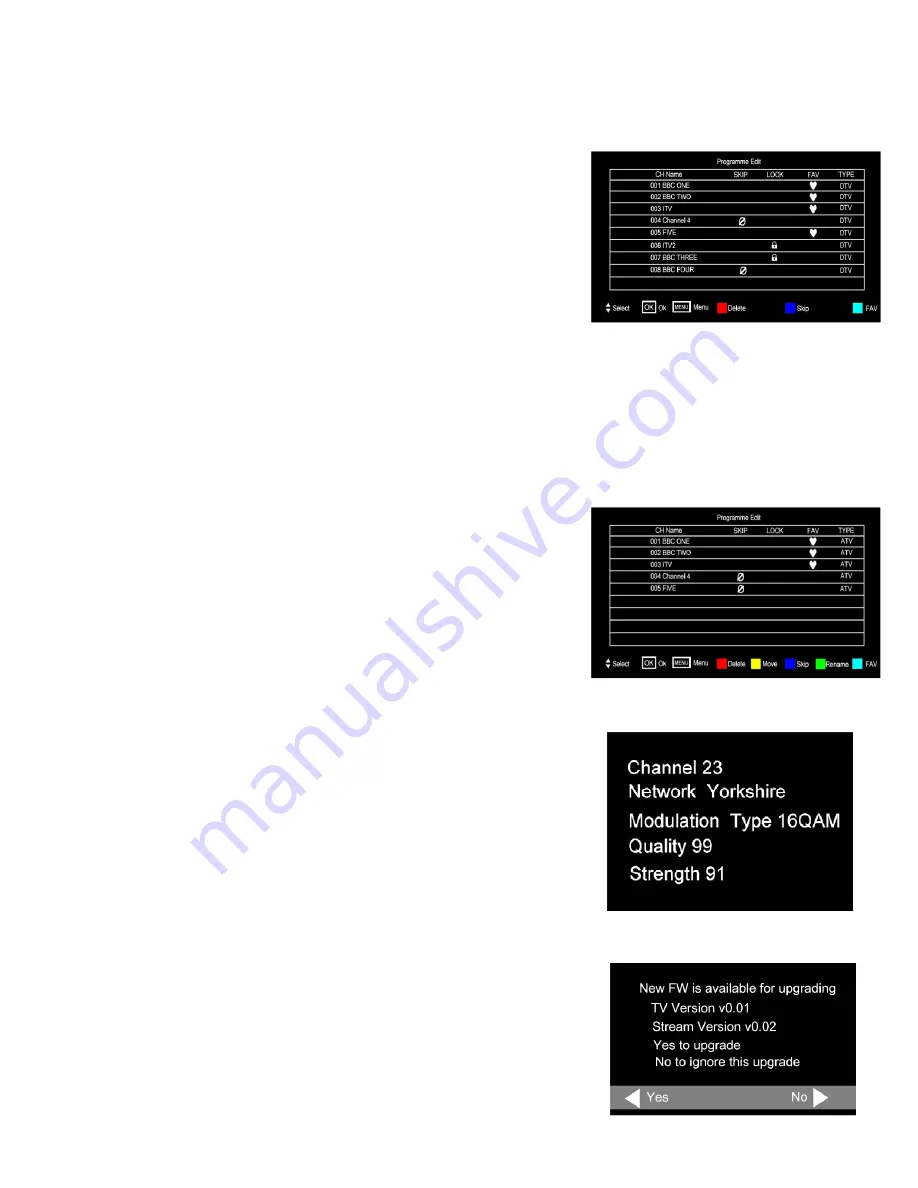
Program Edit. ATV. Fig 9

In this menu you may perform six functions. Skip, Lock, Favourite, Delete, 
Move and Rename

Skip. See above.
Lock.

Displays which stations have been locked. To change status you 

must see page 17.

FAV. See above.
Delete. See above.
Move. 

When “Auto Tuning” in Analog mode, it is possible that the stations 

may not be in the correct order. To move any stations, use the 

/

buttons to select the station. Press the YELLOW button. The line will 
“widen” to show it has been selected. Use the 

/

buttons to select the 

new location and press “OK”. The station will now be in the new location.

Rename

. It is possible to rename any station in Analog mode. Use the 

/

buttons to select the station. Press the GREEN button. The Station 

name text will be highlighted. Use the 

/

buttons to change the letter 

highlighted, a full letter/numeric alphabet is available. To select the next 
letter or digit use the 

/

buttons.  To confirm the change press “OK” 

Signal Information. 

Select using the 

/

buttons. A typical display is 

seen opposite “Fig 10”.
This is for information only and cannot be changed.

13

Software Upgrade OAD. 

This is set to “ON” as default. If an upgrade 

signal is received, you will see a message as in Fig 10A. Select Yes to 
upgrade and No to decline the upgrade. If Yes is selected the TV will 
automatically upgrade the firmware.

Fig 10a

Summary of Contents for APL1668U

Page 1: ...APL1668U MSD306 Digital LCD TV Customer Help Line 0845 293 7698 Website www ekey co uk With Freeview HDMI PVR Record via USB Memory stick or Hard drive not supplied...

Page 2: ...stallation 10 Tuning 11 Firmware upgrade 12 Cam Module 13 Recording 14 Picture menu 15 Sound Menu 16 Time Menu 16 Option Menu 17 Lock Menu 17 9 EPG Electronic Programme Guide 18 10 Digital Radio 18 11...

Page 3: ...reuse of material resources Household users should contact either the retailer where you purchased the product or their local government office for details of where and how you can take this item for...

Page 4: ...ompletely digital TV region by TV region To continue using this digital TV during and following the digital switchover you will need to reset your digital TV channels Users of this digital TV must res...

Page 5: ...2 Vol Reduces Volume level 3 Vol Increases Volume level 4 CH Reduces channel selection by 1 with each press 5 CH Increases channel selection by 1 with each press 6 Menu Selects the MENU function If in...

Page 6: ...nd 4 INFO Displays TV settings and channel being viewed 6 ASPECT Selects different picture size modes 8 NICAM In Analog TV mode switches between Mono and Nicam In DVBt mode selects different soundtrac...

Page 7: ...an the compartment with soapy water and scrape any residue from the contacts To NOT touch or ingest battery residue Should you swallow chemicals leaked from a battery please URGENTLY consult a medical...

Page 8: ...ains adaptor Connect CVBS and Audio L R if required Apply power to TV and source Use SOURCE INPUT button to select AV HEADPHONES Stereo output to headphones only TV TUNER RF input from TV aerial or ca...

Page 9: ...tor to TV and power to appliance Use SOURCE INPUT to select SCART In some circumstances the TV will automatically select scart when the appliance is used 8 Antenna or cable Y Pb Pr Disconnect TV from...

Page 10: ...rrectly If using the TV for DVBt Freeview viewing the existing aerial may not be suitable Indoor aerials set top may not be suitable for some of the received stations If stations are missing freeze or...

Page 11: ...select your country of choice TUNE TYPE In the UK select DTV default If in an area that still has Analog TV select ATV DTV When the selections have been made press OK and Fig 2 will be displayed The T...

Page 12: ...the number of stations received on that channel Note In certain areas where two Digital TV areas overlap e g Wales the stronger signal may take priority In this case Manual Tuning is essential ATV Ma...

Page 13: ...Move and Rename Skip See above Lock Displays which stations have been locked To change status you must see page 17 FAV See above Delete See above Move When Auto Tuning in Analog mode it is possible t...

Page 14: ...the module away from the TV Reconnect the TV and switch on Select DTV Insert your Pay per view card Do NOT touch the gold contacts Press the LCD Menu button and select DTV Setting menu Select CI Infor...

Page 15: ...rding using the menu in Fig 16 Use the buttons to select each function Use the buttons to select the changes required You may set more than one Timer Recording however you must ensure the times do NOT...

Page 16: ...reen and Blue settings individually Aspect Ratio There are up to seven settings depending upon the input mode chosen 16 9 Normal format for general viewing Zoom 1 magnifies the picture Zoom 2 increase...

Page 17: ...to turn off the TV at a pre determined time Especially useful for children s bedrooms Select using the buttons to adjust use the buttons Repeat Select from Once Everyday Mon Fri Mon Sat Sat Sun Sunday...

Page 18: ...o Tuning menu Restore Factory Defaults Should you get all the settings incorrect select this item When selected press OK All the TV settings will revert to Factory default settings Note Tuning memory...

Page 19: ...ou wish to view later This can be on any channel When the time is due to view the programme a Popup will appear on the screen warning you that it is about to start You may then select Yes or No to vie...

Page 20: ...AL Press to reveal hidden answers in quizzes or puzzles SUBPAGE Some text pages may contain several sub pages To access these press this button and then enter the page number using the numeric buttons...

Page 21: ...responsiblity for any data lost from any media device plugged into this TV under ANY circumstances Formatting the media Plug in the selected media storage module select Menu and using the buttons sel...

Page 22: ...t To see a list of scheduled programmes on your record list press the YELLOW button on the R C You may have as many programmes scheduled as you want but none must Over lap Should you try to set a prog...

Page 23: ...at section until the Stop button is pressed normal play will then resume FB Fast Rewind FF Fast Forward Prev Plays previous segment Next Plays next segment Pause select to pause playback and press OK...

Page 24: ...milar to Fig 46 will be seen To remove any file from the play list press the YELLOW button To remove all the files press the GREEN button To repeat any or all of the tracks select REPEAT using the but...

Page 25: ...ess the SOURCE button and select TEXT a display as in Fig 50 will be shown To select Text use the button Press OK and Fig 51 will be displayed Press OK again and Fig 52 will be displayed Use the butto...

Page 26: ...g or breaking up Poor aerial signal Have aerial signal checked If indoor aerial it may need an outdoor aerial Digital Signals missing Poor aerial signal Have aerial signal checked If indoor aerial it...

Page 27: ...GA CVBS L R audio PC Audio Y Pb Pr S Video Outputs Scart Headphones OSD Language English Audio Nicam stereo Mono Analog Wall Mounting Vesa Standard 75 x 75mm Remote Control Infra Red Default code 7948...

Page 28: ...Contact details Akura Limited Spectra House Spring Villa Park Spring Villa Road Edgeware HA8 7EB Tel 02089514323 Email enquiries akura com...

Reviews: