background image

9. Menu Operation. Digital

Fig 13

Fig 12

Fig 14

Fig 16

13

Fig 15

Digital Installation.

Should you move to another location you may need to re install the DTV 
channels. Select Installation and you will see the menu as in FIG 1.
A full retuning will now take place.

DTV Auto Tuning. (Fig 12)

After initial installation it may be necessary to re install all the stations 
especially if new stations have been added. Select DTV SOURCE. Press 
LCD MENU and select DTV Tuning menu. Select Auto Tuning and press 

. The sub menu (Fig 13) will be shown. Select YES using the 

/

buttons and press OK. The search tuning will now start and a display will 
show progress (Fig 14).
When tuning is complete the TV will display the first channel (BBC1) in 
DVBt mode. All received channels will be stored.
If using in another country, select COUNTRY using the 

/

buttons and 

select the country using the 

/

buttons.

DTV Manual Search. (Fig 15).

It may be necessary to add more digital channels as they are provided 
by the programme providers or manually tune stations for reasons 
(above).
Select DTV Manual Tuning and press Ok. Using the 

/

buttons select 

the 

Channel Name

of the multiplex (channel) required. The correct 

channel numbers are available from the website 

www.dtg.org.uk

, and 

select “Transmitters”. If you do not know which region you are in, go to 
website 

www.digitaluk.co.uk

and Insert your postcode, you will then be 

shown which region you are in. 
At the bottom of the menu you will see a bar scale showing the quality of 
the signals on that channel. Press OK to start the search.   When 
complete the menu will display the number of TV and Radio stations 
received, and then return to BBC1. (See Fig 14).
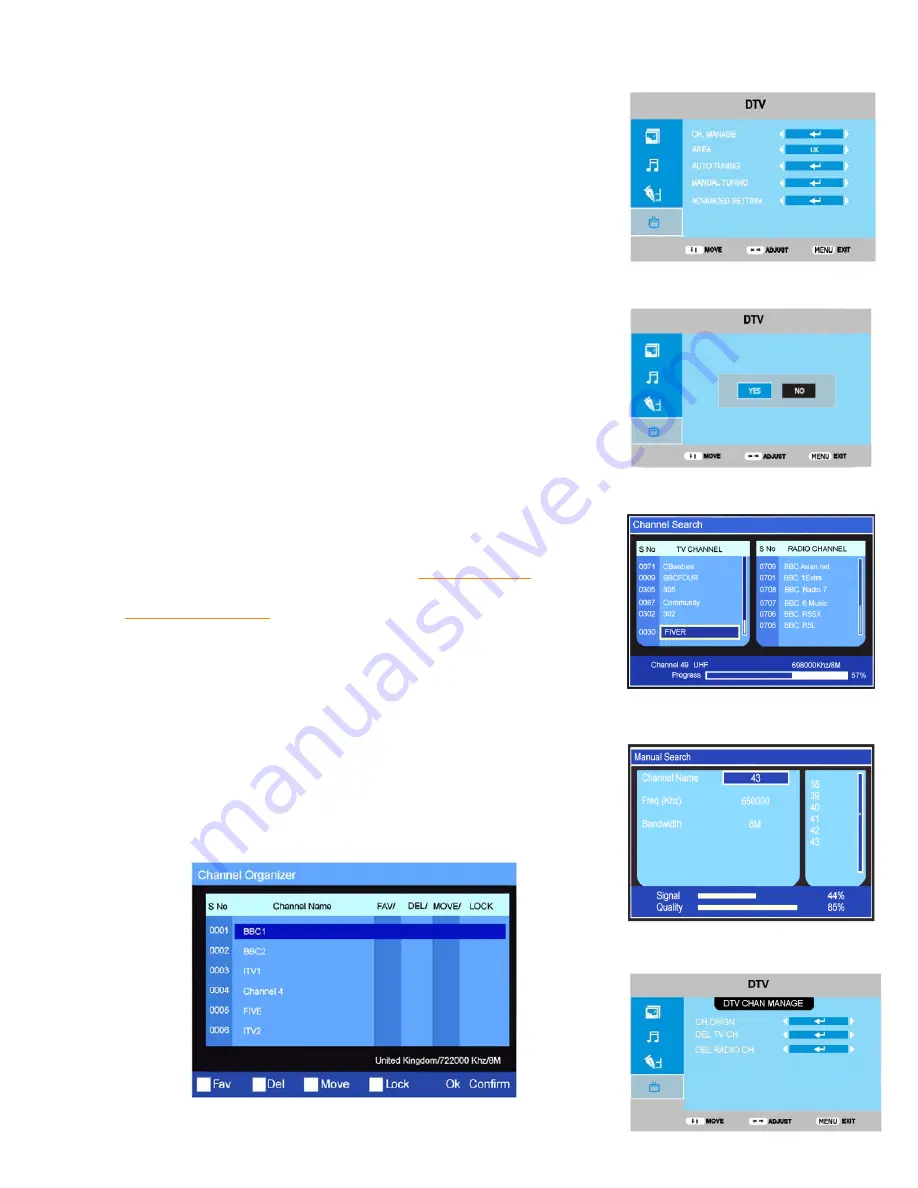
CH MANAGE

.

Enter the 

DTV

menu (Fig 12) , select 

CH Manage, 

and press OK

“A sub menu (Fig 16) will be displayed”.
Select “

CH ORGN

” to enter the Channel Organizer menu Fig 17 

Fig 17

Summary of Contents for ALED2411E FDU

Page 1: ...2411E FDU Super Slim Digital LED TV Incorporating Led Backlight Technology Customer Help Line 0845 293 7698 Website www ekey co uk With DVBt Freeview HDMI PVR USB Record via USB memory stick not suppl...

Page 2: ...nnections 7 8 Menu Operation General 9 9 Menu Operation Digital 13 10 Menu Operation Analog 15 11 EPG Electronic Programme Guide Digital only 17 12 Cam Module 18 13 Teletext Analog 19 14 Teletext Digi...

Page 3: ...in is intended to show that this appliance must not be placed with ordinary household waste at the end of its useful life To prevent possible harm to the environment or human health from uncontrolled...

Page 4: ...dilute mild detergent Do NOT use petrol based fluids or abrasive materials LCD Screen Do not hit or cause impact to the LCD screen The screen consists of many individual pixels and is easily damaged B...

Page 5: ...evel of menu 4 CH Increases channel selection by 1 with each press In menu mode will shift the selection upwards 5 CH Reduces channel selection by 1 with each press In menu mode will shift the selecti...

Page 6: ...in to restore sound 4 INFO Displays TV settings and channel being viewed 6 ASPECT Selects different picture size modes 8 NICAM In Analog TV mode switches between Mono and Nicam In DVBt mode selects di...

Page 7: ...ean the compartment with soapy water and scrape any residue from the contacts To NOT touch or ingest battery residue Should you swallow chemicals leaked from a battery please URGENTLY consult a medica...

Page 8: ...ource 1 m V 75 typical CI SLOT Place a CAM Conditional Access Module into this point to allow a Pay per View card to be used HEADPHONES Stereo outputs to headphones only CVBS Input IMPORTANT When maki...

Page 9: ...button to select HDMI Headphones Plug in headphones Re connect adaptor Turn on TV Set volume level for comfortable listening Note Do NOT use headphones at high volume levels for prolonged periods SCAR...

Page 10: ...g correctly If using the TV for DVBt Freeview viewing the existing aerial may not be suitable Indoor aerials set top may not be suitable for some of the received stations If stations are missing freez...

Page 11: ...lect a language of your choice Note Language may also be selected in the Function Menu When YES has been selected Fig 2 will be displayed showing that the Analog TV channels are being searched When se...

Page 12: ...ess Adjusts the overall picture brightness Contrast Adjusts the ratio of dark to light Colour Adjusts the colour saturation colour depth Sharpness Adjusts the clarity of the picture If the signal is n...

Page 13: ...menu is displayed on the screen it can be set from Never 5 10 30 60 Seconds Never is OSD ON continuously until it is turned off using the Menu or Exit buttons on the Remote Control Blue Screen This ca...

Page 14: ...using the buttons and select the country using the buttons DTV Manual Search Fig 15 It may be necessary to add more digital channels as they are provided by the programme providers or manually tune st...

Page 15: ...elect the station using the buttons A box requesting the PASSWORD will be shown Enter the password A Blue Lock symbol will now be shown in the LOCK column You may also add the lock feature to any loca...

Page 16: ...you chose YES all the RADIO channels will be deleted You must then see page 13 to re install the RADIO stations Fig 20 10 Menu Operation Analog ATV Auto Tuning Fig 21 After initial installation it may...

Page 17: ...rn Europe except France PAL is used In Eastern Europe and France SECAM is used Note SECAM can only be selected when the Country is set to a non UK setting AFT Automatically turned ON when the menu s a...

Page 18: ...or EXIT to exit the full menu Fig 26 Fig 27 Fig 28 17 11 EPG Electronic Programme Guide DVBt only An Electronic Programme Guide EPG is provided by the programme providers To access this press the EPG...

Page 19: ...card Do NOT touch the gold contacts Press the LCD Menu button and select DTV Setting menu Select CI Information and press If everything is working ok you will see Fig 31 press OK If things are working...

Page 20: ...e number using the numeric buttons Press again to exit the feature COLOUR BUTTONS Red Green Yellow Blue are used as fast access buttons to pages of text which are highlighted at the bottom of each tex...

Page 21: ...buttons to select MEDIA and press OK Fig 37 will be displayed Use the buttons to select the required medium and press Ok Fig 38 will be displayed This shows the Media is connected and operational Pre...

Page 22: ...e will be displayed for approximately 3 seconds to pause the slide show press the Pause Play button To resume press the button again Fig 44 Recording There are Four ways of recording TV programmes Tim...

Page 23: ...t Set Timers and press OK Fig 46 will be displayed Use the buttons to select the various features and to enter Sub menu s Timer No You may set up to 8 timer settings you may NOT have more than one set...

Page 24: ...evice is connected and working select Device List SET TIMERS This is covered on page 22 TIMESHIFT START This is covered on page 21 17 Wall Mounting To mount the TV on a wall you need to purchase a bra...

Page 25: ...ge English Audio Nicam stereo Mono Analog Wall Mounting Adjustable 100mm x 100 mm M4 x 10mm Remote Control Infra Red Remote Control batteries 2 x AAA cells TV Master Password 8888 18 Specifications Te...

Page 26: ...aerial signal checked If indoor aerial it may need an outdoor aerial Bright dots or Dark dots Pixel damage This is not uncommon It is not covered by warranty Lost password 8888 PC OPERATION No picture...

Reviews: