background image


If it is in PBC ON status, using program playback 
will turn to PBC OFF automatically. 
According to the highlight area input the title and 
chapter number by numeric buttons, press PLAY 
button to start; or move to the <PLAY> by 
navigation buttons, press ENTER button to start. 
(Program up to 16 tracks) 
While playing the program, you may press  the 
PROGRAM button to display the program menu for 
editing. 
To clear the program by moving to <CLEAR> and 
press ENTER button. Or press STOP button to 
end the program. When you press the PLAY button 
again, the disc will play in sequence. 
While playing the program, there will be an on screen 
indication “PRG PLAY” and the current title and 
chapter number. 


                                                                     Page 15 

2. Title Playback 

(For DVD Disc only) 

• 

Press TITLE button , there will be an on screen 

indication “TITLE”. 

• 

Press the direction or numeric buttons to select your 

favorite title. 

• 

Then it will play from the first chapter of the selected 

title. 

3. Sequential Playback 

(For DVD, Super VCD, VCD, CD, CD-

G, HD-CD, Digital Audio/JPEG discs, DMP and USB) 

For Super VCD & VCD discs, if PBC is “ON” status, 
press PLAY button will enter the disc 
menu. Press MENU button to turn PBC OFF. Press 
PLAY button to start in sequent. 
For Others, while it stopped, press PLAY button to start 
in sequent. 

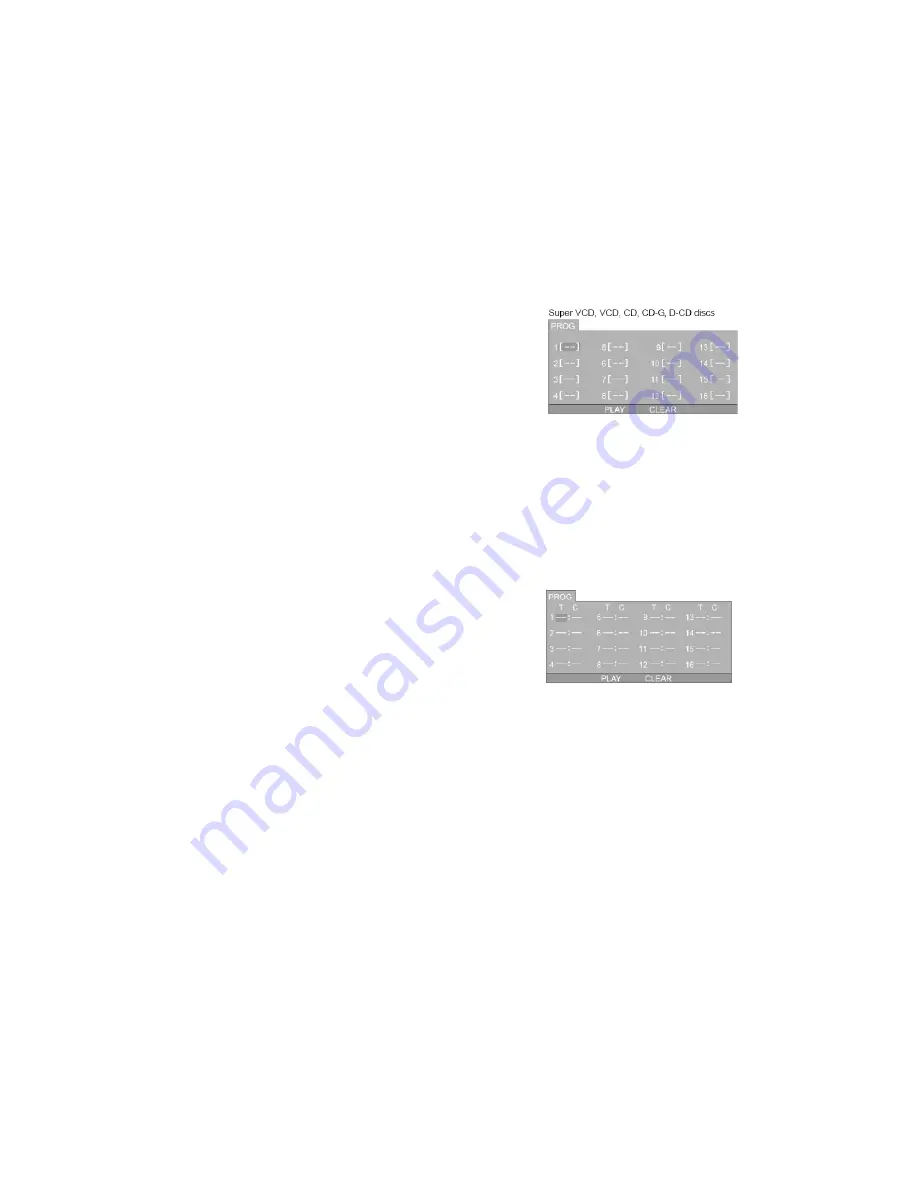
4. Program Playback 

(For DVD, Super VCD, VCD, CD, CD-G, HD-CD, Digital Audio/JPEG discs, DMP 

and USB) 

Using Program playback, you can select up to 16  tracks from the disc to playback in 
programmed order. 

OSD for Program playback 

DVD, Digital Audio / JPEG discs 

Summary of Contents for AHLTV15DVD

Page 1: ...AHLTV15DVD Instruction Manual LCD TV DVD Combo Customer Help Line 01422 263313 www ekey co uk 24Hr Opening hours Mon Fri 8 am 8pm Sat 9 am 4pm Sun 11am 4pm Bank holidays as Sun...

Page 2: ...ricity bill by a significant amount Before connecting the LCD DVD TV and turning the power on please read this book carefully Please keep this book for later use If you loose use of the function butto...

Page 3: ...trolled waste disposal please keep separate from other household waste and recycle it responsibly to promote the sustainable reuse of material resources Household users should contact either the retai...

Page 4: ...not use wet hands to remove the mains adaptor plug Do not pull the DC wire to remove the plug from the power socket Lightning During a thunderstorm or when leaving the appliance for long periods such...

Page 5: ...CVBS Audio inputs 7 Coaxial Audio output 8 2 x 3W internal speakers 9 Plays DVD CD Digital Audio WAV VCD discs 1 Control Panel Illustration TV Control Panel Functions 1 INPUT Select the input signals...

Page 6: ...Page 5 5 Remote Control...

Page 7: ...ical leakage which will corrode the Remote Control Unit or cause the batteries to burst Do NOT leave batteries in the remote control if not used for long periods 1 Always replace both batteries 2 Do n...

Page 8: ...that supports S Video 75 aerial input connect aerial lead here to receive cable aerial signals TV input signal 1 Antenna 75 aerial input 2 DC 12V power input Connection steps Make sure that the power...

Page 9: ...VD TV and the AV device are off Connect a Composite video cable supplied to the yellow composite video connector input on the back of the LCD DVD TV Now insert the other end of the composite cable int...

Page 10: ...D TV is turned on the input mode is displayed on the screen When the LCD DVD TV is turned off using the STANDBY button the LCD DVD TV will go into standby mode and the indicator light turns red To tot...

Page 11: ...s of the LCD DVD TV in the menu system Please read the following descriptions to get an understanding of each adjustable parameter 1 Channel Change the TV channel 2 System Select the TV standard Selec...

Page 12: ...e picture the image becomes higher as the number increases 3 Colour setting Select between 9300k 6500k user define 4 Auto config Use this to Automatically adjust most PC s to the monitor parameters 5...

Page 13: ...Tv will now place BBC1 into location 1 however the Tv will now display what was inI the OLD location 9 Press the f button again to return to the SWAP menu and continue until all the programmes are in...

Page 14: ...ss again to release PGDN PGUP Use these buttons to select the previous or next text page Index Selects the Index page usually page 100 Size This allows you to enlarge the Teletext page Press once to s...

Page 15: ...k For DVD Super VCD and VCD2 0 discs 1 Press MENU button For DVD discs the screen will display the DVD Disc Menu Root Menu For Super VCD VCD2 0 discs the screen will display the Super VCD VCD2 0 Disc...

Page 16: ...he current title and chapter number Page 15 2 Title Playback For DVD Disc only Press TITLE button there will be an on screen indication TITLE Press the direction or numeric buttons to select your favo...

Page 17: ...track is the first one pressing the PREVIOUS button will stop the playback If the current track is the last one pressing the NEXT button will stop the playback For DVD discs the above functions may v...

Page 18: ...repeat playback There are 3 repeat modes press REPEAT to toggle between different modes in sequent REPEAT OFF REPEAT 1 REPEAT DIR REPEAT ALL 7 Display For DVD Super VCD VCD CD CD G HD CD Digital Audi...

Page 19: ...hile playing the discs you may also press INTRO button to activate this function Note if the current track started over 15 sec this function will start from next track 10 Audio For Super VCD VCD CD CD...

Page 20: ...cation REPEAT A In normal Playback fast forward or fast reverse press A B button again at where you want to stop the repeat portion There will have an on screen indication REPEAT A B The repeat functi...

Page 21: ...left corner Start from upper right corner Merge from left right Horizontal blades Vertical blades Merge form 4 corners Random Playback Slide effect OFF When in play or pause with picture playback you...

Page 22: ...UP then press ENTER button to exit Note In Setup mode the following functions will be cancel or pause TITLE SUB TITLE DISPLAY PLAY SETUP STOP SLOW STEP NICAM AUDIO FF FR PREV NEXT GOTO ZOOM ANGLE PROG...

Page 23: ...ratio Password The default setting is locked No Rating selection or change password can be done To edit the Rating setting please enter default password 0000 with the numeric buttons then press ENTER...

Page 24: ...con press ENTER button to confirm There are 6 languages for you selection press buttons to toggle between different languages ENGLISH GERMAN SPANISH FRENCH PORTUGUESE ITLAIAN Press ENTER button to con...

Page 25: ...on press buttons to toggle between different languages ENGLISH GERMAN SPANISH FRENCH PORTUGESE ITALIAN LATIN and OFF Press ENTER button to confirm Note If the selected language is not included in you...

Page 26: ...axial input to your audio amplifier playing back the discs with Dolby or MPEG contents the coaxial output is the original signal to your amplifier Your Amplifier must have the corresponding decoding f...

Page 27: ...You can select four different audio outputs STEREO MONO L MONO R MIX MONO Page 26...

Page 28: ...Page 27...

Page 29: ...elect Auto Config No Sound or loud sound buzz in TV mode Incorrect sound system selected Enter the TV setup menu and select SYSTEM this should be set to I for Uk use DVD Operation Disc not entering pl...

Page 30: ...12V DC 2 5A Power supply AC Input 100 250V AC 50 60 Hz Output 12V DC 3A Audio Output 2 X 3 watts Remote Control Infra Red transmitter Range 3 metres Angle 30 deg Display Display 15 4 FTF LCD 5 25 Vie...

Reviews: