4
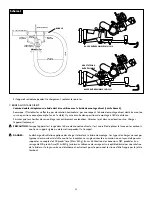
Figure 4
OPERATING INSTRUCTIONS
A .. FLOWING.WATER
.
Slowly.charge.the.hose.line.with.water ..Build.pressure.until.the.gauge.reads.the.rated.tip.pressure ..A.minimum.
operating.pressure.of.70.psi.is.required ..
.
NOTE: The unit will discharge some water from the oscillation mechanism during use.
B .. CHANGING.SWEEP.RANGE
.
1 .. Before.adjusting.the.sweep.range,.stop.the.oscillation.by.depressing.the.oscillation.ON/OFF.knob ..
.
2 .. Move.the.travel.control.knobs.to.desired.position ..The.left.knob.controls.the.right.travel.and.the.right.knob..
.
.
controls.the.left.travel ..(See.Figure.4)
.
3 .. Restart.oscillation.by.gently.pulling.oscillation.ON/OFF.knob.out .
C .. TO.STOP.UNIT.IN.PLACE.AND.USE.AS.A.NON-OSCILLATING.MONITOR
.
Depress.the.oscillation.ON/OFF.knob.when.the.nozzle.reaches.desired.position .
D .. TO.CHANGE.THE.ELEVATION.POSITION
1 .. Before.adjusting.the.elevation,.STOP.the.oscillating.motion.by.pushing.in.on.the.oscillation.ON/OFF.knob .
2 .. Loosen.the.elevation.brake.knob.and.adjust.the.elevation.to.desired.position ..(See.Figure.4).Once.position.is.
reached,.tighten.the.elevation.brake.knob .
.
3 .. Restart.oscillation.by.gently.pulling.oscillation.ON/OFF.knob.out .
E .. AFTER.SHUTDOWN
1 ..
Remove.hose .
2 ..
Tilt.the.unit.and.drain.as.much.water.as.possible.from.the.body.of.the.unit .
3 ..
Move.the.discharge.outlet.back.and.forth.by.hand.to.drain.as.much.additional.water.as.possible.from.the.unit ..
This.minimizes.the.possibility.of.corrosion.and.freezing .
4 ..
If.the.unit.was.used.for.foam.application,.with.salt.water.or.with.blackish.or.dirty.water,.be.sure.to.operate.with.
clean.water.for.at.least.5.minutes.after.shut.down .
WA
RN
ING
DUAL.INLET/.FLANGE.
ADAPTER
OSCILLATING.ON/OFF.KNOB
ELEVATION.BRAKE.KNOB
CONTROL.KNOBS
Summary of Contents for OZZIEMASTER 922
Page 2: ......


