


en
gl
is
h
6
5
cdj-mp100
cdj-mp100
cdj-mp100
PART NAMES AND FUNCTIONS
AVISOS SEGURIDAD
1. Lea detenidamente este manual antes de utilizar su equipo.
2. Mantenga el manual a su disposición para su uso en el futuro.
3. Siga las advertencias que se le proporcionan en este manual.
4. Siga las instrucciones consignadas en este manual, un uso indebido
podría dejar sin efecto la garantía.
5. Agua y humedad. No utilice el equipo cerca del agua o en lugares
muy húmedos (fregadero, lavadora, etc.) para evitar riesgos de
descarga eléctrica o fuego.
6.Transporte del equipo. Transporte el equipo con mucho cuidado.
Los golpes o las vibraciones fuertes pueden dañarlo mecánicamente.
7. Montaje en pared o techo. Siga las instrucciones del fabricante.
8. Fuentes de calor. Tenga cuidado de no colocar el equipo cerca de
fuentes de calor (Ej. radiadores, estufas, amplificadores)
10. Protección del cable. Escoja una posición para el cable de
corriente de modo que esté lo menos expuesto a pisotones y demás
agresiones. Especial atención con los dos extremos del cable de toma
de corriente, la clavija de enchufe a la red y la clavija de alimentación
del equipo.
11. Limpieza. Desconecte el equipo antes de realizar alguna
operación de limpieza del aparato. Utilice un trapo suave y seco para
limpiar. Asegúrese de que los cables están correctamente conectados
antes de volver a enchufar el aparato.
12. Control de seguridad. La diferencia de potencial entre la toma de
corriente de la pared y cualquier pieza metálica del equipo debe ser de
al menos 100.000 ohmios.
13. Periodos largos de reposo del equipo. Desconecte el equipo de la
red en caso de reposo prolongado.
14. Líquidos y objetos extraños. En caso de que algún fluido o
pequeñas partículas sólidas sean derramadas sobre el aparato y se
introduzcan en los circuitos apague el aparato y llévelo a su
distribuidor.
15. Daños en el quipo que precisen reparación. El equipo deberá ser
reparado o revisado por personal cualificado en caso de:
A. El cable de toma de corriente o su conector han sido dañados.
B. Objetos o líquidos se han introducido en el equipo.
C. El aparato ha sido expuesto a la lluvia.
D. El equipo no parece funcionar o lo hace de modo poco usual.
E. EL aparato ha caído al suelo o presenta deterioros en su caja
exterior.
16. Mantenimiento. No abra el equipo para labores de mantenimiento
pues en este aparato no hay piezas que necesiten manutención. En
caso de que abriendo el equipo sea éste dañado o lo sea la persona que
lo manipula la empresa no tomará ninguna responsabilidad por este
servicio de mantenimiento no autorizado. Además en este caso la
garantía perdería su vigencia.
17. Ventilación. El aparato está provisto de hendiduras de
ventilación, es importante no cubrirlas o bloquearlas. La ventilación
del aparato podría verse comprometida resultando en un
sobrecalentamiento que podría dañar el equipo. Tenga siempre en
cuenta que colocar el aparato en un lugar sin ventilación puede
producir un sobrecalentamiento de éste.
18. Nunca utilice accesorios o modificaciones no autorizados por el
fabricante. Ello puede afectar la seguridad del aparato y el fabricante
no tendrá ninguna responsabilidad en este caso.
19. Accesorios. No deposite o instale el equipo sobre superficies o
estructuras inestables. El aparato podría precipitarse y causar
lesiones a las personas en las proximidades de éste. Cualquier
montaje o instalación del equipo deberá ser realizado siguiendo las
instrucciones o recomendaciones dadas en este manual o por el
fabricante directamente.
20. Precaución durante tormentas. Durante una tormenta desconecte
el equipo de la red para evitar que los posibles picos de corriente
dañen el equipo.
21. Durante cualquier manipulación del equipo, para mantener todas
las cualidades de éste tanto en prestaciones como en seguridad para el
operante es necesario utilizar sólo recambios originales.
Consecuentemente asegúrese de que la empresa que realice el
mantenimiento esté autorizada por el fabricante o importador.
22. Comprobación de seguridad. Una vez realizada una reparación o
servicio del equipo pida al personal cualificado que realice una
comprobación para asegurarse de que el equipo le es devuelto en
perfectas condiciones de uso.
9. Voltaje. Antes de conectar el aparato a la red asegúrese de que se
trata del mismo voltaje y frecuencia para las que el equipo está
especificado. En caso contrario no conecte el equipo y póngase en
contacto con su distribuidor.
ATENCION
: PARA REDUCIR EL RIESGO DE ELECTROCUCION, NO MANIPULE
EL INTERIOR DEL EQUIPO.
PARA REALIZAR EL MANTENIMIENTO DEL EQUIPO PONGASE EN CONTACTO
CON EL PERSONAL CUALIFICADO
Esta señal indica la presencia de lugares donde habiendo
un elevado voltaje no presentan aislamiento y por tanto
constituye un claro riesgo de electrocución.
Esta señal indica la presencia de componentes del equipo
que precisan de mantenimiento. Para m s información
sobre stos lea el manual.
á
é
Para evitar riesgo de electrocución asegúrese de que en caso de no usar una
conexión AC con toma de tierra los conectores de toma de tierra del enchufe del
mezclador no queden expuestos.
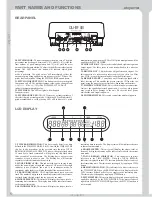
20. PITCH RANGE
21. PITCH ON/OFF BUTTON
22. PITCH LED
23. PITCH RANGE LED
24. LINE OUT R & L
25. DIGITAL OUT
26. REMOTE START
27. POWER CONNECTOR
28. POWER SWITCH
- This button changes the pitch value. The pitch
percentage can be changed between 4%, 8%, and 16%. 4% yields the
least amount of pitch manipulation and 16% will yield the most
amount of pitch manipulation. To adjust to the different values tap this
button. The LED above this button will indicate which pitch
percentage
mode is activated. The pitch values will immediately reflect the
amount of pitch being applied to a music source in the CD drive. The
pitch value is adjusted by sliding the PITCH SLIDER up and down.
- This button is used to turn the pitch
function on and off. The pitch percentage value can be changed from
(+/-4%), (+/-8%) or (+/-16%). The PITCH SELECT LED will
indicate the maximum pitch value.
- This LED will glow when the pitch
function is active.
- This LED serves as a visual reminder of
the selected pitch percentage mode. A flashing LED will indicate 4%
pitch manipulation, a solid glowing LED will indicate 16% pitch
manipulation, and when the LED is off 8% pitch manipulation will be
applied to the PITCH SLIDER.
- These jacks send a left and right analog mono
output signal. Use these jacks to send standard audio to a mixer or
receiver.
- This jack sends a digital stereo out signal. Use
this connection to create near perfect copies of your disc to a Mini
disc, CD-R, or any other recording device with a digital input.
- Connects to any DJ mixer equipped with a
fader start input. This enables the user to start the CD from the cue
point, using the mixer’s cross or line fader, depending on the mixer.
- This is the main power connection.
Only use the supplied polarized power cord. Use of any other power
may result in Sever damage to the unit. Be sure the local power
matches the unit’s required power.
- This switch controls the unit's main power.
LCD DISPLAY
1. TIME BAR INDICATOR -
2. SINGLE INDICATOR -
3. TRACK INDICATOR -
4. MINUTES METER -
5. SECONDS METER -
6. FRAME METER -
7. TOTAL REMAIN INDICATOR -
8. REMAIN INDICATOR -
9. PITCH METER -
This bar visually details the time
defined in the TIME METER (M, S, &F). As with the TIME METER
this bar is also dependent on the selected time function TOTAL
REMAIN, REMAIN or ELAPSED. This bar will begin to flash when
15 seconds of a track remain and will begin to rap idly flash when
three seconds of a track remain. The flashing bar is a great visual
reminder a track is about to end. The flashing bar will function
regardless of which time mode the unit is in.
This indicates the unit is in single play
mode, the unit will play a single and return to CUE mode. If the single
indicator is not displayed the unit is in continuous mode. In
continuous mode the drive will play through all the tracks on the disc.
This 3-digit indicator details a current
track. The number displayed in the track indicator is a direct reference
to a track being selected a track in play, pause, or cue mode.
This meter will display the elapse, total, or
remaining time in minutes. The display time will be indirect reference
to the current time mode.
This meter will display the elapse, total, or
remaining time in seconds. The display time will be indirect reference
to the current time mode.
This meter will display the elapse, total, or
frames. The displayed frames will be indirect reference to the current
time mode.
This indicator is in direct
reference to the TIME METER. When the TOTAL REMAIN
indicator is displayed in the LCD, the time defined will refer to a disc's
total remaining time. The time mode is changed by tapping on TIME
button.
This indicator is in direct reference to
the TIME METER. When the REMAIN indicator is displayed in the
LCD, the time defined will refer to a single track's remaining time.
The time mode is changed by tapping on TIME button.
This meter displays the pitch percentage being
applied to playback by the PITCH SLIDER. If the meter read zero
regardless of the PITCH SLIDER'S position, the PITCH function is
not activated.
REAR PANEL