


27
3.10.2 Setting the
Squelch Threshold
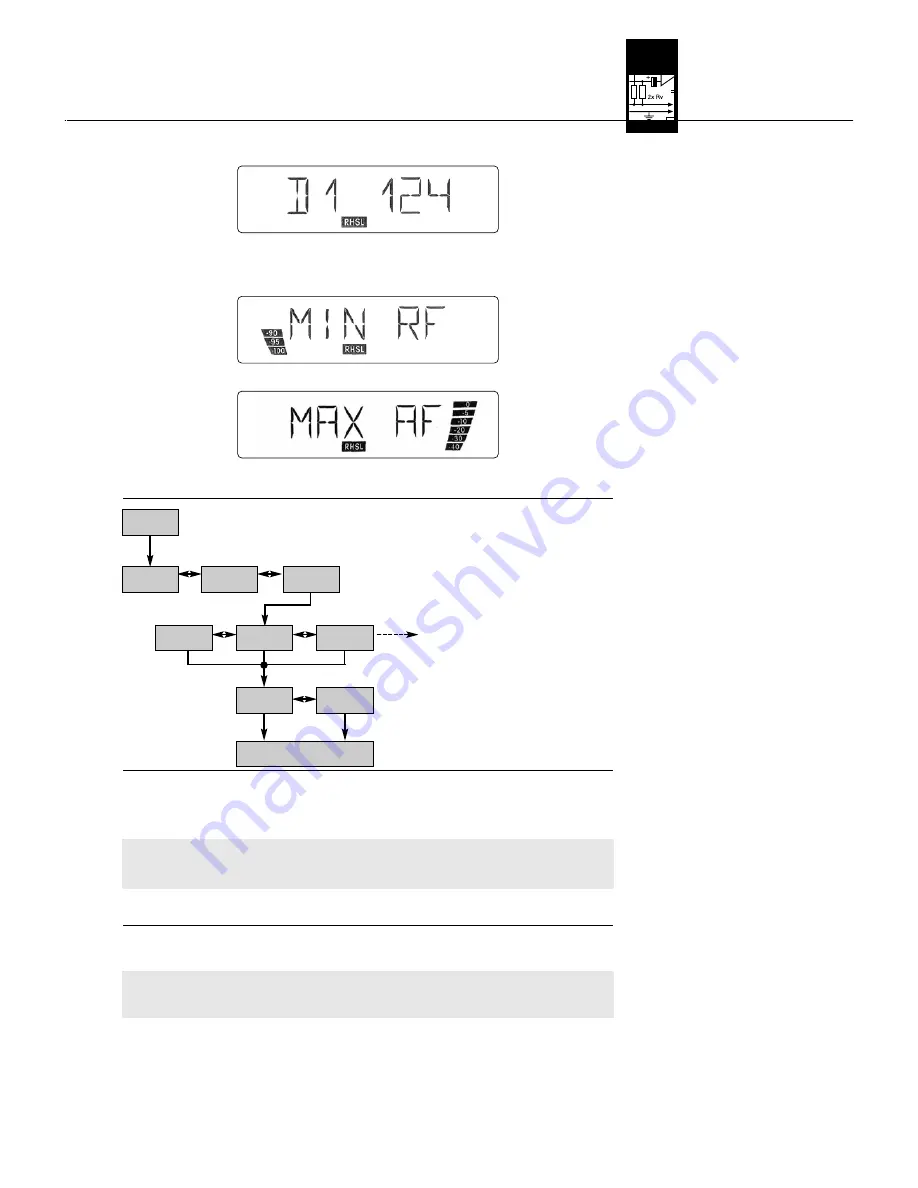
Diagram 9: Setting the
squelch threshold.
3.11 Multichannel Systems
Note:
3.11.1 Selecting Frequencies
for Multichannel Systems
(Auto Channel Setup)
•
To retrieve the other results press
or
briefly. Dropouts are indicated like this (Example 1):
Example 1: Dropout no. 1 occurred after 124 seconds.
•
The first storage locations are assigned to dropouts, the last two for the lowest RF level and highest
audio level measured (Examples 2 and 3).
Example 2: Minimum RF level: -90 dB
Example 3: Maximum audio level: 0 dB
•
The last item in the result list is followed (the first item preceded) by the "EXIT" option.
The display indicates the setting cur-
rently in memory, e.g., "-90 dB". Use
and
to select one of the following set-
tings: -80, -85, -90, -92, -94, -96, -98,
-100 dB.
Never set the squelch threshold any
higher than absolutely necessary.
The higher the squelch threshold
(-80 dB = max., -100 dB = min.), the
lower the sensitivity of the receiver
and thus the usable range between
transmitter and receiver.
1. Be sure to assign a separate carrier frequency to each wireless channel (transmitter and receiver).
2. To find intermodulation-free carrier frequencies quickly and easily, we recommend using Auto Preset
to select all required carrier frequencies from the same Frequency Group within the same Preset.
If reception on the selected carrier frequency is poor, use Auto Channel Setup (refer to section 3.9.2)
to find the next clean Subchannel within the selected Frequency Group. Should you find no clean
Subchannel, use Auto Group Setup to select a different Frequency Group within the same Preset and
select a new frequency for each WMS 450 channel (refer to sections 3.9.1 and 3.9.2).
3. Do not operate two or more wireless channels on the same frequency at the same time and location.
This would cause unwanted noise due to radio interference.
1. Select the frequency of the receiver for channel 1 using the Auto Group Setup screen (refer to section
3.8.1 above).
2.
Switch ON all radio microphones except the one for channel 1
, personal monitor transmitters, etc.
(including even those made by other manufacturers) to be used at the venue! This is the only way to
make sure the receiver will find frequencies that will be free of any mutual interference during the per-
formance.
3. Use the Auto Channel Setup screen to find the optimum frequency (CHANNEL) for the receiver (see
next page).
EXTRA
X-TRA
EXTRA
X-TRA
">-80< dB"
X-TRA
">-100< dB"
X-TRA
">-90< dB"
X-TRA
SAVE >Y<
>X-TRA<
SAVE >N<
>X-TRA<
>NAME<
X-TRA
>SQL<
X-TRA
>STATUS<
X-TRA
AKG WMS 450 V 1.10
3 Setting Up
Summary of Contents for HT 450
Page 2: ...ii AKG WMS 450 V 1 10 WMS 450 SR 450 11 a Fig 1 Fig 2 13 11 11 10 14 12 15 Fig 8 Fig 9 ...
Page 5: ...v AKG WMS 450 V 1 10 A Fig 7 B C Fig 6 A C B D D ...
Page 6: ...vi AKG WMS 450 V 1 10 Fig 13 Fig 16 Fig 15 Fig 14 Fig 10 Fig 11 1a 1b Fig 17 1a 1b 10cm 10cm ...
Page 7: ...vii AKG WMS 450 V 1 10 ...


