background image

9

0

eSATA Connection

4.

 Boot-up your system and your external drive should be ready to use.

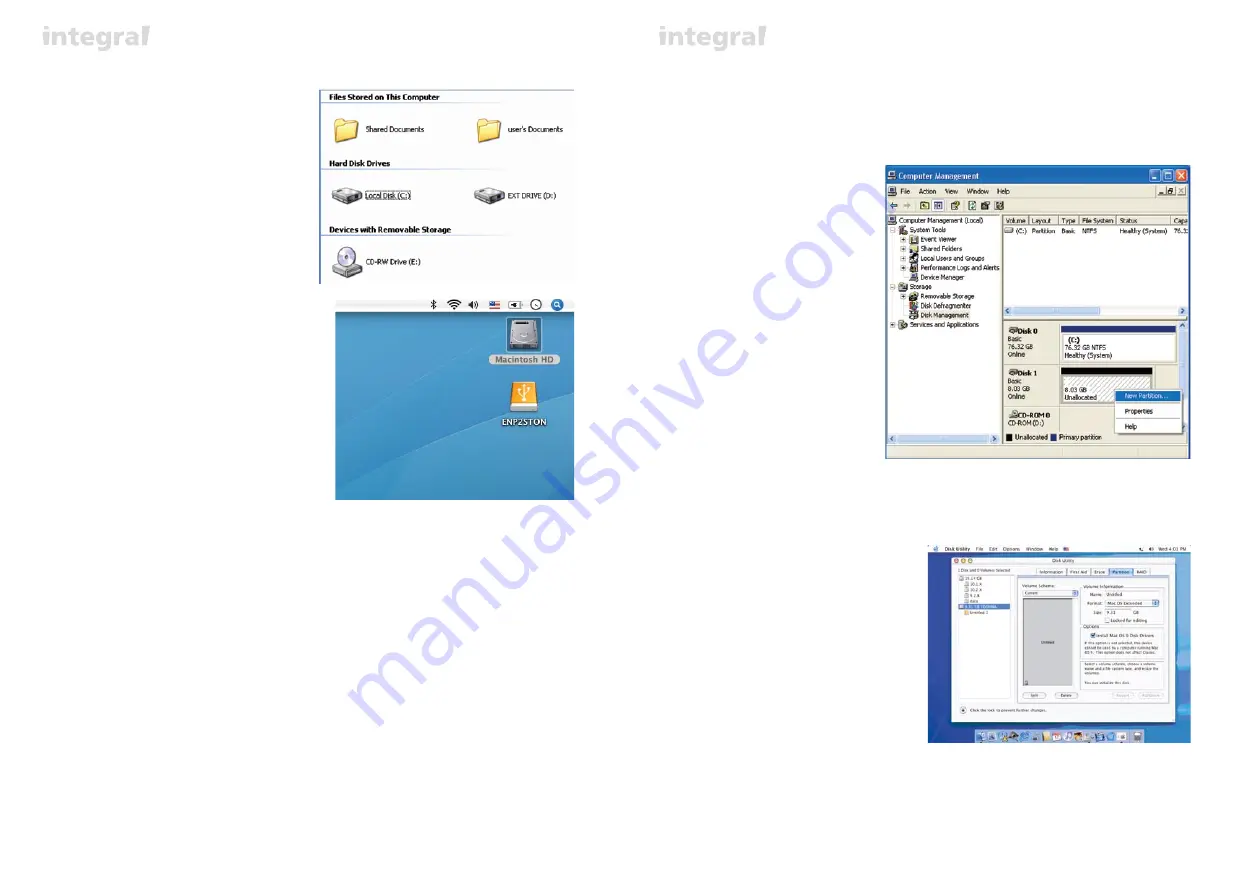
Windows- 

open “My Computer” or
"Computer" to see the icon
of the external hard drive
ready to use.

MAC -

the icon of the ready to use extenal
drive will appear on the desktop.

5.

 To access the external drive simply double-click on its icon.

Disconnecting the INTEGRAL eSATA (eSATA mode)

WARNING!

Do not switch off the enclosure or unplug the SATA or power cable when using the 
INTEGRAL eSATA .
DOING THIS MAY RESULT IN LOSS OF DATA!

1. 

Turn off the system

2. 

Switch off and unplug the enclosure

Hard Disk Formatting

HARD DISK FORMATTING

Before you partition or format your hard disk, please be aware that this will destroy all your existing data on 
the drive, so make sure you have a backupif required.This step is usually only required the first time you install 
a factory new hard drive or if you want to change the existing format of the drive.

WARNING!!


Windows 2000/XP/VISTA

Step1


To partition the drive please plug the Hard Disk

either via USB or eSATA connection then click

on 

[My Computer]

 cand choose 

[Manage]

.

[Computer Management]

 window will

appear (as on the right).


Step2

Click on 

[Disk Management]

 on the left part

of this window and all connected disk drives

will be listed in the right part. Find the Hard

Disk that you added with it's partition status

on the right. You can create a new or delete

an existing partition by right clicking on this

area.

Step3

Right-click on the hard disk partition status

area and choose 

[New Partition...]

.The

“New partition wizard”

 will appear.

Step4

Following the "wizard"instructions to partition

and format your HDD.

Step5

Wait until "wizzard" finish formating your

eSATA drive. It should now appear in

 [My

Computer]

 ready to use.

Mac OS

NOTE:

Mac OS does not recognize NTFS formatted drives.

Mac OS9.2 and earlier, does not support creating 

partitions on an external drive. To do that, you would 

need to purchase additional 3rd party software. 

Initializing is no problem on all Operating Systems.

Mac OS X, use the Disk Utility to format and create 

partitions on your external disk.

•  Select “Disk Utilities” in the utilities folder.
•  Choose your external drive and format it

    according to your requirement.

REMARKS

• Only one interface (USB or eSATA) can be connected at the same time.

• For better heat dissipation and performance, do not cover the Enclosure and leave enough room around it.

• Never expose the product to water or humid conditions.

Summary of Contents for integral P2STON

Page 1: ...USER Manual GB F D ES PT 3 5 SATA HDD external enclosure for data storage and mobility with USB2 0 and eSATA interface...

Page 2: ...cur during normal use and do not extend to damage to products that results from incompatibility abuse misuse negligence unauthorized repair modification incorrect installation incorrect voltage supply...

Page 3: ...II 350MHz 64MB RAM Windows 2000 XP Vista Active USB or SATA port MAC Requirements Minimum Apple G3 processor 64MB RAM Mac OS 9 1 9 2 10 1 5 10 2 10 3 Active USB or eSATA port BACK PANEL ARRAGEMENT Ha...

Page 4: ...NOTE Do not connect both USB and eSATA cables at the same time HDD Installation Connecting the INTEGRAL SATA USB mode 1 Connect one end of the USB cable into the USB Port of your Integral SATA and the...

Page 5: ...ess the external drive simply double click on its icon Disconnecting the Integral eSATA USB mode WARNING Close all windows and quit all running applications that are stored on the Integral External Dr...

Page 6: ...ow will appear as on the right Step2 Click on Disk Management on the left part of this window and all connected disk drives will be listed in the right part Find the Hard Disk that you added with it s...

Page 7: ...asa ne peut tre tenu responsable pour des erreurs techniques ou ditoriales ou des omissions dans le pr sent document Droits d auteur 2008 Akasa Asia Corporation Reconnaissances Microsoft Windows Windo...

Page 8: ...s Taux de transfert eSATA jusqu 3 0Gb s Plug Play Hot swappable en mode USB USB 2 0 reste compatible avec USB 1 1 Le logo Integral sur le panneau avant s allume en bleu DEL pour indiquer la mise sous...

Page 9: ...ent du manuel pour plus d instructions REMARQUE Ne connectez pas les deux c bles USB et eSATA en m me temps Installation du disque dur Installation du disque dur dur Installation du disque dur 1 Ouvre...

Page 10: ...cliquez simplement sur son ic ne D connexion du eSATA Integral mode USB ATTENTION Fermez toutes les fen tres et quittez les applications en cours qui sont stock es sur le disque externe Integral avant...

Page 11: ...e bo tier Connexion eSATA CONNEXION eSATA REMARQUE La carte m re ou la carte de l adaptateur avec interface eSATA est requise Connecting the INTEGRAL eSATA eSATA mode 1 Assurez vous que le syst me est...

Page 12: ...que le port eSATA SATA de la carte m re est activ dans le BIOS Red marrez le syst me Si vous avez d autres questions veuillez nous contacter l adresse technical akasa com tw FAQ FORMATAGE DU DISQUE D...

Page 13: ...s cobrem apenas defeitos ocorridos durante o uso normal e n o cobrem danos aos produtos resultantes de incompatibilidade uso indevido mau uso neglig ncia reparo n o autorizado instala o incorreta forn...

Page 14: ...indestens Intel Prozessor Pentium II 350MHz 64MB RAM Windows 2000 XP VISTA MAC Anforderungen MAC Requirements Mindestens Apple G3 Prozessor 64MB RAM Mac OS 9 1 9 2 10 1 5 10 2 10 3 Aktiver USB oder SA...

Page 15: ...gleichzeitig an Installation des Festplattenlaufwerks Anschluss des Integral SATA im USB Modus 1 Schlie en Sie ein Ende des USB Kabels an die USB Buchse Ihres Integral SATA Ger ts an und das andere En...

Page 16: ...enfestplatte brauchen Sie nur auf das Ikon klicken Abtrennen des Integral SATA im USB Modus ACHTUNG Vor dem Ausschalten oder Abtrennen der USB Verbindung schlie en Sie alle Fenster und laufenden Anwe...

Page 17: ...enster und alle angeschlossenen Laufwerke werden auf der rechten Fensterseite aufgelistet Finden Sie das Laufwerk dass Sie installiert haben inklusive des Partitionsstatus Sie k nnen nun eine neu Part...

Page 18: ...Frage haben nehmen Sie bitte Kontakt mit uns auf technical akasa com tw F A Avisos de la compa a AKASA La informaci n contenida en este documento est sujeta a cambios sin previo aviso Todos los derec...

Page 19: ...e eSATA de hasta 3 0 Gb s Plug Play Intercambiable en caliente en modo USB Compatible con USB 2 0 1 1 compatible Logo de Integral en el panel frontal con indicador de LED azul de encendido Interruptor...

Page 20: ...exi n que desea usted usar USB o eSATA y vaya al cap tulo correspondiente del manual para mayores instrucciones NOTA No conecte ambos cables USB y eSATA al mismo tiempo Instalaci n del disco duro Inst...

Page 21: ...idad externa simplemente haga doble clic en su icono Desconectando el eSATA Integral modo USB ADVERTENCIA Cierre todas las ventanas y salga de todas las aplicaciones que est n corriendo y que est n al...

Page 22: ...A NOTA Se requiere una tarjeta madre o una tarjeta adaptadora con interfaz SATA Conectando el eSATA Integral modo eSATA 1 Deje que Windows MAC busque e instale el controlador autom ticamente 2 Use el...

Page 23: ...l puerto eSATA SATA de la tarjeta madre est habilitado en el BIOS Reinicie el sistema Si usted tiene cualquier pregunta adicional por favor cont ctese con technical akasa com tw Preguntas frecuentes D...

Page 24: ...al do produto e n o extendida para produtos danificados por incompatibilidade abuso neglig ncia reparos modifica es instala o incorreta voltagem incorreta polui o acidentes ou desastres de causa natur...

Page 25: ...os do PC M nimo Processador Intel Pentium II 350MHz 64MB RAM Windows 2000 XP VISTA Portas ativas USB ou eSATA Requerimentos do MAC Min mo Processador Apple G3 64MB RAM Mac OS 9 1 9 2 10 1 5 10 2 10 3...

Page 26: ...ambos os cabos USB e eSATA ao mesmo tempo Instala o do HD Conectando o Integral SATA modo USB 1 Conecte uma das pontas do cabo USB na porta USB do Integral SATA e a outra ponta em alguma porta USB ati...

Page 27: ...sta um double click sobre o cone Desconectando o Integral eSATA modo USB ATEN O Antes de desligar o enclosure ou desconectar os cabos de for a USB Feche todas as janelas e saia dos aplicativos em exec...

Page 28: ...erenciamento de disco na esquerda desta janela e todos os drives conectados ser o listados na parte direita Encontre o HD que voc adicionou com o status da parti o no lado direito Voc pode criar uma n...

Page 29: ...n o possui porta eSATA eu ainda posso usar o enclosure Voc pode usar o enclosure no modo USB ou equipar seu PC com um adaptador SATA para eSATA cabo SATA para exata e no Notebook utilizar um cart o de...

Reviews: