Akai VS-K207M-E3 Operator'S Manual Download Page 13

11

Automatic TV station presetting / Mapping TV stations

Automatic station presetting

All stations will be preset in sequence available in your area.

1

Press MENU.

Press 

 or

 repeatedly

until the dot before
CHANNEL SETUP
blinks. Then press
ENTER.

TIMER REC SET
VCR EXTENSION

CHANNEL SETUP
SYSTEM SETUP

SELECT :
ENTER  : ENTER

MENU

EXIT      :

SHARPNESS

2

CH TUNING
AUTO TUNING

CHANNEL SETUP

SELECT  :
ENTER    : ENTER

MENU

EXIT       :

CHANNEL MAPPING

3

Press ENTER.
The VCR will begin searching and setting with
early stored channel the number is increased by
one into memory all the broadcasting channels
available in your area (VHF-L, VHF-H, UHF).
While setting channels, AUTO TUNING appears.
When the setting finished, the CHANNEL
MAPPING menu will appear.

Press 

 or

      repeatedly

until the dot before
AUTO TUNING blink.

To skip a channel position

Unwanted channels can be skipped so that they
cannot be called up by pressing CH. Select the
channel to be skipped, ...e.g. channel 29. Select
channel 29, then press  CANCEL.
This channel’s number will be flashing. That way you
can cancel further channels one after the other.

To cancel skipping select the skipped channel using
10 number buttons, then press CANCEL. The chan-
nel No. does not blink any longer, and the channel
No. now may be selected again using CH.

AUTO TUNING

CHANNEL MAPPING

1
2 6

9

12 


5

7
8

10
11

SELECT               :
SKIP                     : CANCEL
CHANGE NAME : 1
MOVE                 : 2
EXIT                    : MENU

4

Press  MENU repeatedly until the TV picture
appears on the screen.

Preparation
Turn on the TV, and select the AV-program position on TV.

Automatic TV station presetting

This VCR has one built-in tuner to receive the
broadcast. Before you record one TV-broadcast,
you must set and preset the whole of the broadcasts.
This VCR can preset up to 80 broadcast.

Note:

TV reception interference or power failure may result in

Automatic station presetting malfunctions. In such a
case repeat the setting procedure from the beginning.
However, you can not receive the necessary broadcast
yet, try to preset the broadcast manually.(See page 13)

When the unit is in the auxiliary input mode, you can not

preset channels.

For a number of TV stations (such as MTV) no name
code will be displayed because these TV stations do
not provide the necessary information. You can
enter the respective names yourself. Moreover,
unwanted station codes can be changed by the user.

Turn on the TV, and select the AV-program position on TV.

Preparation

Exempel: MTV is assigned to station No. 10, but the
code  “MTV” will not be displayed and will also not
appear in the table.

1

Select the "CHANNEL MAPPING" in Menu-
screen in the same way as the step 1 ~ 2 on left
side. Then press ENTER.
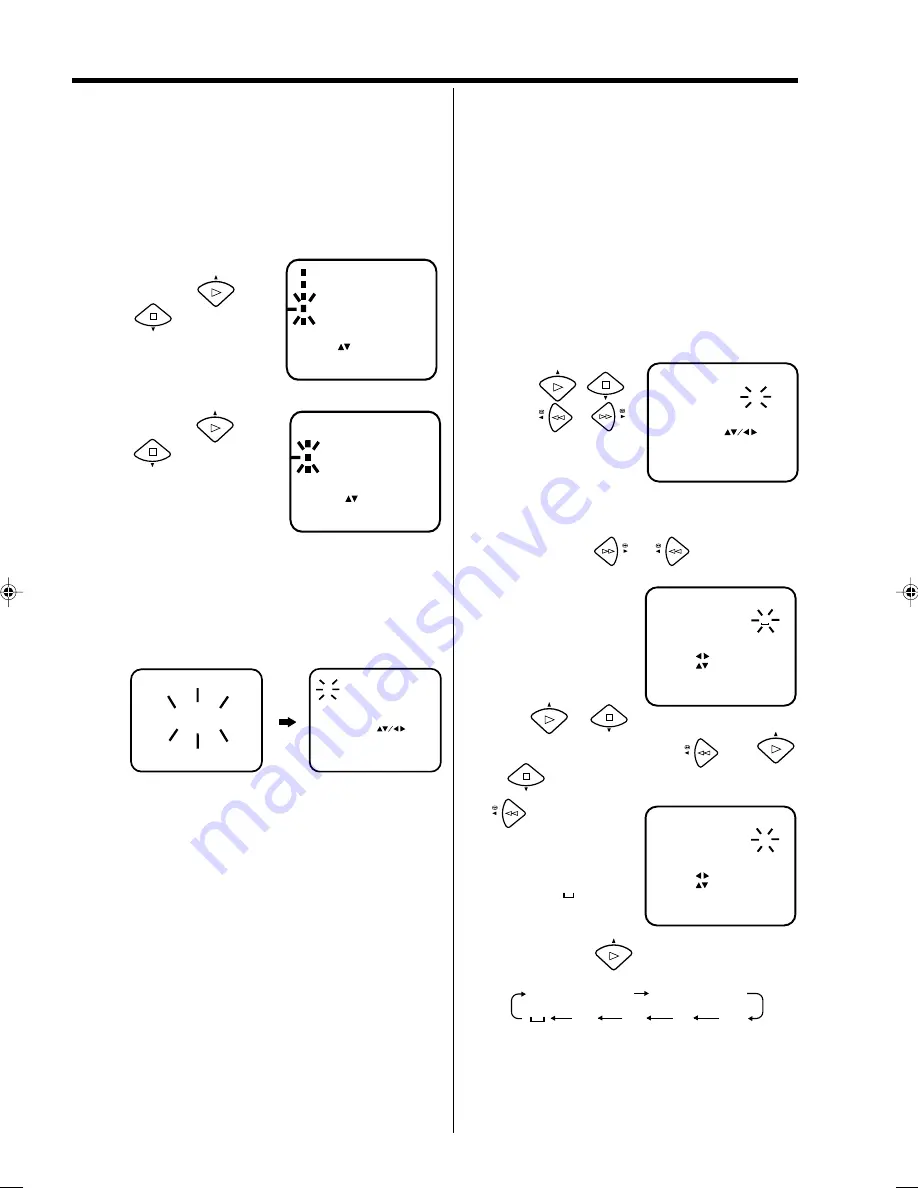
2

Press 

/

or 

/

repeatedly until the
station number
position now to be
named will blink.

1
2 6

9

12 


5

7
8

10
11

CHANNEL MAPPING

SELECT               :
SKIP                     : CANCEL

CHANGE NAME : 1

MOVE                 : 2
EXIT                    : MENU

• If you want to turn over the page when the

blinking spot is in the left or right edge of on-

screen, press 

 or 

 repeatedly until

the next page's 12 stations appears.

3

Press "1" of 10
number buttons
. The
first display line will
change to "CHANGE
B R O A D C A S T
NAME".

4

Press 

 or 

 repeatedly until the desired

character appears. Then press 

. Use 

or 

 to select the next character. Then press

1
2 6

9

12 


5

7
8

10
11

M

CHANGE BROADCAST NAME

SELECT :
NAME     :

OK          : ENTER

CLEAR   : CANCEL
EXIT       : MENU

. Up to four

characters can be
used to create a
station name. The
character “     ” stands
for a space.
Then press ENTER.

Each press of 

 will change the screen

display as follows.

A, B, C, ... X, Y, Z      0, 1, 2, ... 7, 8, 9

Press  MENU repeatedly until the TV picture
appears on the screen.

5

1
2 6

9

12 


5

7
8

10
11

CHANGE BROADCAST NAME

SELECT :
NAME     :

OK          : ENTER

CLEAR   : CANCEL
EXIT       : MENU

Note:
When a wrong character is entered, press CANCEL
and enter the correct character.

                 –            +            /             •

Changing TV station names

Mapping TV stations

 4F37001A (E)P10-15

5/6/2002, 16:40

11

Summary of Contents for VS-K207M-E3

Page 1: ...Video Recorder VS K207M E3 S...

Page 2: ...ndex Search System NTSC Video Cassette Tape Playback on PAL TV Auto Power ON and Auto Playback when inserting a Cassette Tape Auto Rewind Auto Eject and Auto Power OFF Real Time Tape Counter with ZERO...

Page 3: ...etting 11 Mapping TV stations 11 Manual TV station presetting 13 Preparation Recording a TV Program 18 One Touch Timer Recording OTR 19 Timer Recording 20 Recording Duplicating a Video Tape 22 Error S...

Page 4: ...me moisture and dust Avoid to place the unit on any surfaces that may by subjected to vibrations or shocks Moisture will condense on the unit in the following cases If the unit is suddenly moved from...

Page 5: ...or any other objects into the cassette loading slot Also when cleaning the unit never spray cleaner or furniture wax directly on the unit housing To protect the unit during a thunder storm unplug the...

Page 6: ...Recording Instant recording Infrared sensor Display Playback Tape rewind Tape fast forward Power On Off Cassette loading slot 0 30 11 30 01 54 AU CH 29 CUE FF OFF Page Remaining Time of OTR Current Ti...

Page 7: ...se for recording On Off Playback Menu setting 14 Menu setting 14 15 Reverse picture search Tape rewind Menu setting Forward picture search Fast forward 14 15 14 15 Tape Stop Menu setting Memorize ENTE...

Page 8: ...obstacle is placed between the unit and the handset The remote control handset will not work properly in the following cases 3 2 1 Move cover in direction of arrow and take it off Install the batteri...

Page 9: ...f you don t have a SCART cable at hand just now perform now the output channel adjustment AV channel see pg 9 This VCR will work without connecting a SCART cable Please note that not using a SCART cab...

Page 10: ...m The playback sound is in Mono Connections and Installation Video Cassette Recorder VCR From house antenna To AUDIO Input left To AUDIO Input right SCART cable not supplied Connection to a Satellite...

Page 11: ...The number next to RF is the channel in UHF band to VCR 2 Select an unused channel on the TV and tune the TV in the same way as tuning in a TV broadcast station until the TEST appears clearly on the T...

Page 12: ...press ENTER 5 Press MENU repeatedly until the TV picture appears on the screen On screen Language Selection Setting the Time and Date Press the button to turn on the VCR 1 Press MENU If you use the un...

Page 13: ...ult in Automatic station presetting malfunctions In such a case repeat the setting procedure from the beginning However you can not receive the necessary broadcast yet try to preset the broadcast manu...

Page 14: ...on to be reassigned blinks Press 2 of 10 number buttons Then the TV station will be moved to the first display line And position 6 becomes blank CHANNEL MAPPING 1 2 6 9 12 3 4 KA1 TV5 MTV NELO VIIH NR...

Page 15: ...ress MENU Press or repeatedly until the dot before CHANNEL SETUP blinks Then press ENTER TIMER REC SET VCR EXTENSION CHANNEL SETUP SYSTEM SETUP SELECT ENTER ENTER MENU EXIT SHARPNESS The Auto CH Memor...

Page 16: ...n on TV Preparation If the cassette has not loaded yet will blink for 4 seconds VCR VCR VCR VCR ATR Use only video cassette tapes marked Loading Push the center of the tape until it is automatically i...

Page 17: ...ing continues In case of noise distorted recordingsfromothersourcesthesystemwillperform several attempts to improve the playback picture quality Use TR to reduce the picture noise on these cassette ta...

Page 18: ...link on the screen SR R SR PLAY 5 When the starting point was found the Scene repeat playback will start automatically SR R will appear on the screen and the tape will be rewinded automatically to go...

Page 19: ...se prevention tab intact Preparation CH 6 12 00 SUN 00 00 00 SP M6 CH 6 12 00 SUN 01 23 45 SP M6 VCR VCR 1 Press INDEX during the playback or tape stop mode The Video Index Search System enables you t...

Page 20: ...cassettetapewiththeeraseprevention 2 Select the program you want to record with CH or 10 number buttons 3 If a recording in Long Play mode is intended press SPEED SP LP to display LP To check the tape...

Page 21: ...ing time is extended to the nearest 30 minute interval One Touch Timer Recording OTR 1 Load a blank cassette tape with the erase preventiontabintact TheVCRwillautomatically turn on 2 Select the progra...

Page 22: ...timer program number 1 1 Press MENU Press or repeatedly until the dot before TIMER REC SET blinks Then press ENTER 2 3 4 Set the Starting time 13 00 ending time 14 30 channel 1 RTP1 and Tape speed LP...

Page 23: ...een activated now press TIMER REC to deactivate the Timer The clock symbol will disappear 2 Press PROGRAM All the 8 Timer memories will appear 3 To cancel Timer program Press or to select the written...

Page 24: ...on and then PAUSE STILL button of Playback unit 3 Press REC OTR and then PAUSE STILL of Recording unit Playback unit Playback on camera To AV socket not supply Recording unit For duplicating a previou...

Page 25: ...symbol is lit PROGRAM function is not accessible Set the clock Press TIMER REC to turn OFF the timer The clock symbol must be unlit Timer recording does not work The timer is turned off The clock symb...

Page 26: ...ing poor quality or damaged tapes If the heads require cleaning use a high quality head cleaning cassette or have them cleaned professionally Attention Video heads may eventually wear out and should b...

Page 27: ...k with PAL 60 Hz 2 12 X Y Z S1 S41 21 69 VHS SP LP Approx 1 minutes 12 seconds E 180 Cassette at 25 C Video 2 rotary heads Audio Control 1 stationary head Erase 1 full track erase 1 audio erase head S...

Page 28: ...4F37001A 02 06 X...

Reviews: